
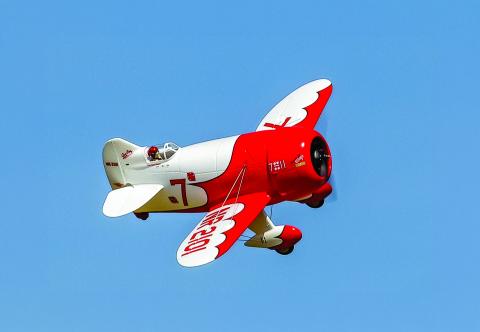
E-flite Gee Bee R-2 1.0m BNF Basic with AS3X+ and SAFE Select
Discover why this model is a winner!
The flight photo of the Gee Bee was taken by Richard Doney. placeholder credit
Full disclosure: Gee Bees are my favorite airplanes, so my first impression was, “This is a beautiful thing!” Seriously, the E-flite Gee Bee R-2 1.0m BNF Basic with AS3X+ and SAFE Select is exceptional in its scale detail and size. I found myself just admiring the pieces as I unwrapped them from the foam shipping box. Everything was perfect, and parts bags were sorted and sealed.
Assembly
It will take about an hour once you get started for the Gee Bee to be ready. The tail pieces slide into their prospective slots, and the control horns attach to the linkages that are already in place. No glue is required for assembly; everything is held in place with screws. It was nice to find that all but a couple of the screws were hex head.
Spend a little extra time looking at the instructions for the flying wires and sort them by their labels. This step takes longer than anything else, and it’s important to get them in the right positions. It’s a rather ingenious design that is quick to do once you figure it out the first time.
Double-check the connections inside the wheel pants when you’re done to make sure that none of them have come loose. A couple of them needed the turnbuckles snugged up; I waited until they were all in place to do that, which allowed one of them to come off of the retention post inside the wheel pant. When you snug them up, make sure not to get them too tight or twist the wing. They should be just tight enough so that they don’t rattle.
The wing employs a single connector at the front, so align that carefully as you place the wing into the fuselage saddle. It’s then secured with four screws.
There is a cavernous battery compartment on top of the fuselage with a hatch held on by magnets. Two plastic tabs are on the side to help you pull it up and off. Those magnets are incredibly strong! I double-checked to ensure that I was doing it correctly because the first attempt didn’t get it loose. They are just strong, so there will be no chance that the hatch will come off in flight. Velcro and a strap secure the 4S battery, and there is a lot of room to adjust the center of gravity (CG).
Programming, Control Throws, and the CG
The manual lists the settings for various radios, so it’s quick and easy to get your transmitter set up properly. It’s even easier to use the Smart Transmitter File (STF) to program your radio. In fact, this process is so easy that you’ll double-check to see whether you missed something. After adding a new model, you simply begin the bind process and will be offered the opportunity to download the STF from the receiver. I accepted this option and it was flawless.
A word of caution here. If you decide to do this before assembling the Gee Bee by plugging a receiver battery into the receiver for binding, you will not be able to choose SAFE Select because there is a bind plug in a port located in the battery compartment. You won’t know that until you open it and see that it will always be in bind mode. The implementation of the bind plug port in the battery compartment makes sense because once the flying wires are in place, accessing the receiver is somewhat complicated.
It’s best to do the binding using the bind plug with the airplane assembled so that you have the options of using SAFE Select or it not being active. I chose SAFE Select and have a switch defined to turn it off and only have AS3X+ active. There is no provision to turn everything off.
I found the programming from the STF to be perfect for the initial test flights. I did reassign the rudder rate switch, though; I prefer a different one than what is defined. Other than that, everything is exactly as what was programmed by the STF. I ensured that all of the controls were centered mechanically and rebound it one last time. The factory-set control throws were perfect when they were compared to the chart in the instructions.
The CG worked out to be right in the middle of the recommended range of 45 mm (+/-3 mm) without requiring any weight or adjustments. My 4,000 mAh battery pack is about an inch back from the front. When I use the 4S 3,200 mAh pack, it’s all the way forward.


Model type: Scale, EPO foam
Skill level: Intermediate to expert
Wingspan: 39.37 inches
Wing area: 295 sq. in.
Length: 27.64 inches
Weight: 63.14 ounces with 4S 4,000 mAh LiPo battery
Motor: 3549-1,000 Kv brushless 14-pole
ESC: Avian 70-amp Smart Lite
Construction: EPO foam
Requires: Six-channel transmitter; 4S LiPo battery
Price: $329.99
Motor used: 3549-1,000 Kv brushless 14-pole (included)
ESC used: Avian 70-amp Smart Lite (included)
Battery: 4S 4,000 mAh LiPo (required)
Propeller: Two-blade 10 x 7E (included)
Radio system: Spektrum iX14 transmitter
Ready-to-fly weight: 65.2 ounces with 4S 4,000 mAh Spektrum battery
Wing loading: 32 ounces per sq. ft.
Flight duration: 5 minutes
• Scale details
• Programming via STF
• Easy assembly
• Flight performance
• Very secure battery hatch magnets
• None


AS3X+ and SAFE Select
The system is preprogrammed to provide SAFE Select and AS3X+. If you don’t want any SAFE settings, there is a procedure to deactivate it through the SAFE Select instructions. Because the receiver is “locked,” you can’t go into forward programming and make any changes there. I found the SAFE settings to work well, and the AS3X+ settings were also to my liking. As noted previously, there is no way to turn both SAFE and AS3X+ completely off. I’m not sure why I’d want to since it works so well.
Flying
Even though I’ve had several different sizes of Gee Bees throughout the years, I was still a tad nervous for the test flight. The outdoor temperature was 74°, and the wind was 8 mph gusting to 17 mph directly across the runway. The takeoff roll and liftoff were uneventful because the rudder control was excellent. I had SAFE off for the initial flights. My field is grass, and although the Gee Bee’s wheels are relatively small, it handled it nicely. The airplane took off and felt very solid during the climb.
I admit that I cringed when I wrote, “It flew right off the board without any trim required,” but that would describe what happened. It just felt very locked in and solid despite the gusts of wind that were trying to knock it around. I flew my 3D Edge 540 airplane prior to this, and it got thrown around pretty good, so I was on my toes. The AS3X+ is just so nice in these conditions, and the factory settings had clearly been well tested.
In low rates, there is plenty of control authority for any aerobatics that you might consider. In high rates, it becomes very sporty. I switched between the two several times during the subsequent flights and didn’t make any changes to them other than adding a bit more exponential.
Rolls are nicely axial, and loops are big and round. Just like Delmar Benjamin’s full-scale R-2, this Gee Bee will happily knife-edge the length of the field with little correction required except to counter the crosswind. It looks so good up on its side that you’ll be tempted to keep it there.
The airplane didn’t display any bad habits, but it’s not one you want to get complacent with either. Stalls are rather abrupt but are easily recovered from with enough altitude. Spins are quick, but, once again, they are recoverable with minimal effort. You want to stay ahead of a Gee Bee, so if you find yourself getting a bit antsy, take a moment to slowly circle the field and get your wits about you. When in doubt, toss the model into SAFE Select and take a breather.
The SAFE settings worked well and, as with most airplanes that are in SAFE mode, make sure to remember your rudder. The Gee Bee likes to be flown in coordinated flight using rudder and aileron, which will keep you out of trouble in those “downwind turns.”
Landing was easy enough, and there was no tipping over onto the nose. I followed the manual’s advice and “drove it to the ground” with power the first few times. I have since landed it by gliding it in without power, but it’s more difficult, so I try to land with enough battery left for a go-around if it’s needed.


Conclusion
What’s not to love? I really like the size of this airplane, and it handles gusty conditions well. In calm air, it’s even better. It’s not an airplane for beginners, but a competent intermediate pilot will have no trouble enjoying its entire flight envelope. It presents itself beautifully in the air and draws a lot of attention.
This little Gee Bee is clearly a winner, just like the real one!

SOURCES
- E-flite
- horizonhobby.com/e-flite
- Spektrum
- spektrumrc.com


