Happy First 100, Guillow’s!
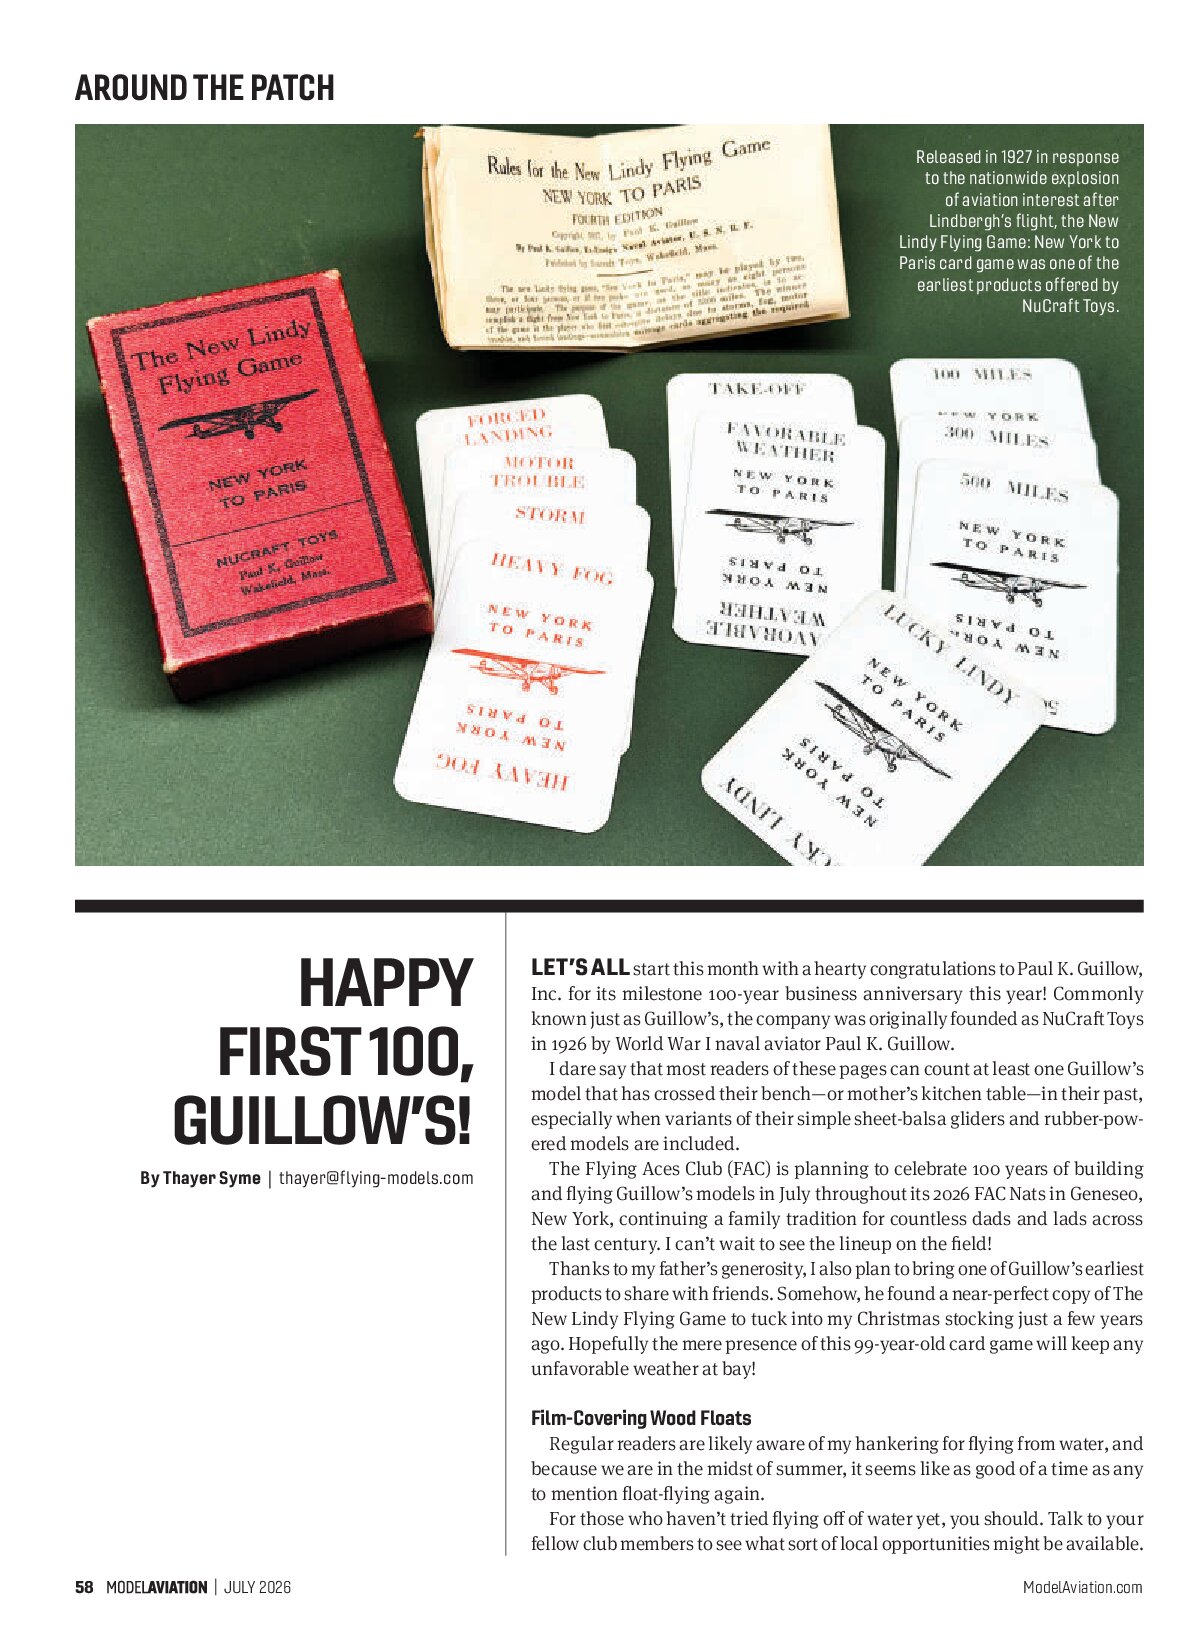
Released in 1927 in response to the nationwide explosion of aviation interest after Lindbergh’s flight, the New Lindy Flying Game: New York to Paris card game was one of the earliest products offered by NuCraft Toys.
Let’s all start this month with a hearty congratulations to Paul K. Guillow, Inc. for its milestone 100-year business anniversary this year! Commonly known just as Guillow’s, the company was originally founded as NuCraft Toys in 1926 by World War I naval aviator Paul K. Guillow.
I dare say that most readers of these pages can count at least one Guillow’s model that has crossed their bench—or mother’s kitchen table—in their past, especially when variants of their simple sheet-balsa gliders and rubber-powered models are included.
The Flying Aces Club (FAC) is planning to celebrate 100 years of building and flying Guillow’s models in July throughout its 2026 FAC Nats in Geneseo, New York, continuing a family tradition for countless dads and lads across the last century. I can’t wait to see the lineup on the field!
Thanks to my father’s generosity, I also plan to bring one of Guillow’s earliest products to share with friends. Somehow, he found a near-perfect copy of The New Lindy Flying Game to tuck into my Christmas stocking just a few years ago. Hopefully the mere presence of this 99-year-old card game will keep any unfavorable weather at bay!
Film-Covering Wood Floats
Regular readers are likely aware of my hankering for flying from water, and because we are in the midst of summer, it seems like as good of a time as any to mention float-flying again.
For those who haven’t tried flying off of water yet, you should. Talk to your fellow club members to see what sort of local opportunities might be available. You can also search the AMA website in the Club/Flying Site Finder for the contact information of other nearby clubs. The link to this webpage is in “Sources.”
You should also check with local officials to make sure that such fun is allowed on your town’s ponds and lakes. I know not everyone readily has access to the water, but you might be surprised by the response once you start talking to people. Remember, the answer is always “no” until you ask.
I covered a lot of float-flying basics in a dedicated article titled, “Flying From Water,” which appeared in the August 2022 issue of Model Aviation. It is readily accessible on the Model Aviation website or in Model Aviation Digital if you want to learn more.
This month, I want to address an often-overlooked concern when covering a new pair of balsa floats or a flying boat fuselage. This can be a make-or-break detail and cut short an otherwise great flying day.
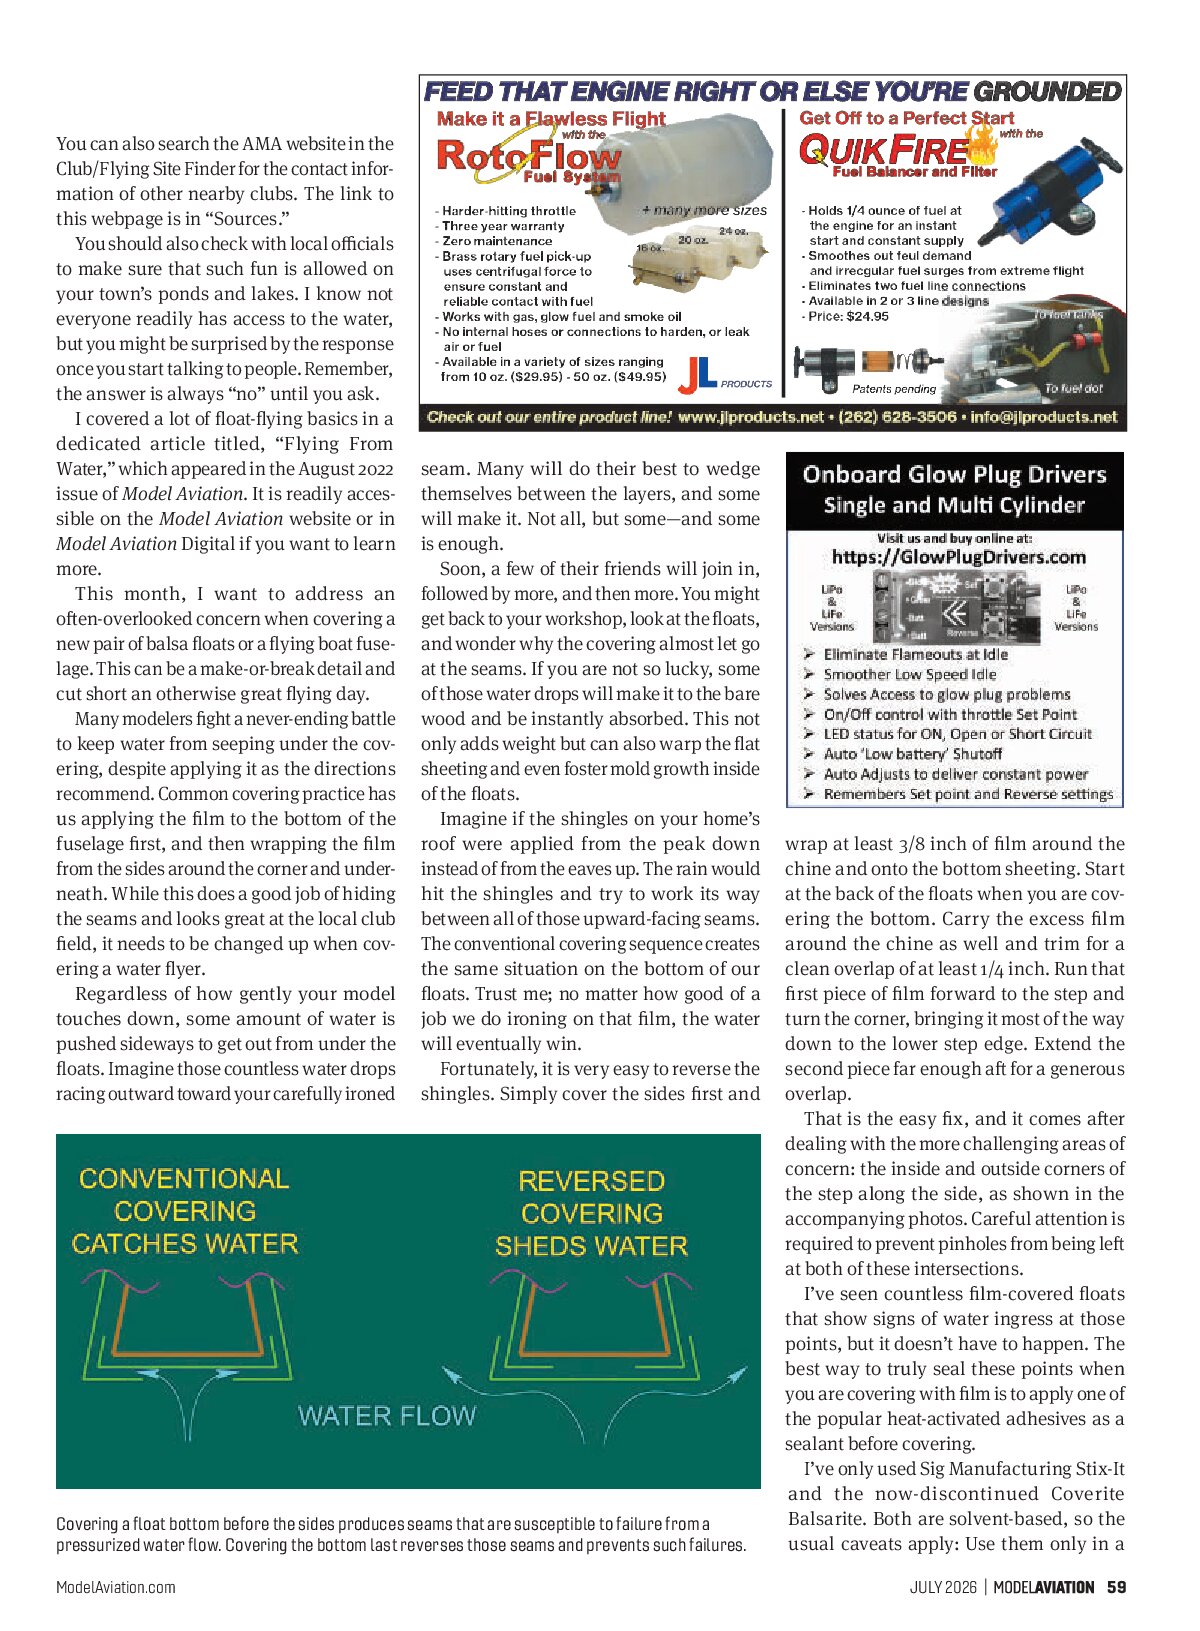
Many modelers fight a never-ending battle to keep water from seeping under the covering, despite applying it as the directions recommend. Common covering practice has us applying the film to the bottom of the fuselage first, and then wrapping the film from the sides around the corner and underneath. While this does a good job of hiding the seams and looks great at the local club field, it needs to be changed up when covering a water flyer.
Regardless of how gently your model touches down, some amount of water is pushed sideways to get out from under the floats. Imagine those countless water drops racing outward toward your carefully ironed seam. Many will do their best to wedge themselves between the layers, and some will make it. Not all, but some—and some is enough.
Soon, a few of their friends will join in, followed by more, and then more. You might get back to your workshop, look at the floats, and wonder why the covering almost let go at the seams. If you are not so lucky, some of those water drops will make it to the bare wood and be instantly absorbed. This not only adds weight but can also warp the flat sheeting and even foster mold growth inside of the floats.
Imagine if the shingles on your home’s roof were applied from the peak down instead of from the eaves up. The rain would hit the shingles and try to work its way between all of those upward-facing seams. The conventional covering sequence creates the same situation on the bottom of our floats. Trust me; no matter how good of a job we do ironing on that film, the water will eventually win.
Fortunately, it is very easy to reverse the shingles. Simply cover the sides first and wrap at least 3/8 inch of film around the chine and onto the bottom sheeting. Start at the back of the floats when you are covering the bottom. Carry the excess film around the chine as well and trim for a clean overlap of at least 1/4 inch. Run that first piece of film forward to the step and turn the corner, bringing it most of the way down to the lower step edge. Extend the second piece far enough aft for a generous overlap.
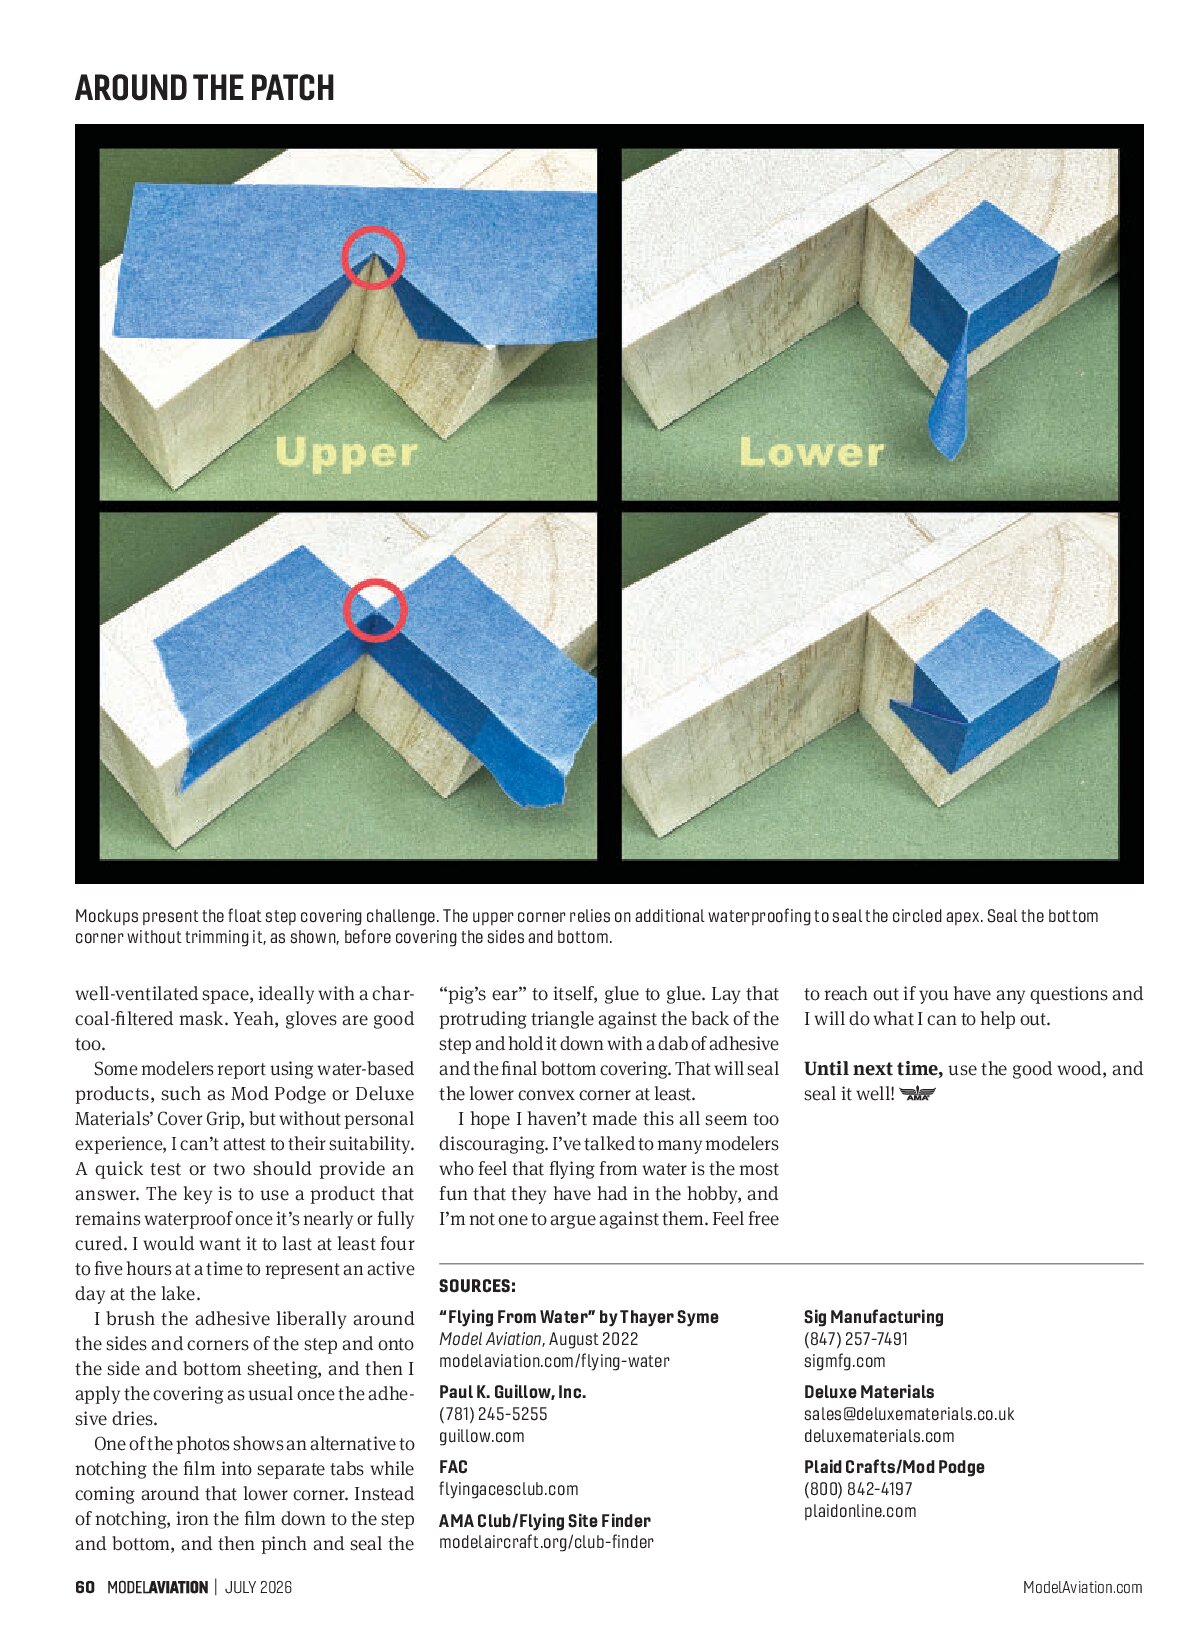
That is the easy fix, and it comes after dealing with the more challenging areas of concern: the inside and outside corners of the step along the side, as shown in the accompanying photos. Careful attention is required to prevent pinholes from being left at both of these intersections.
I’ve seen countless film-covered floats that show signs of water ingress at those points, but it doesn’t have to happen. The best way to truly seal these points when you are covering with film is to apply one of the popular heat-activated adhesives as a sealant before covering.
I’ve only used Sig Manufacturing Stix-It and the now-discontinued Coverite Balsarite. Both are solvent-based, so the usual caveats apply: Use them only in a well-ventilated space, ideally with a charcoal-filtered mask. Yeah, gloves are good too.
Some modelers report using water-based products, such as Mod Podge or Deluxe Materials’ Cover Grip, but without personal experience, I can’t attest to their suitability. A quick test or two should provide an answer. The key is to use a product that remains waterproof once it’s nearly or fully cured. I would want it to last at least four to five hours at a time to represent an active day at the lake.
I brush the adhesive liberally around the sides and corners of the step and onto the side and bottom sheeting, and then I apply the covering as usual once the adhesive dries.
One of the photos shows an alternative to notching the film into separate tabs while coming around that lower corner. Instead of notching, iron the film down to the step and bottom, and then pinch and seal the “pig’s ear” to itself, glue to glue. Lay that protruding triangle against the back of the step and hold it down with a dab of adhesive and the final bottom covering. That will seal the lower convex corner at least.
I hope I haven’t made this all seem too discouraging. I’ve talked to many modelers who feel that flying from water is the most fun that they have had in the hobby, and I’m not one to argue against them. Feel free to reach out if you have any questions and I will do what I can to help out.

Until next time, use the good wood, and seal it well!

SOURCES
- “Flying From Water” by Thayer Syme
Model Aviation, August 2022 - modelaviation.com/flying-water
- Paul K. Guillow, Inc.
(781) 245-5255 - guillow.com
- FAC
- flyingacesclub.com
- AMA Club/Flying Site Finder
- modelaircraft.org/club-finder
- Sig Manufacturing
(847) 257-7491 - sigmfg.com
- Deluxe Materials
sales@deluxematerials.co.uk - deluxematerials.com
- Plaid Crafts/Mod Podge
(800) 842-4197 - plaidonline.com