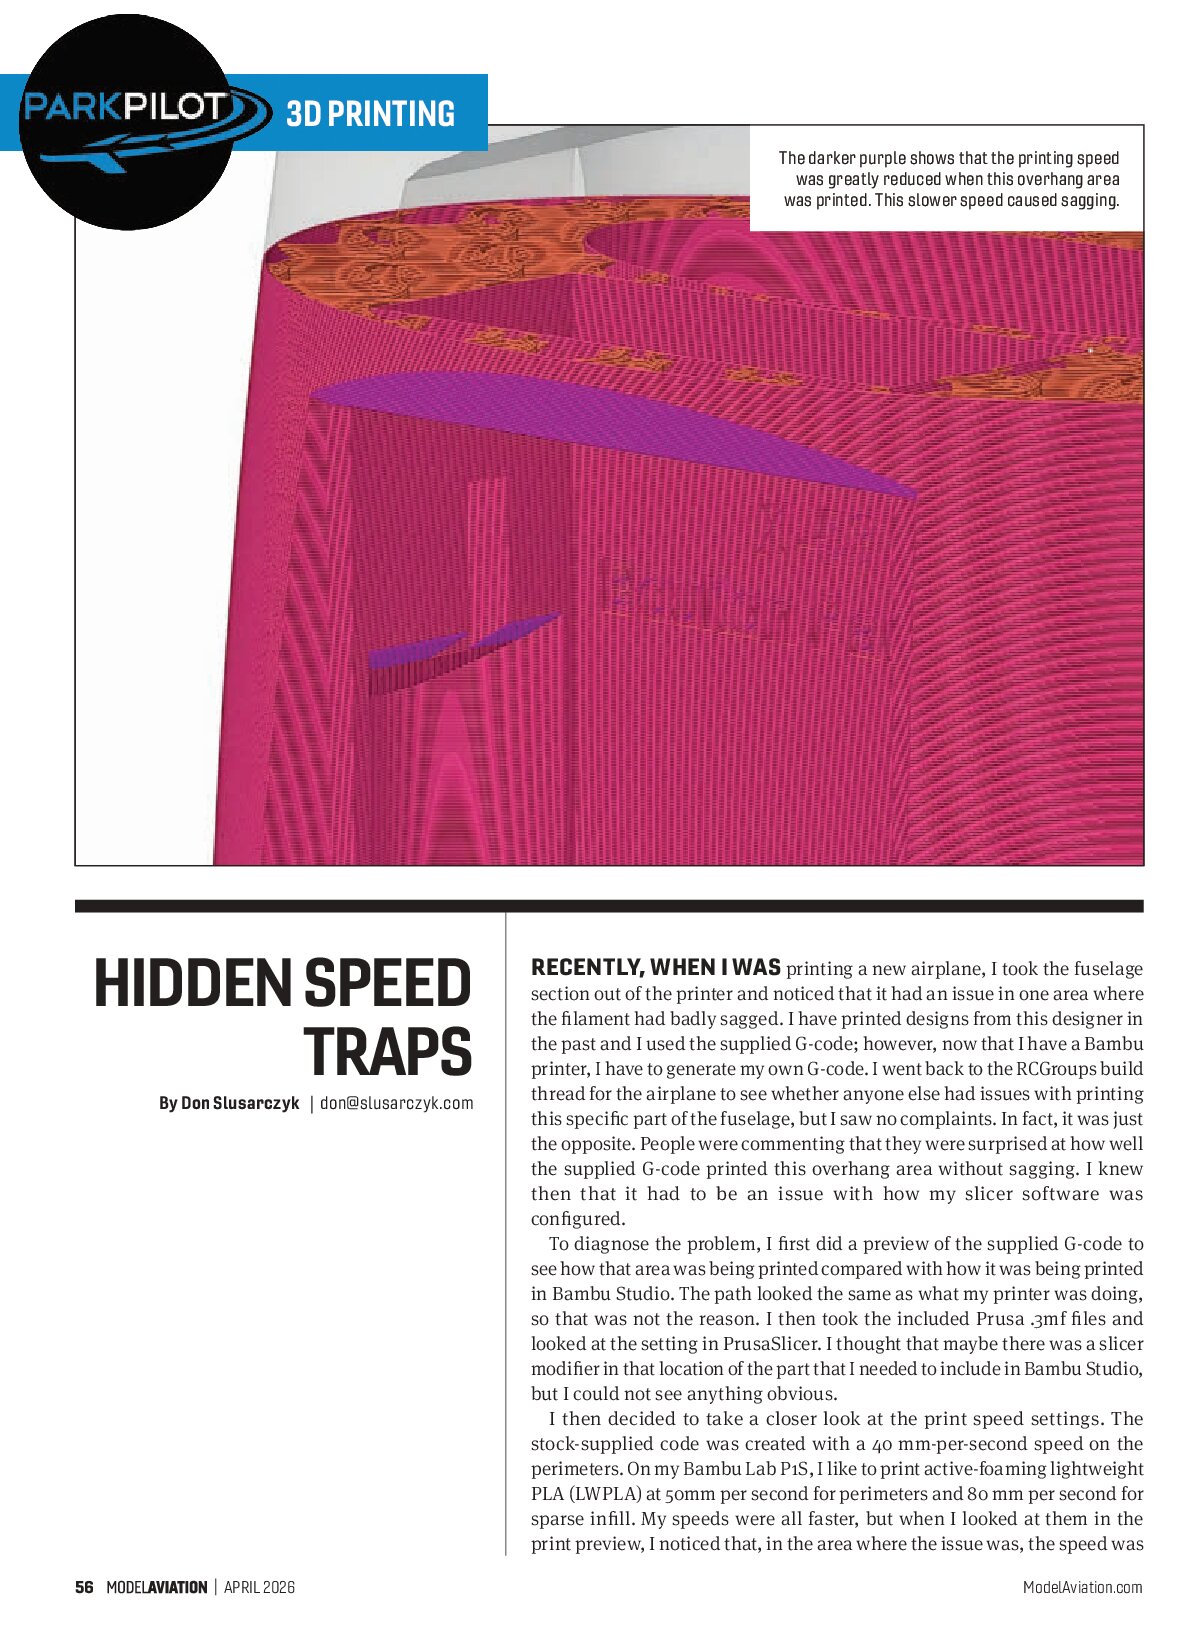
The darker purple shows that the printing speed was greatly reduced when this overhang area was printed. This slower speed caused sagging.
Hidden Speed Traps
By Don Slusarczyk | don@slusarczyk.com
Recently, when I was printing a new airplane, I took the fuselage section out of the printer and noticed that it had an issue in one area where the filament had badly sagged. I have printed designs from this designer in the past and I used the supplied G-code; however, now that I have a Bambu printer, I have to generate my own G-code. I went back to the RCGroups build thread for the airplane to see whether anyone else had issues with printing this specific part of the fuselage, but I saw no complaints. In fact, it was just the opposite. People were commenting that they were surprised at how well the supplied G-code printed this overhang area without sagging. I knew then that it had to be an issue with how my slicer software was configured.


To diagnose the problem, I first did a preview of the supplied G-code to see how that area was being printed compared with how it was being printed in Bambu Studio. The path looked the same as what my printer was doing, so that was not the reason. I then took the included Prusa .3mf files and looked at the setting in PrusaSlicer. I thought that maybe there was a slicer modifier in that location of the part that I needed to include in Bambu Studio, but I could not see anything obvious.
I then decided to take a closer look at the print speed settings. The stock-supplied code was created with a 40 mm-per-second speed on the perimeters. On my Bambu Lab P1S, I like to print active-foaming lightweight PLA (LWPLA) at 50mm per second for perimeters and 80 mm per second for sparse infill. My speeds were all faster, but when I looked at them in the print preview, I noticed that, in the area where the issue was, the speed was 9 mm per second, not 50 mm per second. Because of this, the filament sagged—it was printing too slowly in that area. But why? What setting was causing this to occur in Bambu Studio?
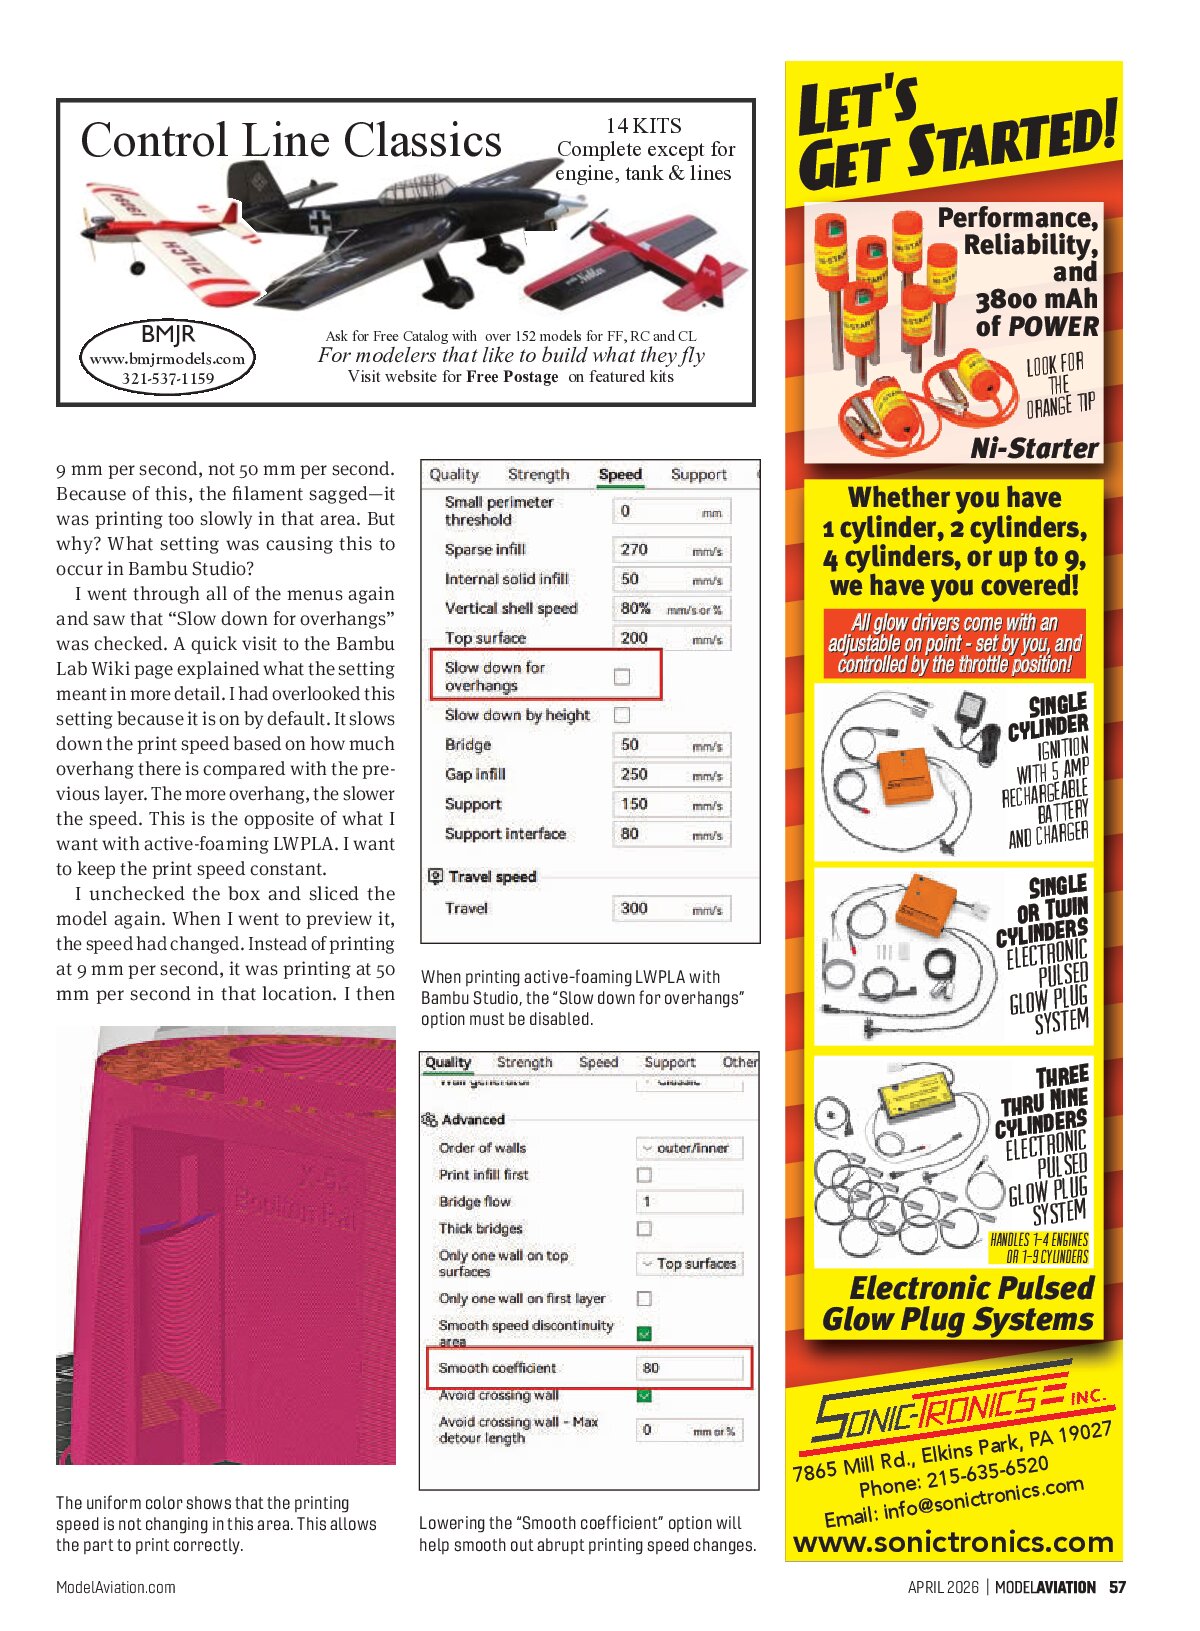
I went through all of the menus again and saw that “Slow down for overhangs” was checked. A quick visit to the Bambu Lab Wiki page explained what the setting meant in more detail. I had overlooked this setting because it is on by default. It slows down the print speed based on how much overhang there is compared with the previous layer. The more overhang, the slower the speed. This is the opposite of what I want with active-foaming LWPLA. I want to keep the print speed constant.
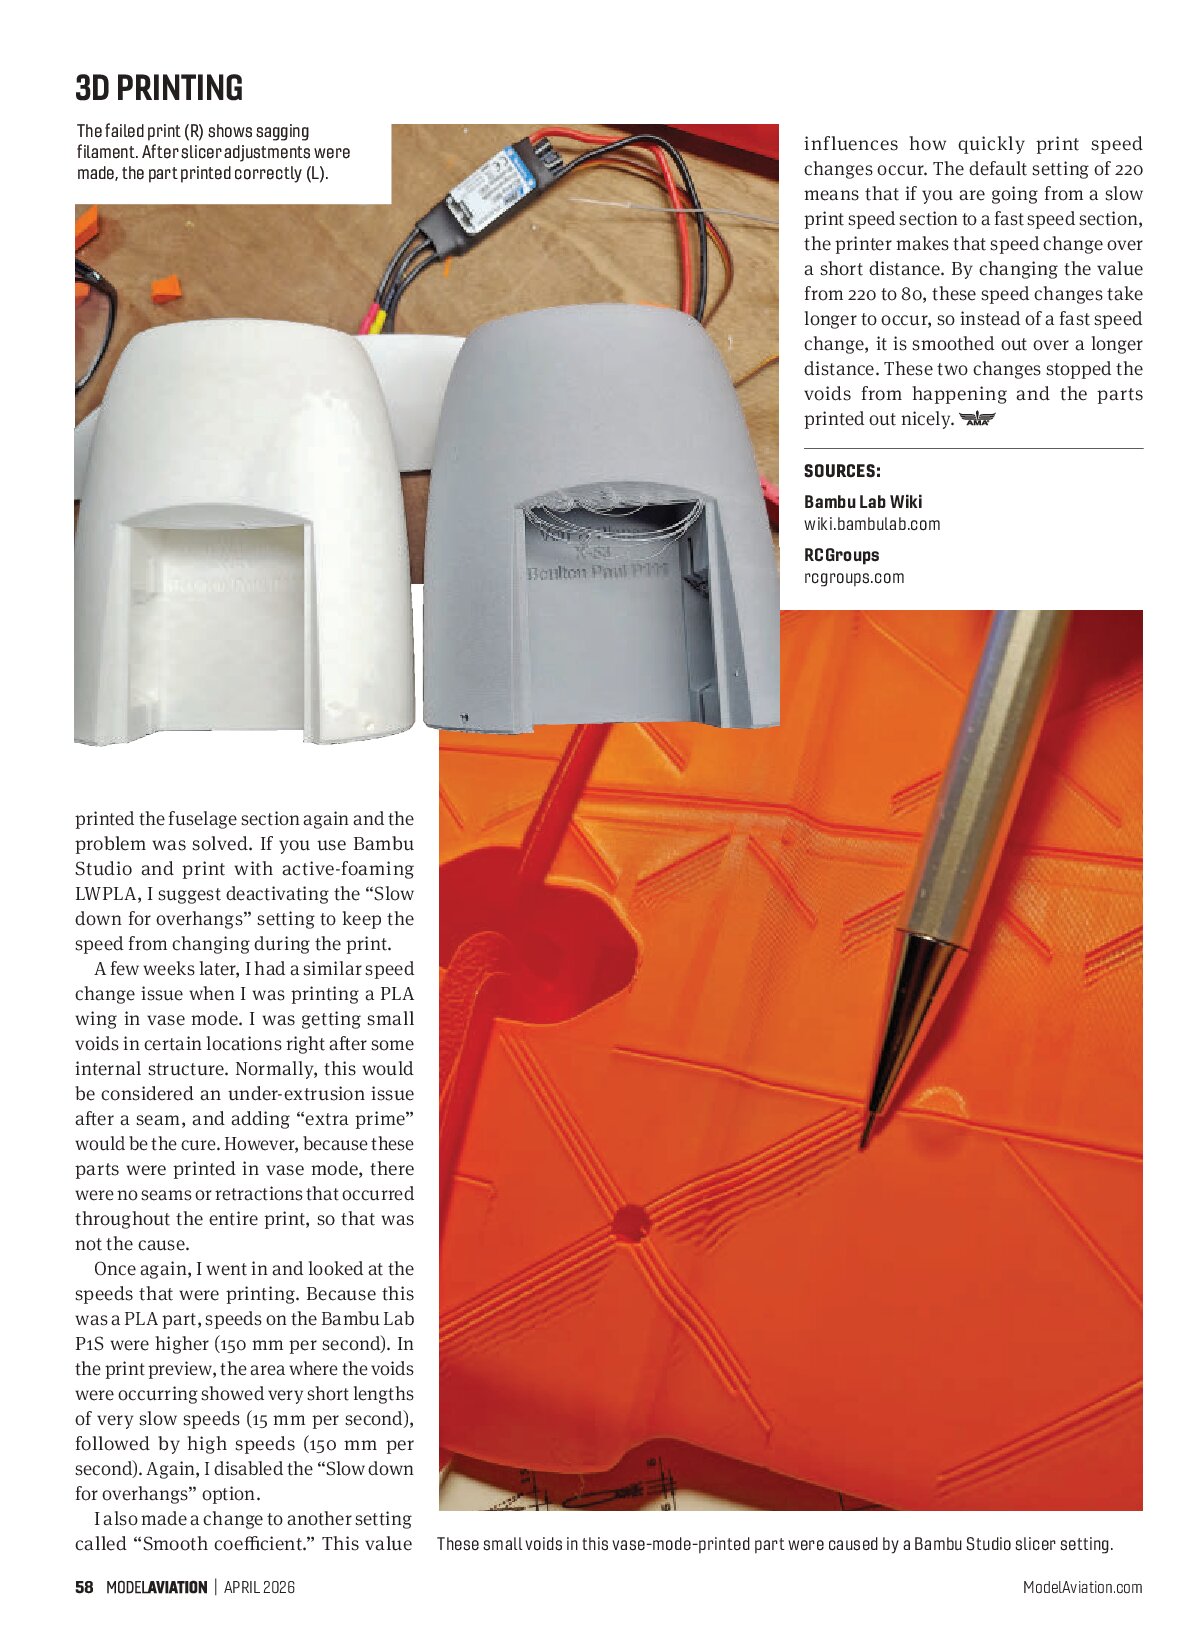
I unchecked the box and sliced the model again. When I went to preview it, the speed had changed. Instead of printing at 9 mm per second, it was printing at 50 mm per second in that location. I then printed the fuselage section again and the problem was solved. If you use Bambu Studio and print with active-foaming LWPLA, I suggest deactivating the “Slow down for overhangs” setting to keep the speed from changing during the print.
A few weeks later, I had a similar speed change issue when I was printing a PLA wing in vase mode. I was getting small voids in certain locations right after some internal structure. Normally, this would be considered an under-extrusion issue after a seam, and adding “extra prime” would be the cure. However, because these parts were printed in vase mode, there were no seams or retractions that occurred throughout the entire print, so that was not the cause.
Once again, I went in and looked at the speeds that were printing. Because this was a PLA part, speeds on the Bambu Lab P1S were higher (150 mm per second). In the print preview, the area where the voids were occurring showed very short lengths of very slow speeds (15 mm per second), followed by high speeds (150 mm per second). Again, I disabled the “Slow down for overhangs” option.
I also made a change to another setting called “Smooth coefficient.” This value influences how quickly print speed changes occur. The default setting of 220 means that if you are going from a slow print speed section to a fast speed section, the printer makes that speed change over a short distance. By changing the value from 220 to 80, these speed changes take longer to occur, so instead of a fast speed change, it is smoothed out over a longer distance. These two changes stopped the voids from happening and the parts printed out nicely.


Photo captions
Lowering the “Smooth coefficient” option will help smooth out abrupt printing speed changes.
SOURCES
- Bambu Lab Wiki
- wiki.bambulab.com
- RCGroups
- rcgroups.com