
Winter maintenance
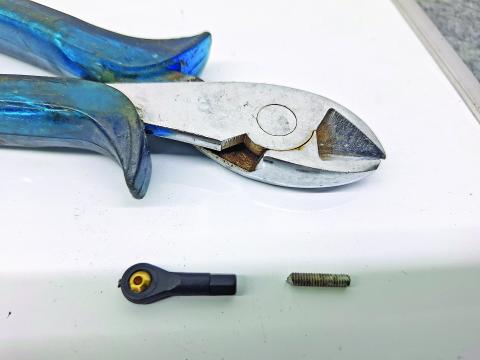
While reusing a pushrod for gear doors on a model, the author found that the builder had simply used side cutters to cut off the thread and left the end unfinished. Cutting the threads worked great going in, but when it was taken out, the threads were also removed, rendering the ball link unusable.
RC JETS
The flying season has ended and winter maintenance and annual inspections are taking place. It’s funny what you can find has happened to your airplanes when you look at them closely.
This year, I started winter maintenance with my Elite Aerosports Picaro, which gets flown a lot. It’s been through a few 25-hour turbine inspections, so it was definitely time.
A deep inspection of the tailpipe came about because I saw a small flat spot of approximately 4 inches develop near the front of it. I pulled the tailpipe and looked at it closely. Sure enough, I had a problem—a small crack was developing from the spotweld of the strap holding the outer tube in place. Continued inspection also revealed that a few of the spotwelds on the main tailpipe seamline were breaking out in this area. Note that these are not weak spotwelds but are actually fatigue-like failures. The main metal of the inner tailpipe was cracked surrounding the spotweld.
Fatigue cracks are inherent to all welding operations. The heat from welding metals also heats the metal that immediately surrounds the weld. The adjacent metal cools very quickly because the surrounding metal pulls the heat out from the weld area, changing the temperature of the adjacent metal. This is an age-old issue with welding, hence our need to be diligent when inspecting tailpipes. The spotweld and the area immediately adjacent to it will always be weak areas.
I will admit that this jet has had a lot of flights and turbine hours, so I can’t complain about the life of the tailpipe; it has served me well. A tailpipe goes through many heat cycles, which affects the temperature of the metal, along with stress from heat expansion. The varying temperatures result in different expansion rates throughout the length of the tailpipe, putting physical stress on many areas. The most important thing to remember is that a tailpipe will not last forever, so regularly keep an eye on its condition.
Another maintenance item on an airplane that I did not build was a set of gear doors that needed reworked. The linkage was hitting the tire so that the doors would never fully close. The cold weather was a good time to address this problem.
I immediately found a couple of my many pet peeves. The screws holding the ball links on to the door were not very good. Nylon-insert locknuts were used, which is an excellent choice, but the screws were all wrong. One had a very long screw with a sloppy appearance. The extra turns that were required put unnecessary wear on the nylon. In full-scale aviation, you try to have no more than two threads showing past the nut. On the second door, the long screw had been cut off with side cutters and was left deformed and sharp. Needless to say, it tore up the nylon in the nut as I backed it out, leaving the nylon insert unable to serve as a locknut.
A quality builder will use the appropriate length of screw, and if it is cut off, they will take a moment to clean up the end and lightly chamfer the cut threads to easily start the screw into a nut. In the case of a nylon-insert locknut, the nylon would not be damaged and could do its job correctly.
This also comes into play when using a threaded rod for the link. Take a moment to clean up where you cut it off so that you don’t damage the threads in a plastic ball link. I found the same problem with a cutoff thread on the gear door pushrods when I went to reuse them on the relocated gear door servos. I ended up replacing two of the ball links because they stripped out when I removed the threaded rod.
I like to take my time when I use plastic ball links and tap clean threads into the link. It gives me a good starting point, and I also finish the cutoff end of the thread so that it does not damage the threads of the ball link. I use a bottom tap for this because it allows a nearly full-depth, tapped hole.
A bottom tap is ground with minimal taper to the cut threads, unlike a regular tap; it is made for tapping non-through holes, such as what is found on ball links. When tapping an aluminum ball link, it is best to start with a regular tap; much lower torque is required to tap the hole. You can then follow up with a second pass by using a bottom tap to cut the last lower threads. (As a side note, cooking oil makes a great lubricant for drilling and tapping aluminum.)
Moving on, check for loose screws. It is surprising how many times I have found my landing gear mounting screws to be loose. The worst example of this was with a Der Jet Vampire that I flew for many years. The nose-gear retract-unit mounting screws needed to be retightened every 30 to 50 flights. The threads were tapped into 5/16-inch-thick G10 plate.
Loctite is normally effective at solving this problem when you have metal-to-metal threads. I use blue Loctite when I am assembling my models, but landing gear mounting screws see a harsh environment and are still prone to loosening because the screws do not always go into metal tapped threads.
These issues are reasons that a thorough inspection of your models should be done on a regular basis. The colder months of winter are a good time for me. Time spent fixing problems at home during the off season allows for more enjoyment at the flying field.


SOURCES
- Jet Pilots Organization (JPO)
- jetpilots.org


