
USEFUL BRIMS
AND SHIMS
By Don Slusarczyk | don@slusarczyk.com

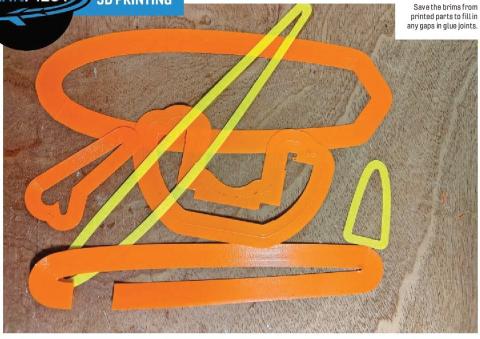
WHEN I AM printing out a part for a new airplane, I generally use a brim on the outside of the part. Brims are great for adding more surface area to the build plate to prevent warping, edges from lifting while printing, or parts coming loose from the build plate while printing. However, even when brims are used, you might find that there could still be small gaps when assembling a model, especially near wing trailing edges (TE).
Trying to get perfectly flat butt joints used to be a large source of frustration for me. I spent a lot of time trying to get perfectly flat parts, and then I started to realize that these small gaps, usually at the wing TE and around one layer height in thickness, are almost unavoidable. There is some flatness variation in build plates, but the big culprit is uneven shrink rate as the parts cool on the build plate. Many times, a part can be flat on the build plate, and then, once removed, internal stress can cause a small warp to occur.
Depending on the size of the gap, it might be possible to sand other areas of the part so that the gap is minimized. A 150-grit sanding block works well, and a few gentle strokes can sometimes help to straighten out any high points. However, if you are gluing two parts together and both are slightly warped at the TE, the gap is twice the width and more obvious. You can use thick CA glue to bridge the gap, but I prefer to fill it in with plastic.
Lately, I have been using the leftover brim pieces to fill in these gaps. The brims I print are generally around 6mm to 10mm wider than the part, and I save them after they are removed. Brims are typically only one layer thick, so they can be cut easily with scissors, and if you need to fill in more of the
gap width, you can either stack or stagger several shims together in the gap since the width might be slightly tapered. Once the shims are in place, apply some CA glue then trim away the excess and sand it down.
On a recent build, I needed a wider piece of shim material than what the typical brim width was. I decided to print a rectangular sheet so that I could cut off what I needed.

To do this, I used a feature in Bambu Studio that lets you insert simple shapes onto a build plate. In Bambu Studio, you right-click the mouse and select Primitives. Other slicers, such as Prusa, have a similar command. Using the Primitive command,

Shims were cut and placed into the gap on the TE. Use CA glue to keep the shims in place.

3D PRINTING

temperature value was correct because it seemed high. For the specific parts I was printing, that was the temperature value being used. Those parts were single-wall vase-mode parts. At temperatures below 265°C, I found poor layer adhesion in such parts.
Recently, I printed an airplane that used a single wall with gyroid infill. For those who have printed any current Planeprint designs, this would be the same as its P5 profile. While the temperature setting of 265°C did work on the test part, I found that it was a little too high for parts that required a few top layers. Lowering the temperature to 245°C solved the problems I was seeing.
So, for single-wall vase-mode parts, 265°C works well, but for parts that are single wall with infill and top layers, 245°C works much better.
Here, a TE wing gap has been repaired.
I inserted a cube, and then I scaled it to the size I wanted. In this case, I scaled it to be 30mm wide and 150mm long. For the thickness, I set it to 0.4mm (two times the layer height). I also added a 20mm brim to the outside that was one layer thick. The result was a sheet that was one layer thick on the edges and two layers thick in the middle. This printed “shim sheet” allows me to cut off whatever shape and thickness I need to fill in any gaps.
Now these small gaps are no longer a source of annoyance. Instead of reprinting an entire part because of a small imperfection in one location, just fill the gap with a shim and carry on with the build.
More on Bambu P1S LW-PLA Settings
In a previous column, I mentioned some settings I use in Bambu Lab for printing parts in lightweight polylactic acid (LW-PLA). I mentioned that the temperature I was printing at was 265°C. Some of you asked me whether that

SOURCES:
Bambu Lab
bambulab.com
Planeprint
planeprint.com


