RC PYLON RACING

G-BOND
EPOXY
By Tim Lampe | tim.lampe@hotmail.com
THROUGHOUT MY YEARS of RC model experience, I’ve been disappointed with some of the epoxies that have been marketed for our hobby. Many don’t have enough working time and/or seem to age by turning yellow and softening over time. I’m always on the lookout for better epoxies.
In my March 2021 column, I wrote about Loctite EA 9462 Toughened Adhesive Epoxy. In my July 2024 column, I wrote about MGS epoxy that is intended for the full-scale aircraft industry. Now I’ve come across another epoxy that I think would also be great for RC use.
I needed an epoxy for my laser-cutting business in paste form that could be spread over large surfaces and wouldn’t flow. I found one called G-Bond, which was demonstrated in a YouTube video by a company named Wood-2Art in Fort Myers, Florida. I went to the company’s website, where it offered the epoxy in 16-fluid-ounce, half-quart containers. At a price of $49.99, this seemed reasonable, so I put in my order.
As advertised, G-Bond is really thick—about the same consistency as petroleum jelly. You’ll need a strong mixing stick! The working time is approximately an hour, and it sets up super hard. It worked perfectly for what I needed, but I haven’t yet tried it on a model airplane.
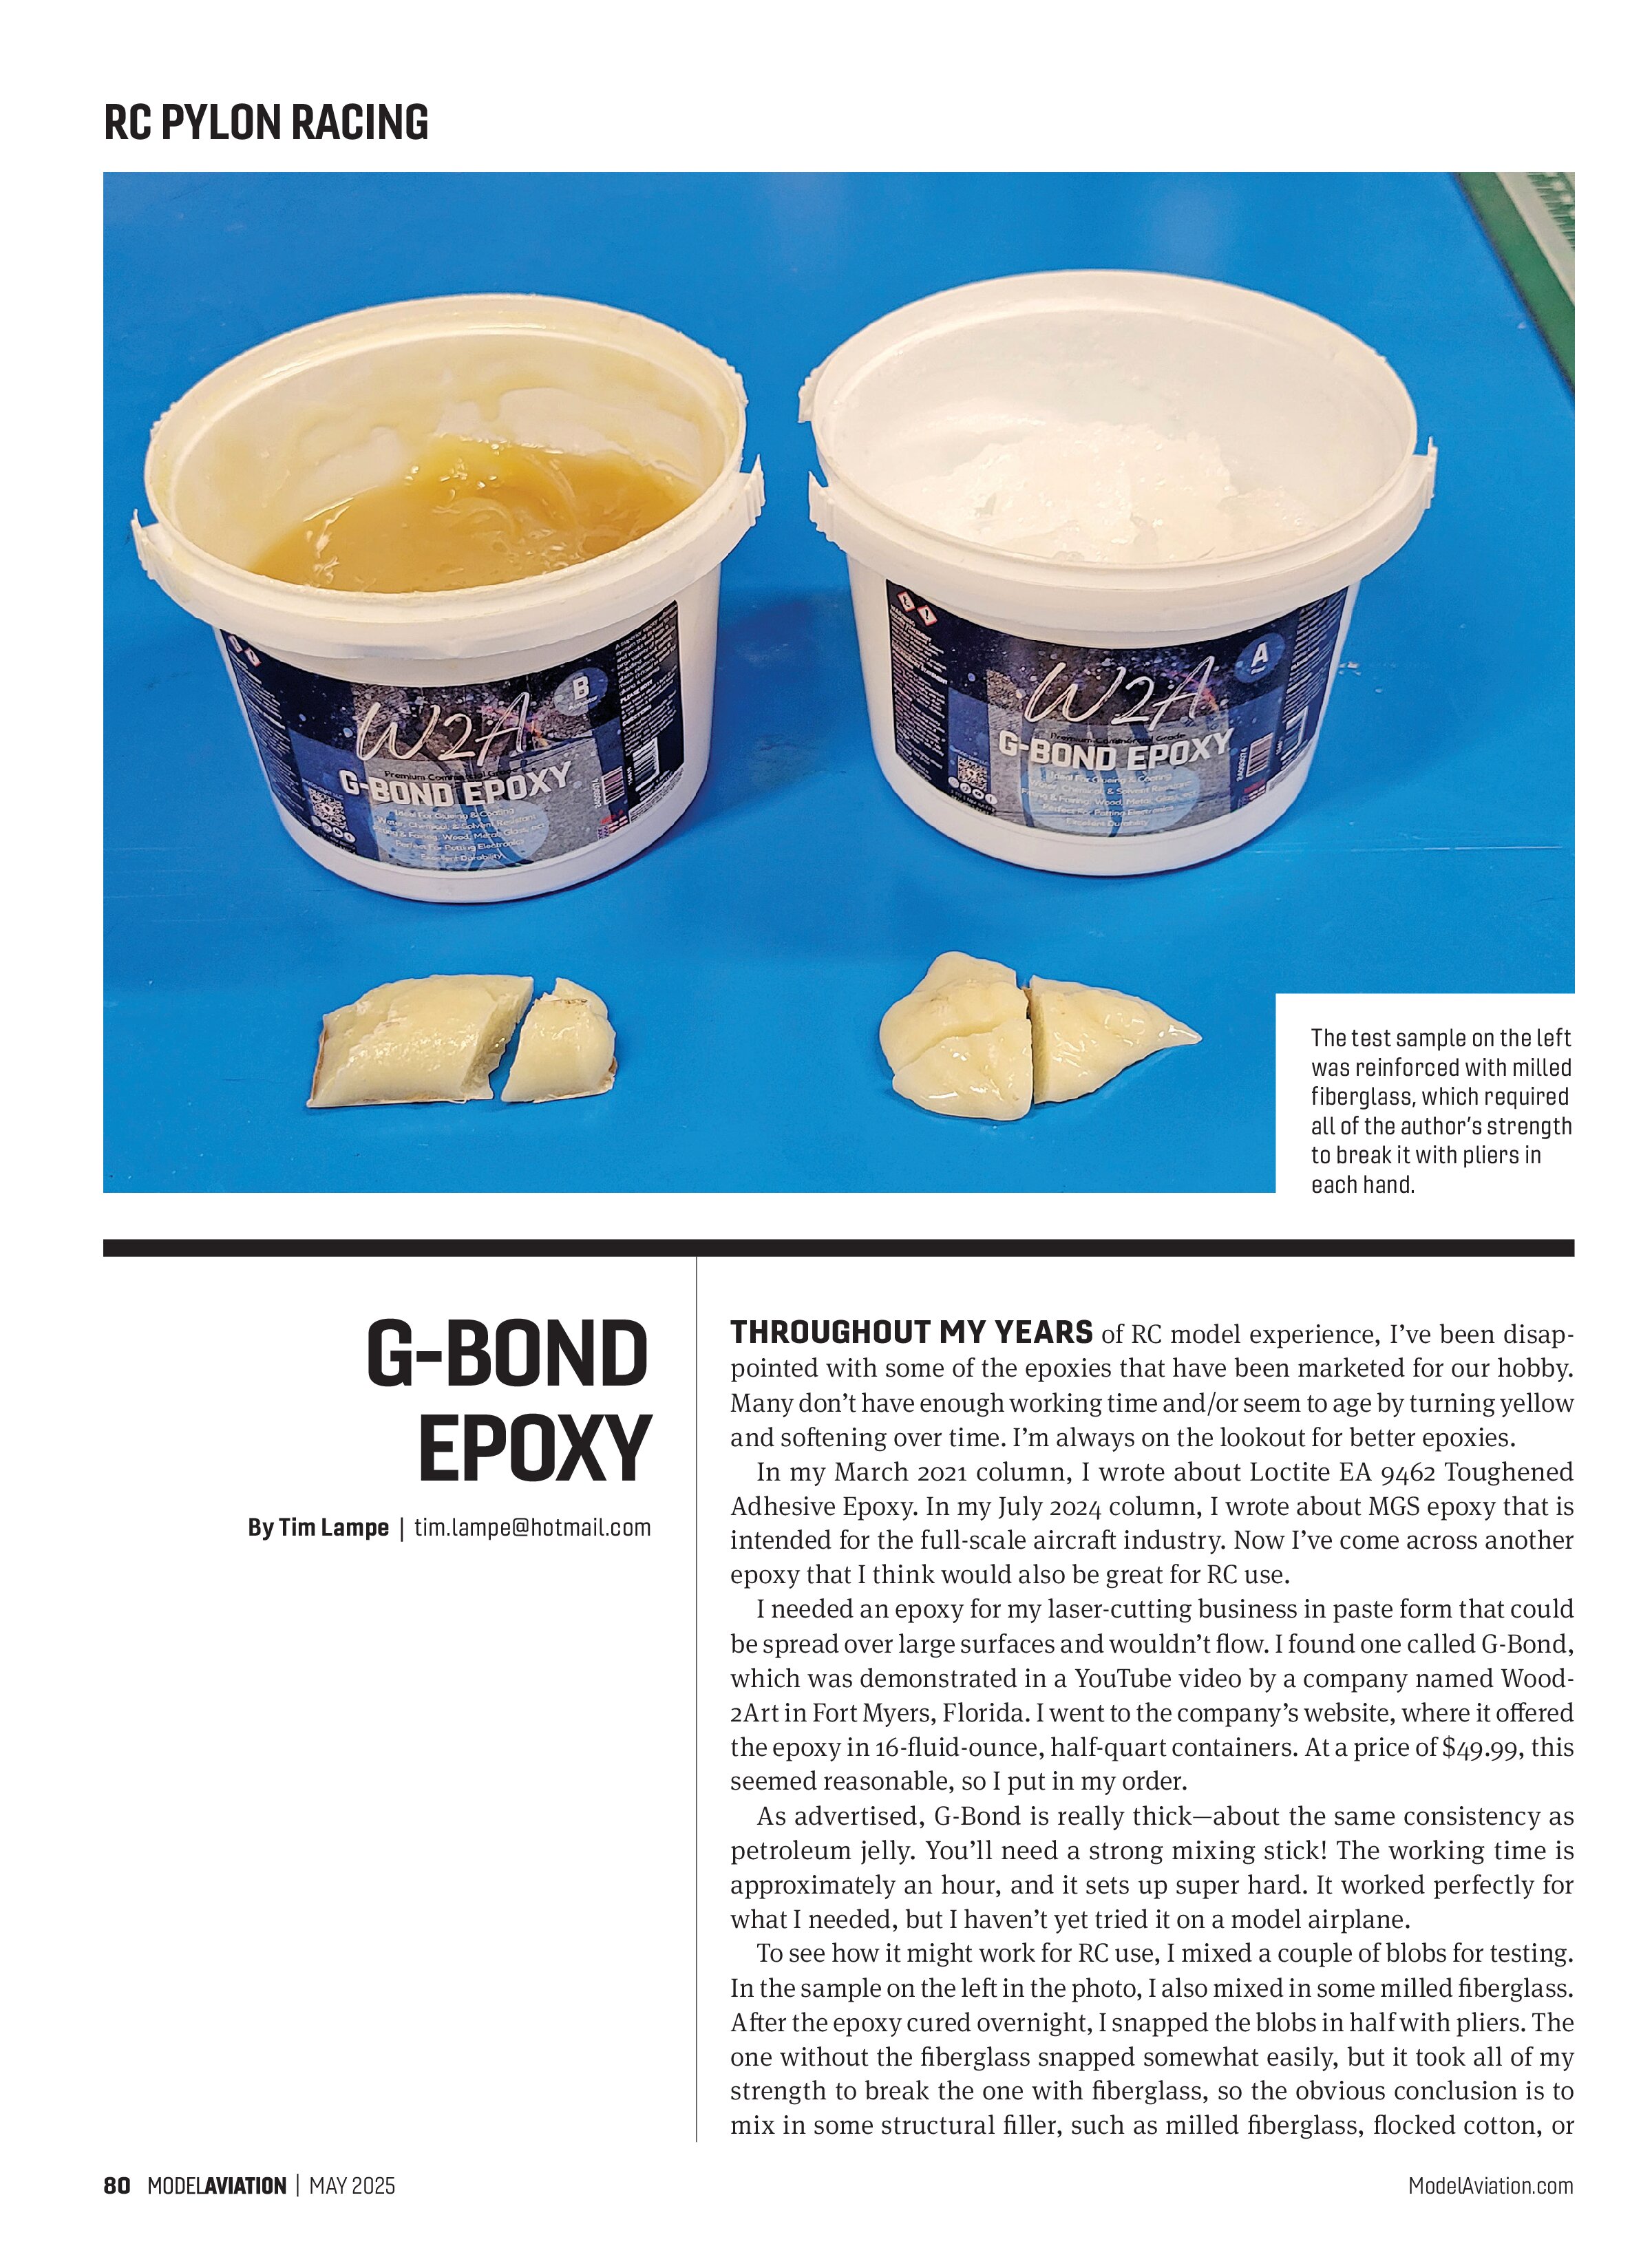
To see how it might work for RC use, I mixed a couple of blobs for testing. In the sample on the left in the photo, I also mixed in some milled fiberglass. After the epoxy cured overnight, I snapped the blobs in half with pliers. The one without the fiberglass snapped somewhat easily, but it took all of my strength to break the one with fiberglass, so the obvious conclusion is to mix in some structural filler, such as milled fiberglass, flocked cotton, or chopped carbon fiber. I think it would be perfect for landing gear mounts or any other structure where a fillet is needed, especially for gluing firewalls into Quarter 40 (Q-40) aircraft.
Curiously, in Wood-2Art’s YouTube video, I noticed that they were pulling the G-Bond from containers labeled Superbond. Wanting to do my due diligence for this column, I searched the internet for Superbond and found the manufacturer, FiberGlass Coatings Inc., in Saint Petersburg, Florida. I also found a distributor for Superbond called Bottom Paint Store, LLC, as well as a storefront on Amazon.
Further reading revealed that there is a “fast” and a “slow” hardener for Superbond. The G-Bond from Wood-2Art comes with the slow hardener, which is advertised as having an approximate one-hour working time, with which I concur.
If you would like to investigate further, the YouTube video link is listed in “Sources,” or go to YouTube and search “Wood-2Art best way to glue wood” to bring up the video.
Radio Installations
I’m always curious to look at other people’s radio installations. The quality of the install is a big factor in determining the airworthiness of an airplane. I figure that maybe I’ll learn something too.
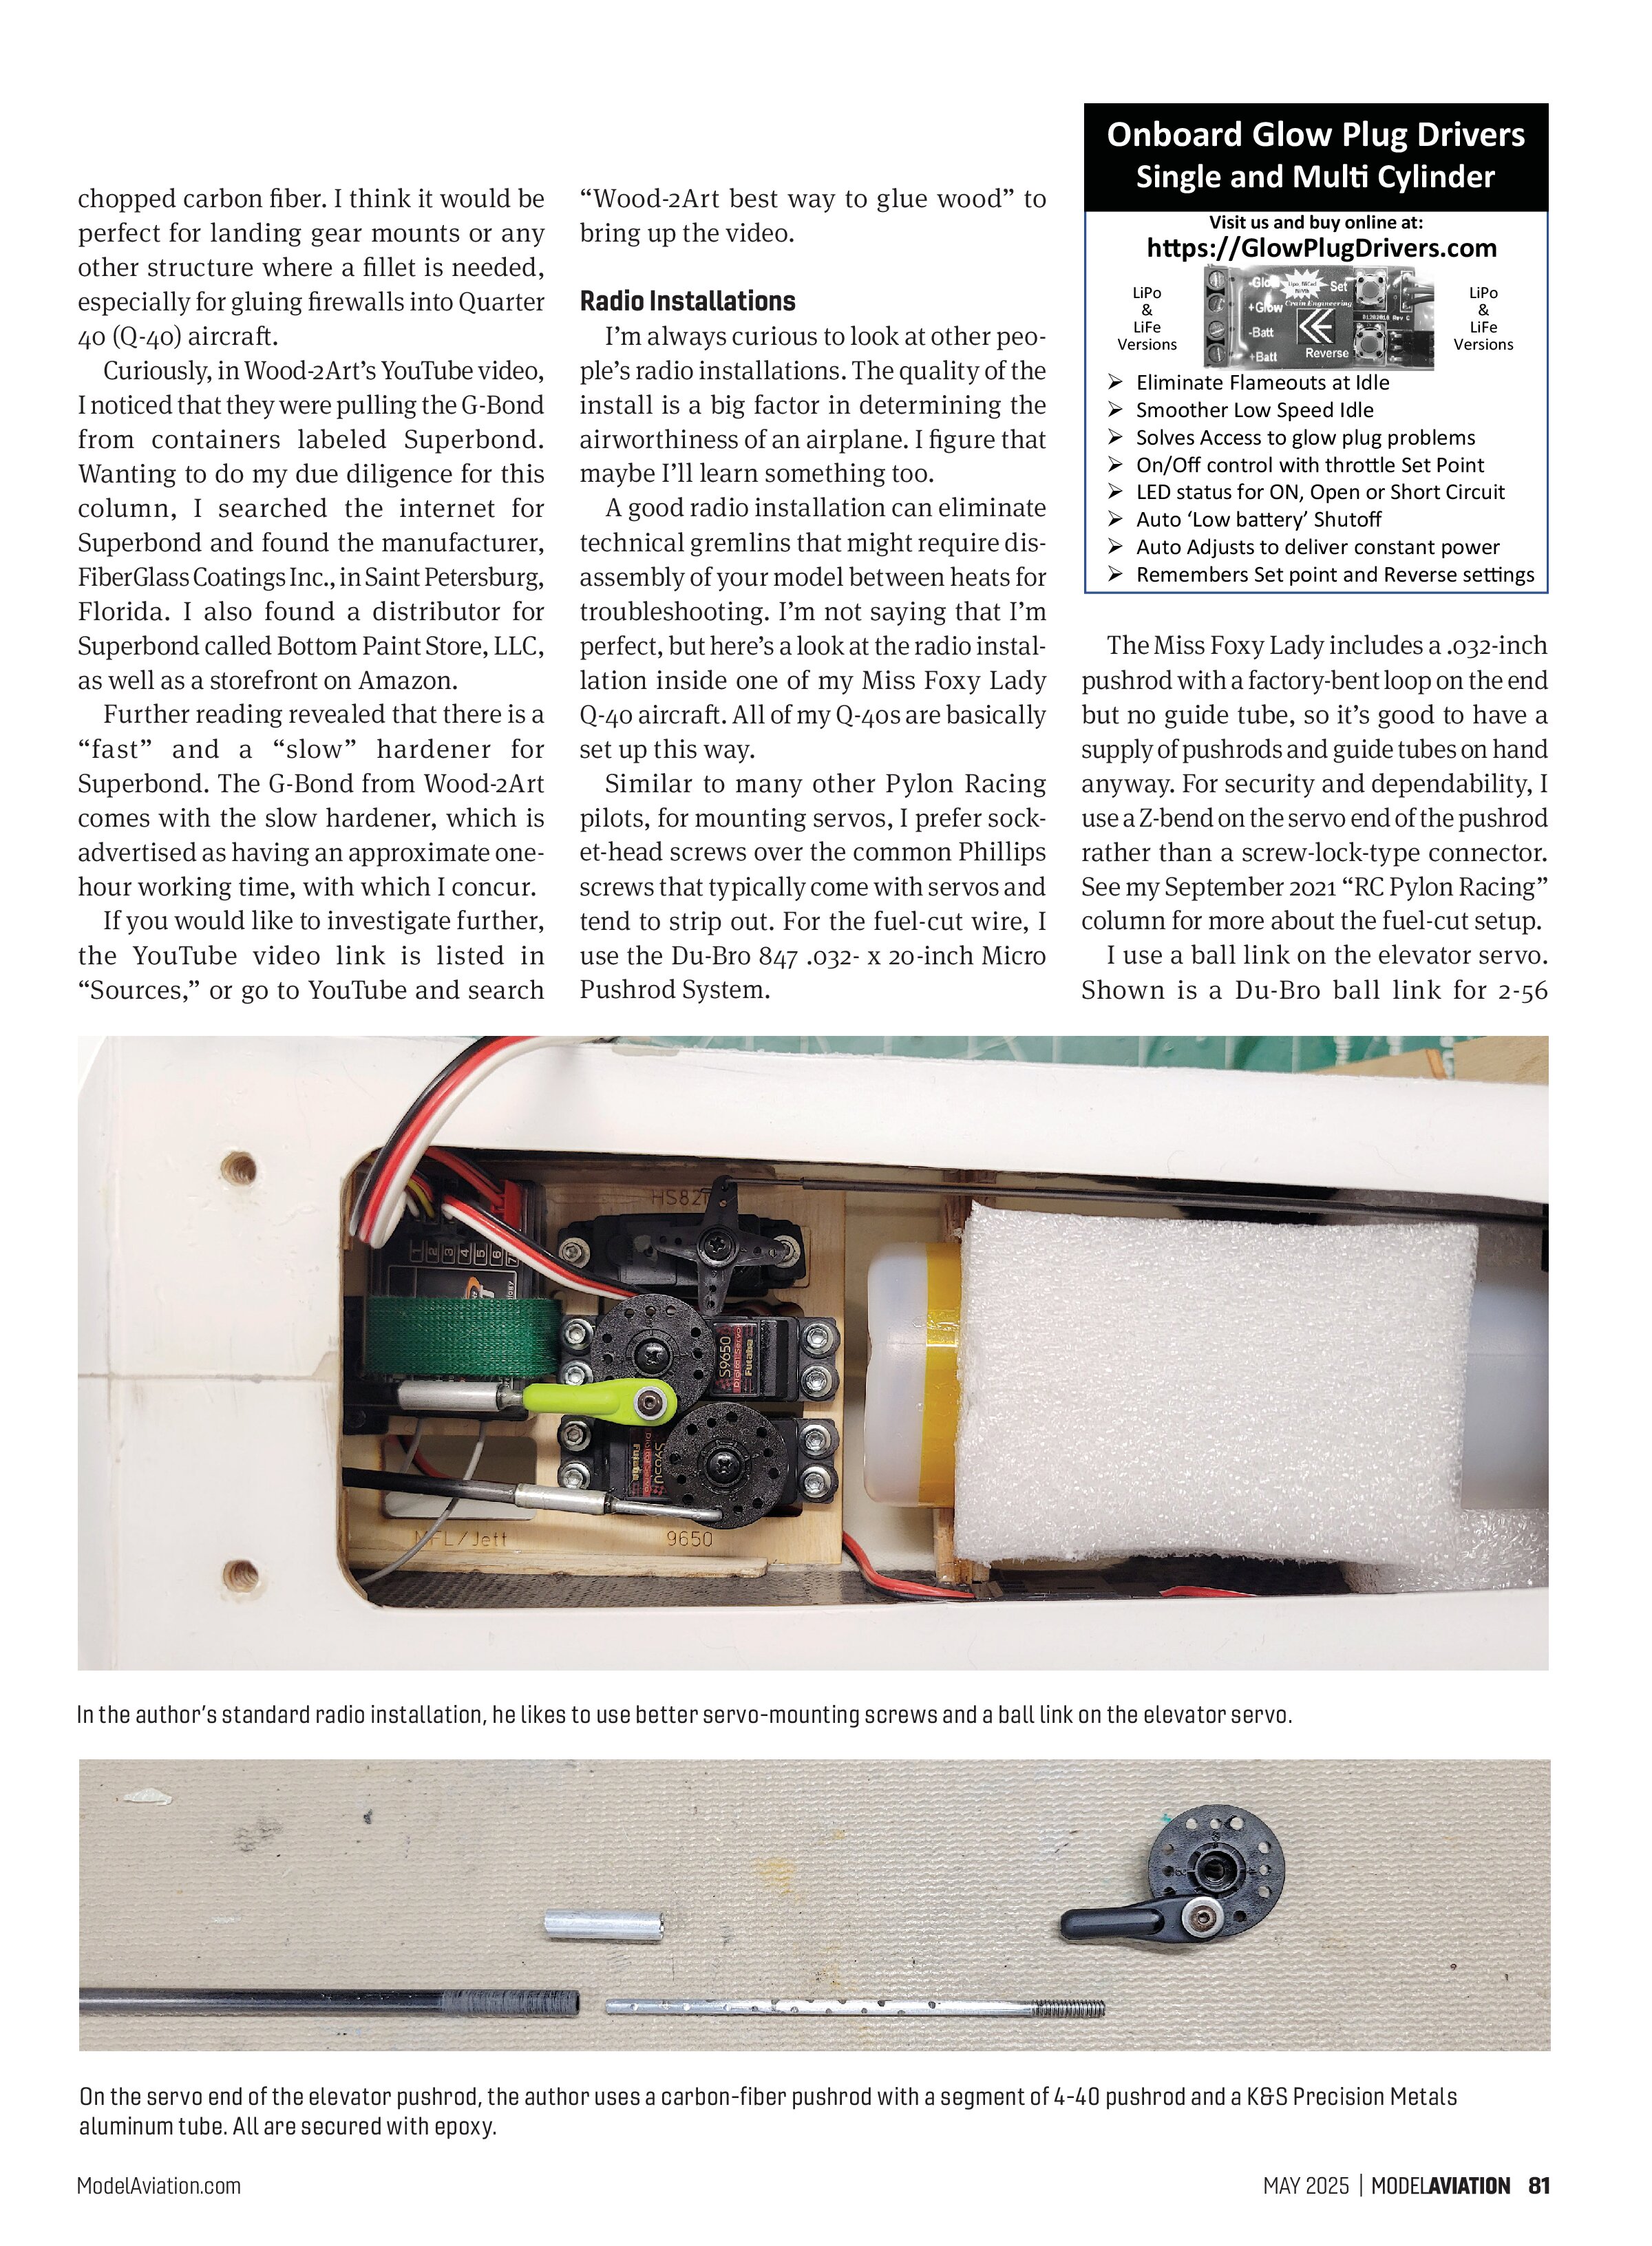
A good radio installation can eliminate technical gremlins that might require disassembly of your model between heats for troubleshooting. I’m not saying that I’m perfect, but here’s a look at the radio installation inside one of my Miss Foxy Lady Q-40 aircraft. All of my Q-40s are basically set up this way.
Similar to many other Pylon Racing pilots, for mounting servos, I prefer socket-head screws over the common Phillips screws that typically come with servos and tend to strip out. For the fuel-cut wire, I use the Du-Bro 847 .032- x 20-inch Micro Pushrod System.
The Miss Foxy Lady includes a .032-inch pushrod with a factory-bent loop on the end but no guide tube, so it’s good to have a supply of pushrods and guide tubes on hand anyway. For security and dependability, I use a Z-bend on the servo end of the pushrod rather than a screw-lock-type connector. See my September 2021 “RC Pylon Racing” column for more about the fuel-cut setup.
I use a ball link on the elevator servo. Shown is a Du-Bro ball link for 2-56

In the author’s standard radio installation, he likes to use better servo-mounting screws and a ball link on the elevator servo.

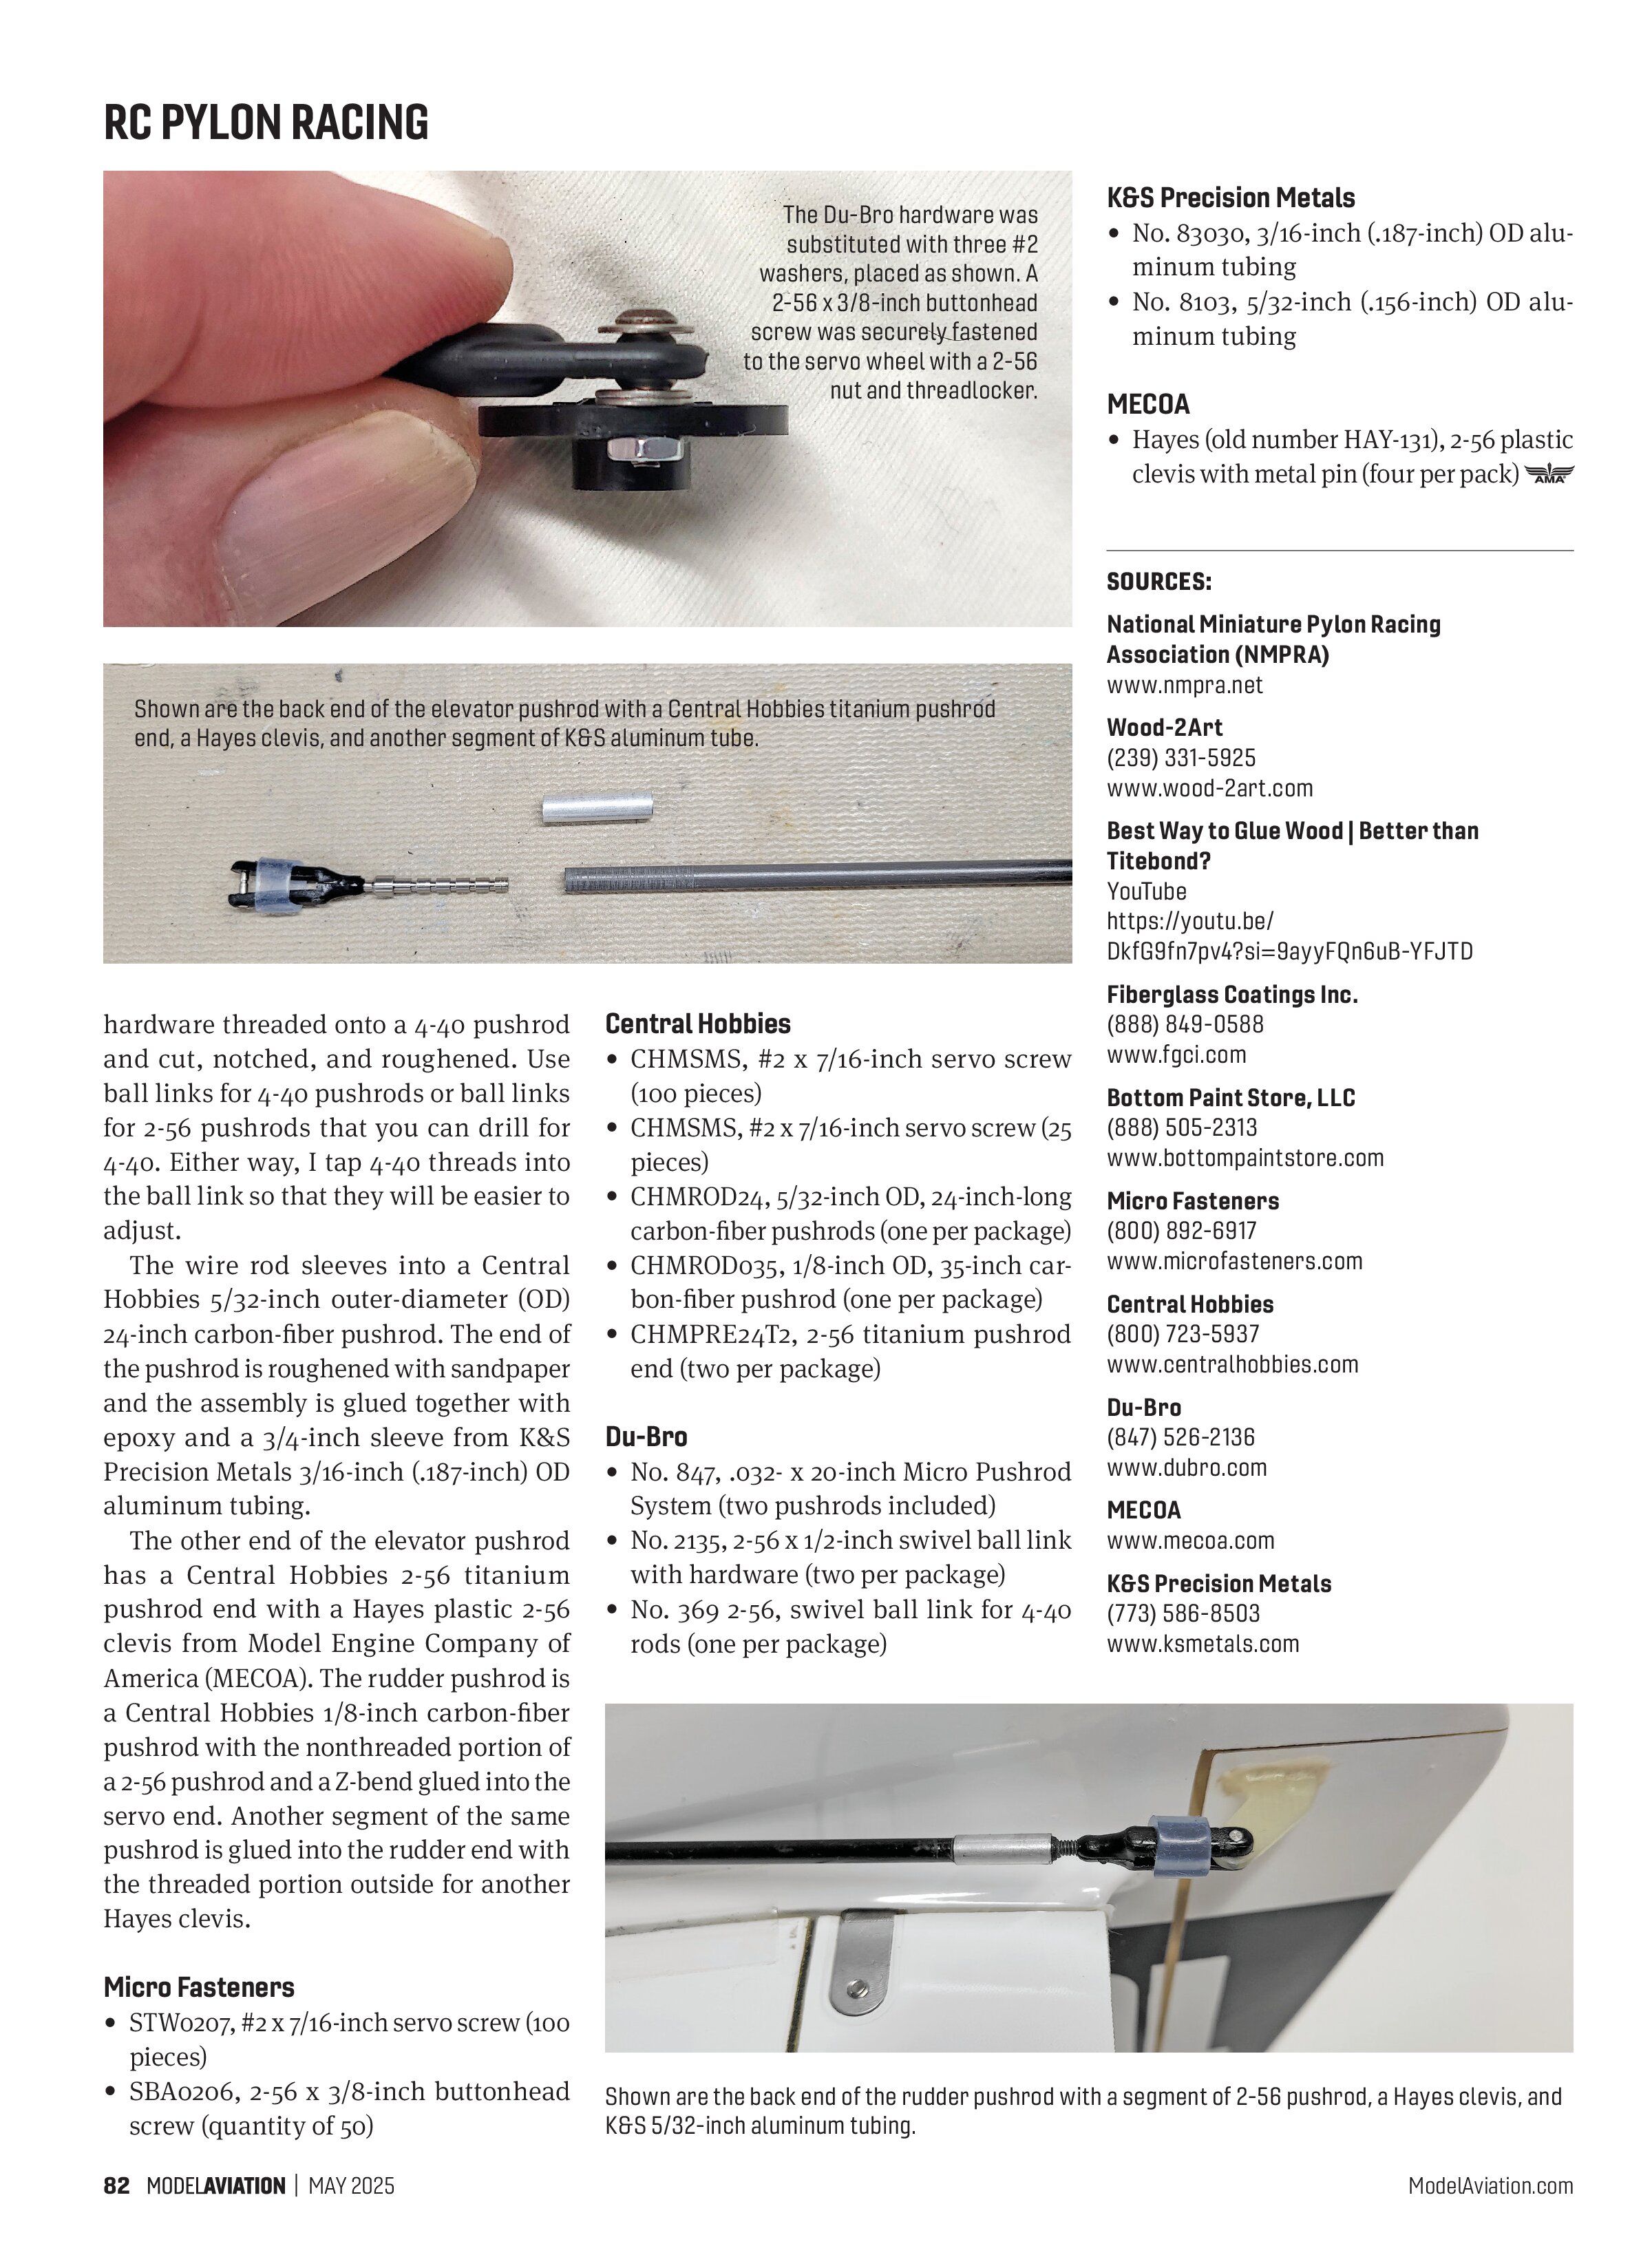
On the servo end of the elevator pushrod, the author uses a carbon-fiber pushrod with a segment of 4-40 pushrod and a K&S Precision Metals aluminum tube. All are secured with epoxy.


hardware threaded onto a 4-40 pushrod and cut, notched, and roughened. Use ball links for 4-40 pushrods or ball links for 2-56 pushrods that you can drill for 4-40. Either way, I tap 4-40 threads into the ball link so that they will be easier to adjust.
The wire rod sleeves into a Central Hobbies 5/32-inch outer-diameter (OD) 24-inch carbon-fiber pushrod. The end of the pushrod is roughened with sandpaper and the assembly is glued together with epoxy and a 3/4-inch sleeve from K&S Precision Metals 3/16-inch (.187-inch) OD aluminum tubing.
The other end of the elevator pushrod has a Central Hobbies 2-56 titanium pushrod end with a Hayes plastic 2-56 clevis from Model Engine Company of America (MECOA). The rudder pushrod is a Central Hobbies 1/8-inch carbon-fiber pushrod with the nonthreaded portion of a 2-56 pushrod and a Z-bend glued into the servo end. Another segment of the same pushrod is glued into the rudder end with the threaded portion outside for another Hayes clevis.
Micro Fasteners
- STW0207, #2 x 7/16-inch servo screw (100 pieces)
- SBA0206, 2-56 x 3/8-inch buttonhead screw (quantity of 50)
Central Hobbies
- CHMSMS, #2 x 7/16-inch servo screw (100 pieces)
- CHMSMS, #2 x 7/16-inch servo screw (25 pieces)
- CHMROD24, 5/32-inch OD, 24-inch-long carbon-fiber pushrods (one per package)
- CHMROD035, 1/8-inch OD, 35-inch carbon-fiber pushrod (one per package)
- CHMPRE24T2, 2-56 titanium pushrod end (two per package)
Du-Bro
- No. 847, .032- x 20-inch Micro Pushrod System (two pushrods included)
- No. 2135, 2-56 x 1/2-inch swivel ball link with hardware (two per package)
- No. 369 2-56, swivel ball link for 4-40 rods (one per package)
K&S Precision Metals
- No. 83030, 3/16-inch (.187-inch) OD aluminum tubing
- No. 8103, 5/32-inch (.156-inch) OD aluminum tubing
MECOA
- Hayes (old number HAY-131), 2-56 plastic clevis with metal pin (four per pack)
SOURCES:
National Miniature Pylon Racing Association (NMPRA)
www.nmpra.net
Wood-2-Art
(239) 331-5925
www.wood-2art.com
Best Way to Glue Wood | Better than Titebond?
YouTube
https://youtu.be/
Dkfg9fn/pv4?si=9ayvFQn6uB-YFJTD
Fiberglass Coatings Inc.
(888) 849-0588
www.fgci.com
Bottom Paint Store, LLC
(888) 505-2313
www.bottompaintstore.com
Micro Fasteners
(800) 892-6917
www.microfasteners.com
Central Hobbies
(800) 723-5937
www.centralhobbies.com
Du-Bro
(847) 526-2136
www.dubro.com
MECOA
www.mecoa.com
K&S Precision Metals
(773) 586-8500
www.ksmetals.com