
MICRO-FLYING

DUAL-PURPOSE FF/MICRO-RC MODEL
By Joe Malinchak | joemal@echoes.net
LAST SUMMER, I attended the Flying Aces Club (FAC) Nats in Geneseo, New York. I had plans to build a few new models for the event, but life got in the way, and I only had time to complete one. I wanted to build a model for the event that was a little bit different—one that could be flown in Free Flight (FF) events, such as the FAC Nats, as well as electric RC events, such as the Northeast Electric Aircraft Technology (NEAT) Fair. This gave me the idea to build a dual-purpose model that could be flown for FF but could easily be converted to micro RC.
I was thinking about a few possible subjects to build and decided on a Peanut Scale version of the Monocoupe. I had a Sterling Peanut Scale kit of one in my collection of old model kits to build, and it was time to pull it out!
I have built several models from the Sterling Peanut Scale series before. They all flew okay, but the wood that is supplied in the kit was on the heavy side. I knew that for this model to fly well, it had to be built as lightweight as possible. I ended up copying and redrawing all of the parts so that I could laser-cut some new ones with contest-grade balsa.
I built up the airframe in the traditional manner on my magnetic building board. I wanted to build a removable fin/rudder so that I could replace it with one that has a magnetic actuator for micro RC use. I used a two-pin connector that would hold the fin/rudder in place. Lightweight Litz wire was glued to the inside of the fuselage so that it wouldn’t get caught up in the rubber motor when it was unwinding. I also added a balsa floor for the receiver to sit under so that it would be clear of the rubber motor.
I used the beautifully molded plastic cowling that was included in the kit. The cowling is also on the heavy side, but the model has a very short nose and needed some extra nose weight. I actually used two cowlings after finding another kit on eBay. One cowling was used for rubber power and the other for electric RC. The electric version uses a 4mm gear drive. I attached the cowlings to the fuselage with some magnets so that they could easily be removed. This works great when flying with rubber power because the magnets hold the cowling in place as the rubber unwinds and eliminate the need for a long thrust block!
I drew up the graphics for the model in Adobe Illustrator, and then printed them out on some white Flying Bird Asuka tissue. I used an Epson Workforce printer with DURABrite Ultra ink. This ink is water-resistant and will not run when you shrink the tissue. I covered the model using the glue-stick method and shrank the tissue by spraying water with my airbrush. You must be really careful when shrinking the wing and tail parts to prevent warps.
I used to use magnets to hold parts down to my magnetic building board until the tissue dried; however, the strong magnets can often damage the structure when applying or removing them. I then had an idea of gluing some cork to the tops of
I used the beautifully molded plastic cowling that was included in the kit. The cowling is also on the heavy side, but the model has a very short nose and needed some extra nose weight. I actually used two cowlings after finding another kit on eBay. One cowling was used for rubber power and the other for electric RC. The electric version uses a 4mm gear drive. I attached the cowlings to the fuselage with some magnets so that they could easily be removed. This works great when flying with rubber power because the magnets hold the cowling in place as the rubber unwinds and eliminate the need for a long thrust block!

I drew up the graphics for the model in Adobe Illustrator, and then printed them out on some white Flying Bird Asuka tissue. I used an Epson Workforce printer with DURABrite Ultra ink. This ink is water-resistant and will not run when you shrink the tissue. I covered the model using the glue-stick method and shrank the tissue by spraying water with my airbrush. You must be really careful when shrinking the wing and tail parts to prevent warps.
I used to use magnets to hold parts down to my magnetic building board until the tissue dried; however, the strong magnets can often damage the structure when applying or removing them. I then had an idea of gluing some cork to the tops of


several magnets and using pins to hold them down. This works well and allows air to circulate underneath the structure while it’s drying!
I made several FF propellers for the model using fellow Model Aviation columnist Tom Hallman’s building techniques. Tom has some wonderful videos on his YouTube channel for FF enthusiasts. His “Free Flight Basics” series of videos is a great source for anyone who is interested in trying FF modeling.
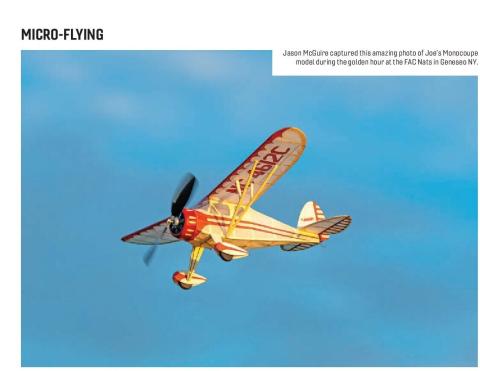
I finished the model right before the Geneseo event, so I needed a few different propellers to test. After several trim sessions, I had the model flying well in the FF configuration. Jason McGuire captured some amazing photos of my model, as well as many others, at the FAC Nats. Thanks, Jason!
After Geneseo, it was time to get it ready for the NEAT Fair. I changed out the cowling with the electric one and installed a 185 mg Grasshopper receiver from Micro Flier Radio. I put in some great flights in the gym at the Indoor Night at NEAT event. It is interesting that the weight of the model in the electric configuration (12 grams) is roughly the same as the rubber FF configuration.
I was thinking about the benefits of a model such as this. Flying with rubber-powered RC control is a great way to not lose it when you are flying at smaller fields. Converting it to electric RC is also a fun way to fly, and flying it in the FF configuration is perfect for events such as the FAC Nats.
You can find out more about the construction of my model and see it fly on the YouTube channel that is under my name.
SOURCES:
NEAT Fair
www.neatfair.org
Micro Flier Radio
(941) 377-9808
www.microflier-radio.com
Tom Hallman’s YouTube Channel
www.youtube.com/@maxfliart
Joe Malinchak’s YouTube Channel
www.youtube.com/@JoeMalinchak


