RC SCALE AEROBATICS

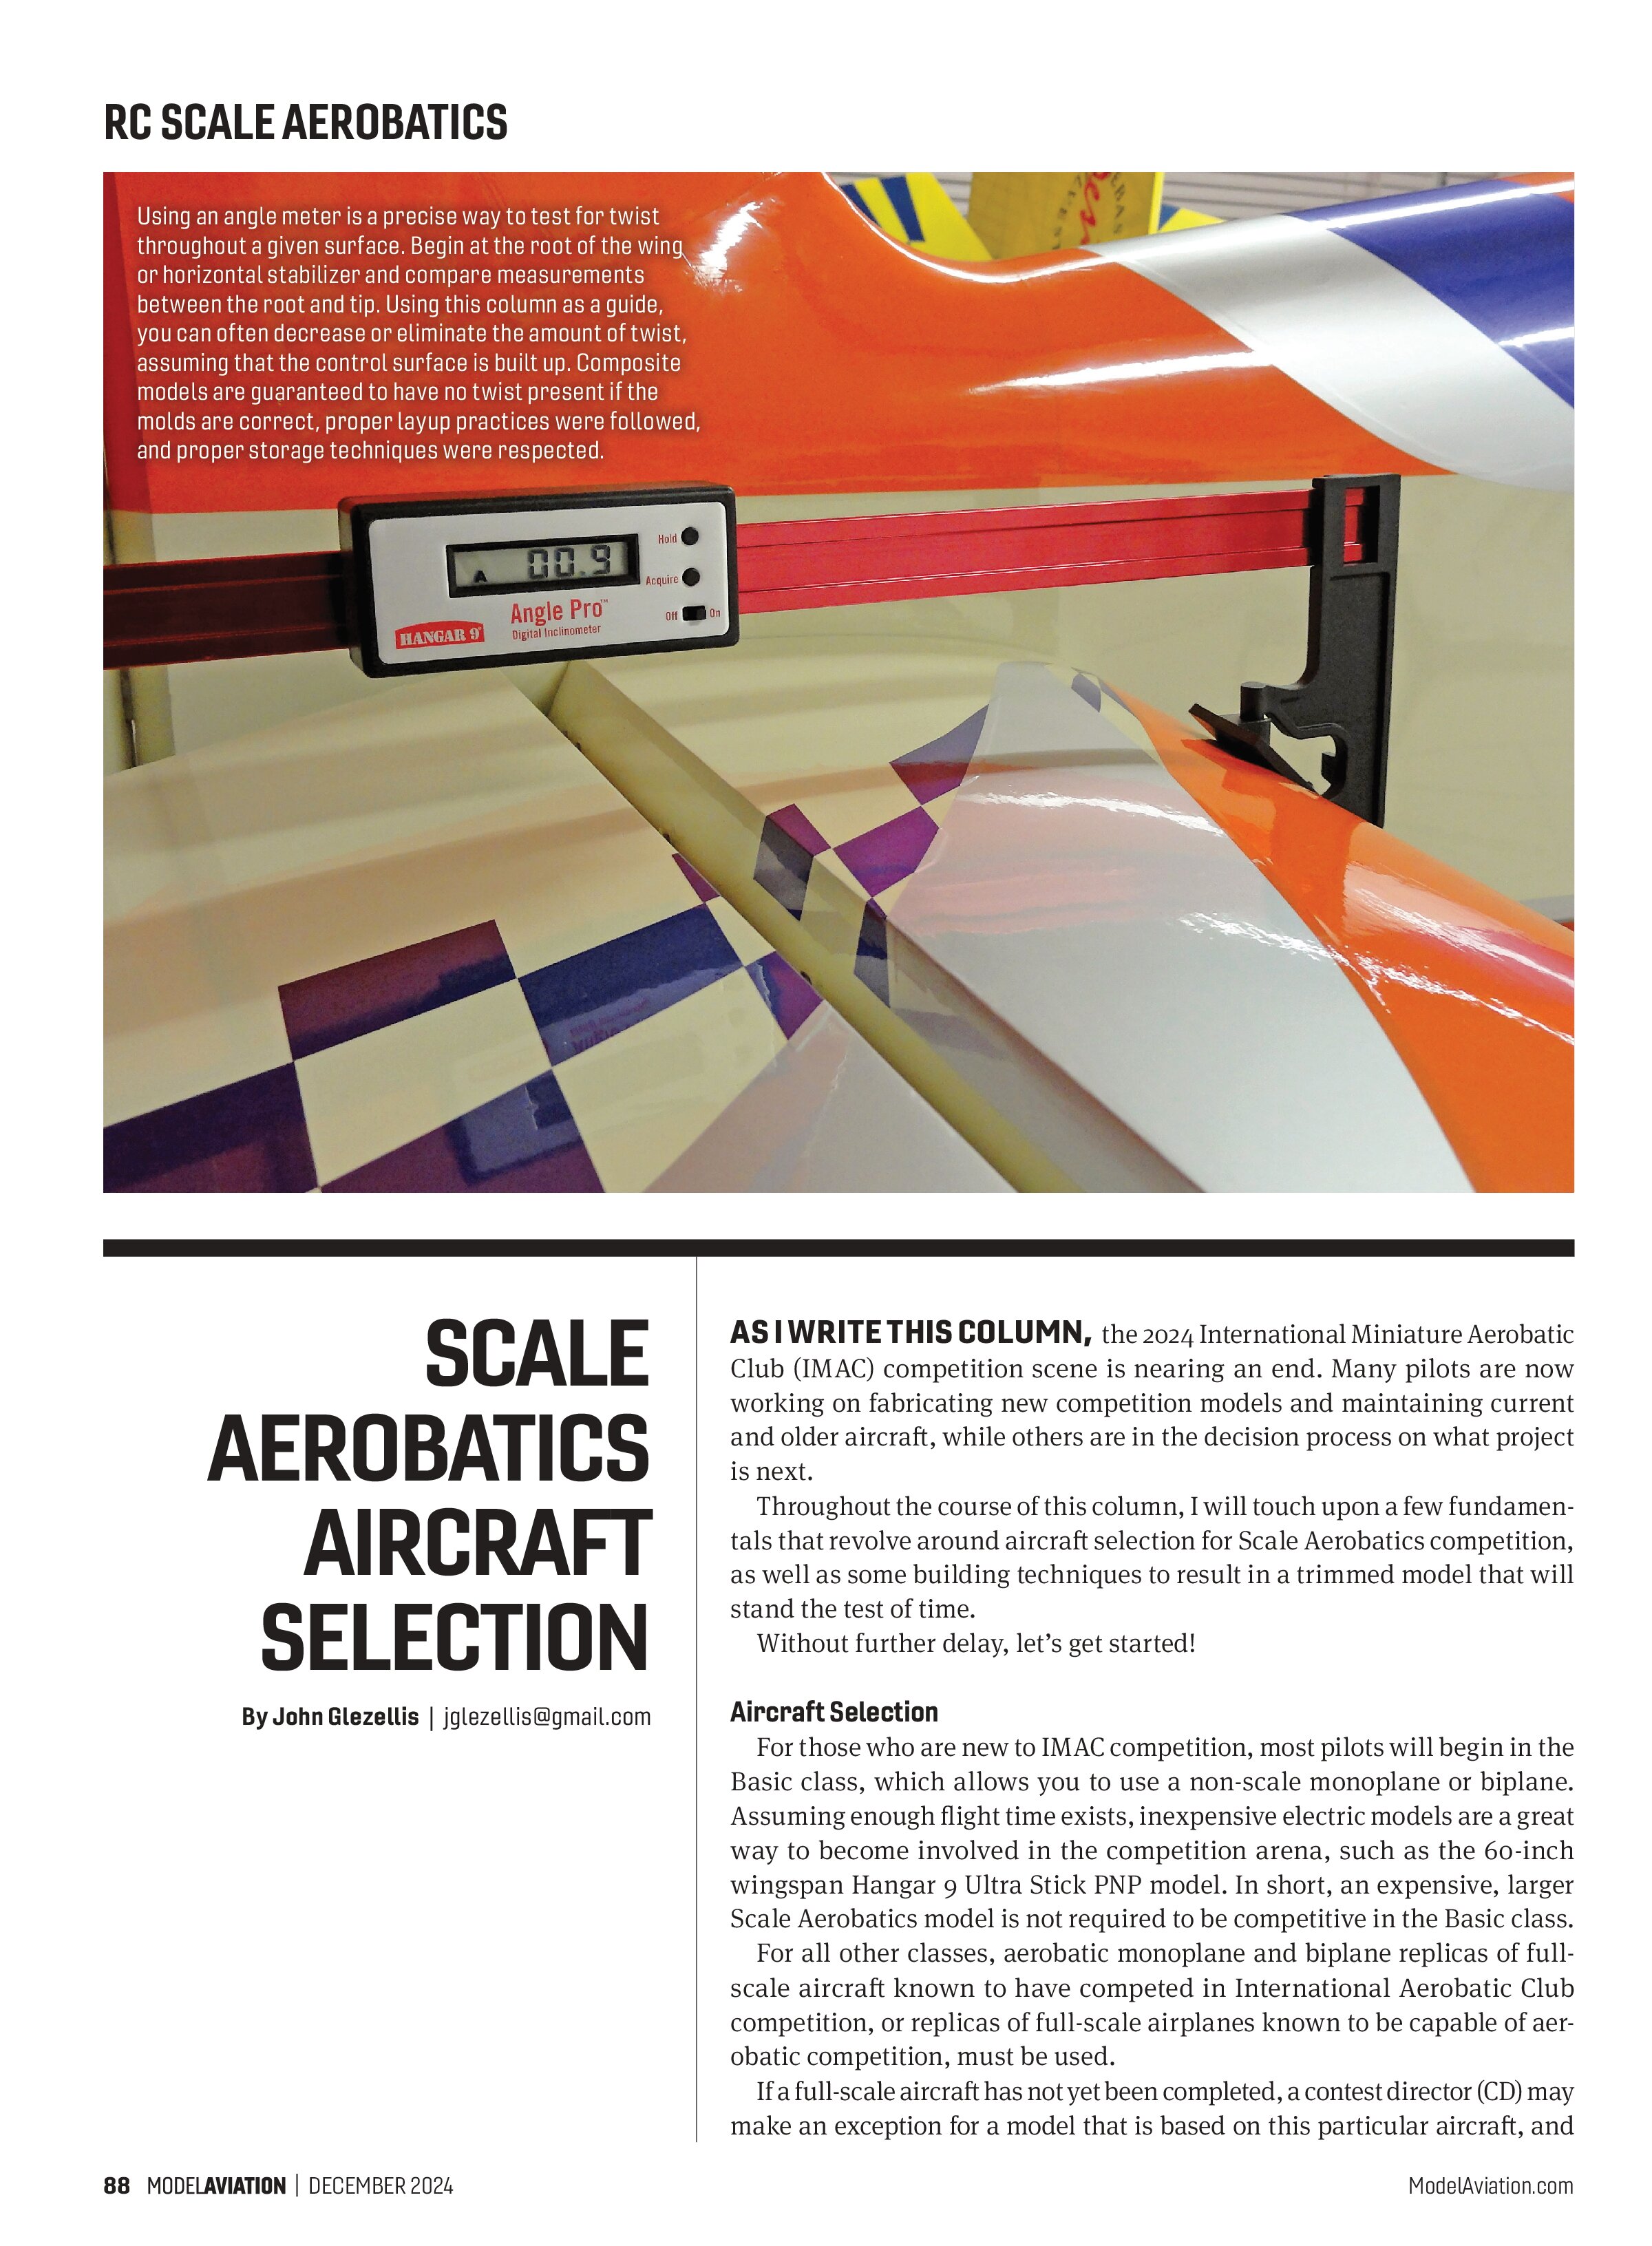
Using an angle meter is a precise way to test for twist throughout a given surface. Begin at the root of the wing or horizontal stabilizer and compare measurements between the root and tip. Using this column as a guide, you can often decrease or eliminate the amount of twist, assuming that the control surface is built up. Composite models are guaranteed to have no twist present if the molds are correct, proper layup practices were followed, and proper storage techniques were respected.
SCALE
AEROBATICS
AIRCRAFT
SELECTION
By John Glezellis | jglezellis@gmail.com
AS I WRITE THIS COLUMN, the 2024 International Miniature Aerobatic Club (IMAC) competition scene is nearing an end. Many pilots are now working on fabricating new competition models and maintaining current and older aircraft, while others are in the decision process on what project is next.
Throughout the course of this column, I will touch upon a few fundamentals that revolve around aircraft selection for Scale Aerobatics competition, as well as some building techniques to result in a trimmed model that will stand the test of time.
Without further delay, let’s get started!
Aircraft Selection
For those who are new to IMAC competition, most pilots will begin in the Basic class, which allows you to use a non-scale monoplane or biplane. Assuming enough flight time exists, inexpensive electric models are a great way to become involved in the competition arena, such as the 60-inch wingspan Hangar 9 Ultra Stick PNP model. In short, an expensive, larger Scale Aerobatics model is not required to be competitive in the Basic class.
For all other classes, aerobatic monoplane and biplane replicas of full-scale aircraft known to have competed in International Aerobatic Club competition, or replicas of full-scale airplanes known to be capable of aerobatic competition, must be used.
If a full-scale aircraft has not yet been completed, a contest director (CD) may make an exception for a model that is based on this particular aircraft, and the proof of existence of the full-scale subject is the responsibility of the contestant. Should this be the case, I would recommend that you contact the CD prior to the event to ensure that no challenges will exist on the day of competition. Regardless of the class, though, no minimum size requirement exists.
A few items do exist that you must be aware of regarding the aircraft selection process and how your model is equipped. Looking at the rule book, one propeller per aircraft is allowed and only one engine shall be used, unless the model is powered by an electric propulsion system. In some instances, two motors on a gear-drive system are used for such applications.
In terms of the right aircraft, many pilots have applied their input about which models are competitive. Unfortunately, many are often misled. Some pilots might state that the only competitive models are commonly Extra 300s, Extra 260s, and, for biplanes, the Ultimate. These same individuals might state that other designs are more oriented toward Freestyle competition, but their experience of a particular model might have been because of a poor setup and/or design.
Although I will agree that certain aircraft present better in flight, such as the stretched lines of the Ultimate biplane versus a shorter, coupled model, a few contributing items for whether an aircraft is destined for aerobatic competition include the aircraft design and designer. The general outlines of the model shall approximate the full-scale outlines of the subject aircraft and exact scale is not required. Rather, the model shall be judged for likeness at a distance of approximately 10 feet and, regarding deviations in design, the fuselage width, height, and aircraft planform or any other variations shall not exceed 10% of scale, with the exception of airfoils and the size/shape of the control surface.
Other items that contribute to general flying characteristics include the general build quality and the ability to keep the model lightweight and straight, the electronic and mechanical setup, and how the airplane is outfitted component-wise. In capable hands, I’ve seen many different types of aerobatic designs dominate Scale Aerobatics competition. Many pilots often feel that they might need to change to a different aircraft design to be competitive or select the highest power-to-weight ratio to have a more powerful model. Instead, you should invest in gasoline (or LiPo batteries, if you fly electric), practice, and work to obtain the best possible setup for success.
Installation Practices
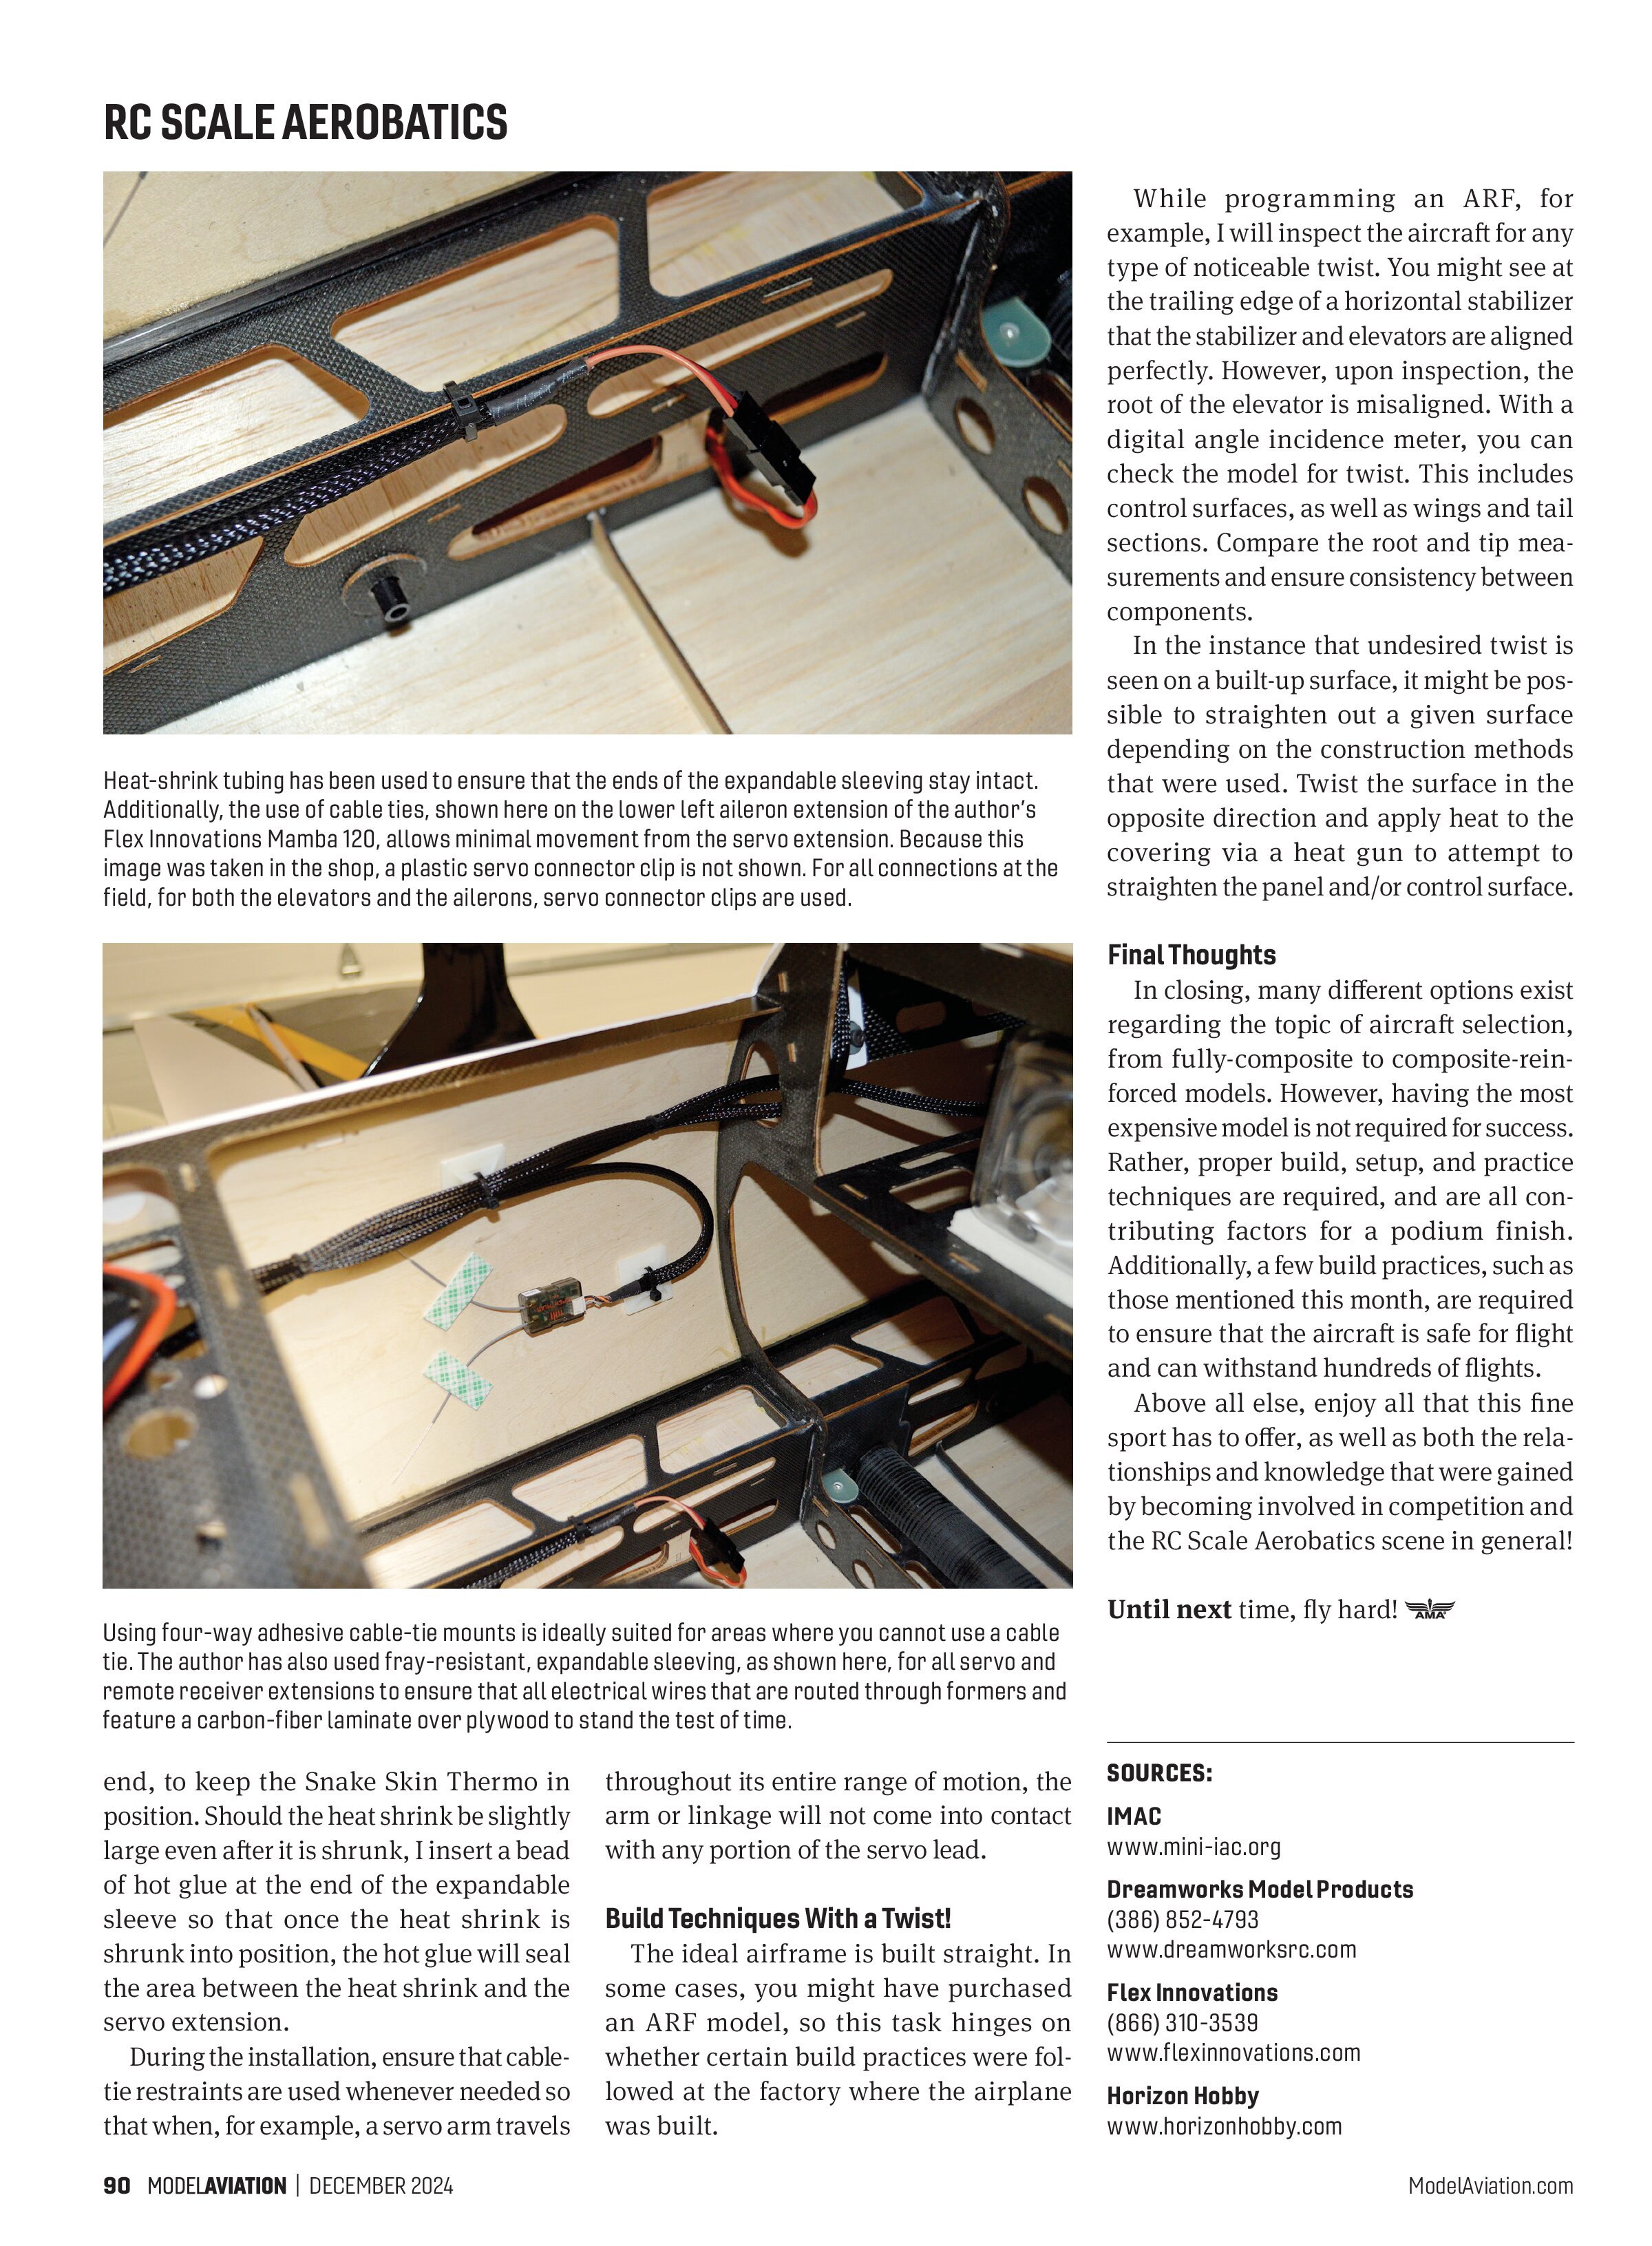
Many modern-day ARF models today feature an internal structure that is fabricated using laminated carbon fiber, fiberglass, plywood, and balsa, which add rigidity to the aircraft while keeping the weight down. In some instances, I have seen corners become frayed, such that sharp edges exist. Over time, these sharp edges could damage extensions or fuel tubing with extensive contact.
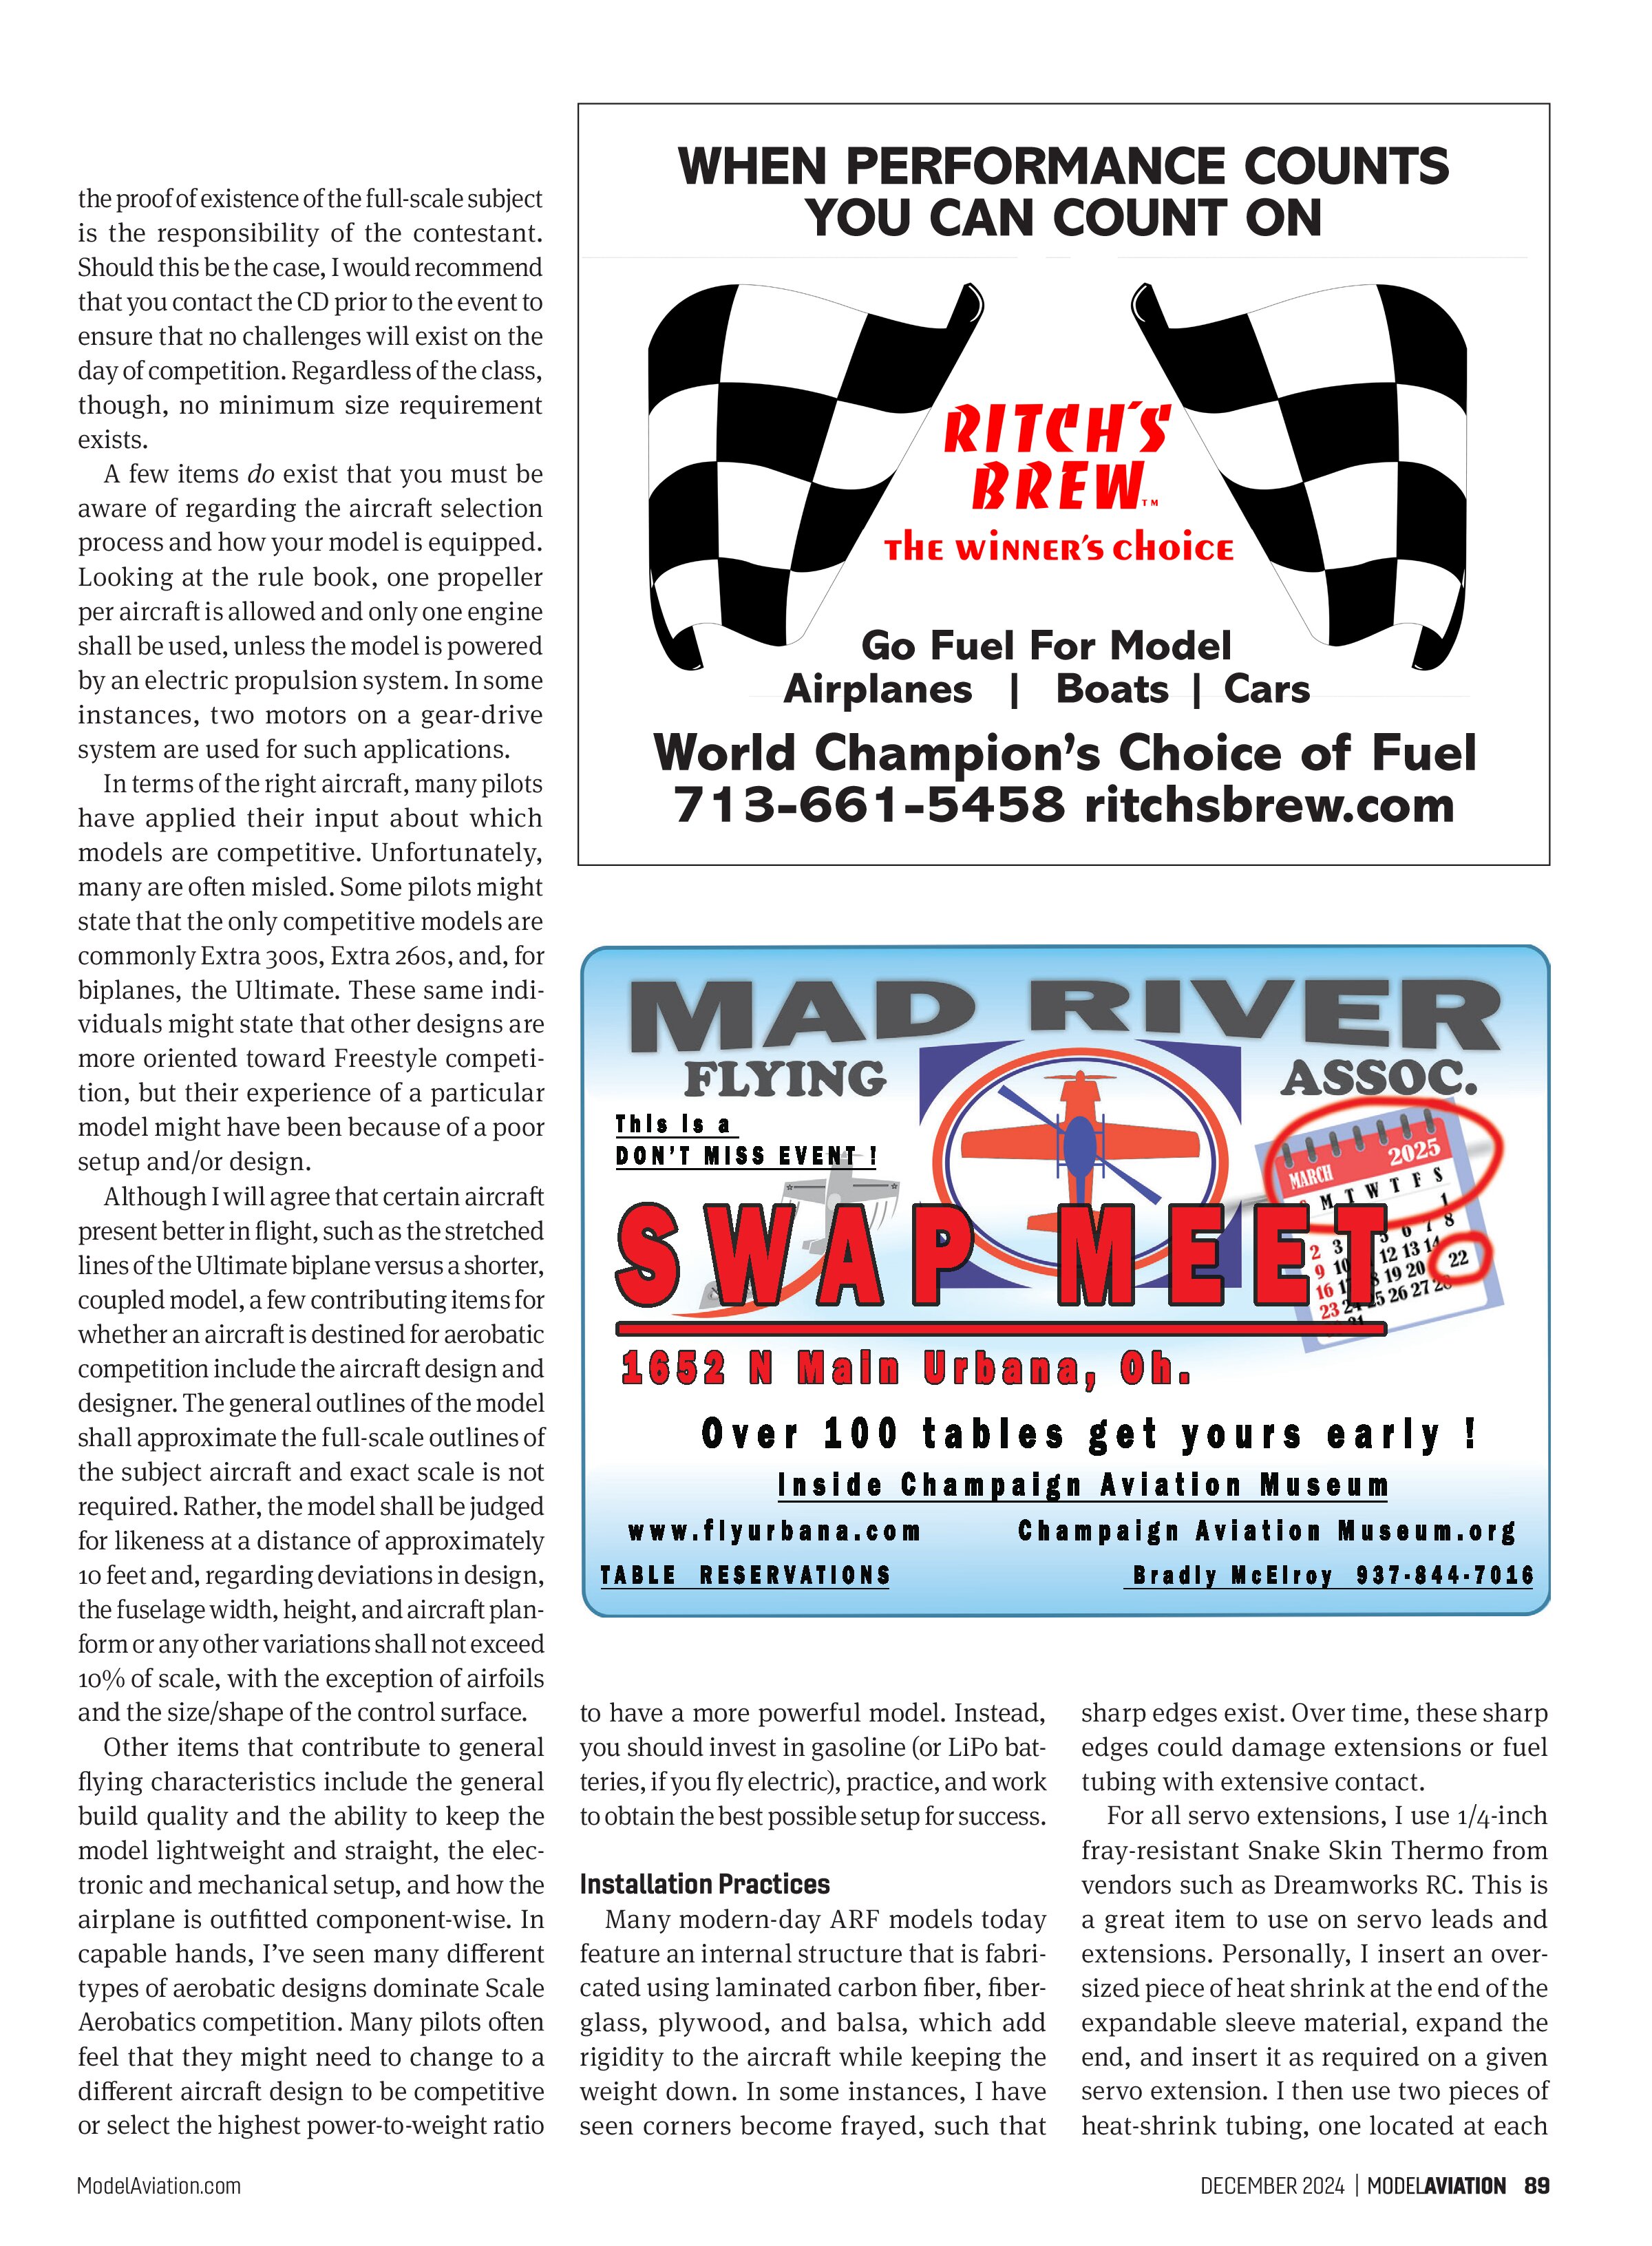
For all servo extensions, I use 1/4-inch fray-resistant Snake Skin Thermo from vendors such as Dreamworks RC. This is a great item to use on servo leads and extensions. Personally, I insert an oversized piece of heat shrink at the end of the expandable sleeve material, expand the end, and insert it as required on a given servo extension. I then use two pieces of heat-shrink tubing, one located at each
While programming an ARF, for example, I will inspect the aircraft for any type of noticeable twist. You might see at the trailing edge of a horizontal stabilizer that the stabilizer and elevators are aligned perfectly. However, upon inspection, the root of the elevator is misaligned. With a digital angle incidence meter, you can check the model for twist. This includes control surfaces, as well as wings and tail sections. Compare the root and tip measurements and ensure consistency between components.
In the instance that undesired twist is seen on a built-up surface, it might be possible to straighten out a given surface depending on the construction methods that were used. Twist the surface in the opposite direction and apply heat to the covering via a heat gun to attempt to straighten the panel and/or control surface.

Heat-shrink tubing has been used to ensure that the ends of the expandable sleeving stay intact. Additionally, the use of cable ties, shown here on the lower left aileron extension of the author’s Flex Innovations Mamba 120, allows minimal movement from the servo extension. Because this image was taken in the shop, a plastic servo connector clip is not shown. For all connections at the field, for both the elevators and the ailerons, servo connector clips are used.

Using four-way adhesive cable-tie mounts is ideally suited for areas where you cannot use a cable tie. The author has also used fray-resistant, expandable sleeving, as shown here, for all servo and remote receiver extensions to ensure that all electrical wires that are routed through formers and feature a carbon-fiber laminate over plywood to stand the test of time.
Final Thoughts
In closing, many different options exist regarding the topic of aircraft selection, from fully-composite to composite-reinforced models. However, having the most expensive model is not required for success. Rather, proper build, setup, and practice techniques are required, and are all contributing factors for a podium finish. Additionally, a few build practices, such as those mentioned this month, are required to ensure that the aircraft is safe for flight and can withstand hundreds of flights.
Above all else, enjoy all that this fine sport has to offer, as well as both the relationships and knowledge that were gained by becoming involved in competition and the RC Scale Aerobatics scene in general!
Until next time, fly hard!
end, to keep the Snake Skin Thermo in position. Should the heat shrink be slightly large even after it is shrunk, I insert a bead of hot glue at the end of the expandable sleeve so that once the heat shrink is shrunk into position, the hot glue will seal the area between the heat shrink and the servo extension.
During the installation, ensure that cable-tie restraints are used whenever needed so that when, for example, a servo arm travels throughout its entire range of motion, the arm or linkage will not come into contact with any portion of the servo lead.
Build Techniques With a Twist!
The ideal airframe is built straight. In some cases, you might have purchased an ARF model, so this task hinges on whether certain build practices were followed at the factory where the airplane was built.
SOURCES:
IMAC
www.mini-iac.org
Dreamworks Model Products
(386) 852-4793
www.dreamworksrc.com
Flex Innovations
(866) 310-3539
www.flexinnovations.com
Horizon Hobby
www.horizonhobby.com