TEAM-BUILDING A NEW MODEL
By Thayer Syme | thayer@flying-models.com

THE DISTRACTIONS of the holidays and a new job have all but stopped my own modeling progress over the last few months, but I’ve still found myself busy in the workshop.
Most recently, I have been enjoying a near-daily correspondence with Marian Buszco, a Florida friend who assures me that our conversations and mutual projects have provided great enjoyment and mental therapy for him throughout the winter.
Marian had purchased a kit for Fred Reese’s Electric Kitten a while back and greatly enjoyed both building and flying that model. Sometime around the first of the year, we got to talking about other Fred Reese designs and he asked if I had any recommendations for another short kit that I might be able to prepare. I mentioned Fred’s Doppelecker, a “cute as a bug” little biplane spanning 32 inches and sporting a Cox TD .09 engine in its nose.
This design captivated my immediate imagination when it was originally published in Radio Control Modeler magazine 45 years ago this month, and it remains on my “to-do” list. No, I’ve never built one of my own, but this seemed like a perfect opportunity to help a friend fulfill my dream by proxy—and maybe even convince me that it is time to build my own.
While clearly inspired by any number of World War I biplanes, this simple model is pure fantasy. Fred designed the quick-building flivver as an alternative to more complex Scale projects, thinking it would prove to be a fun, little knockabout flyer for the coming summer of 1981.
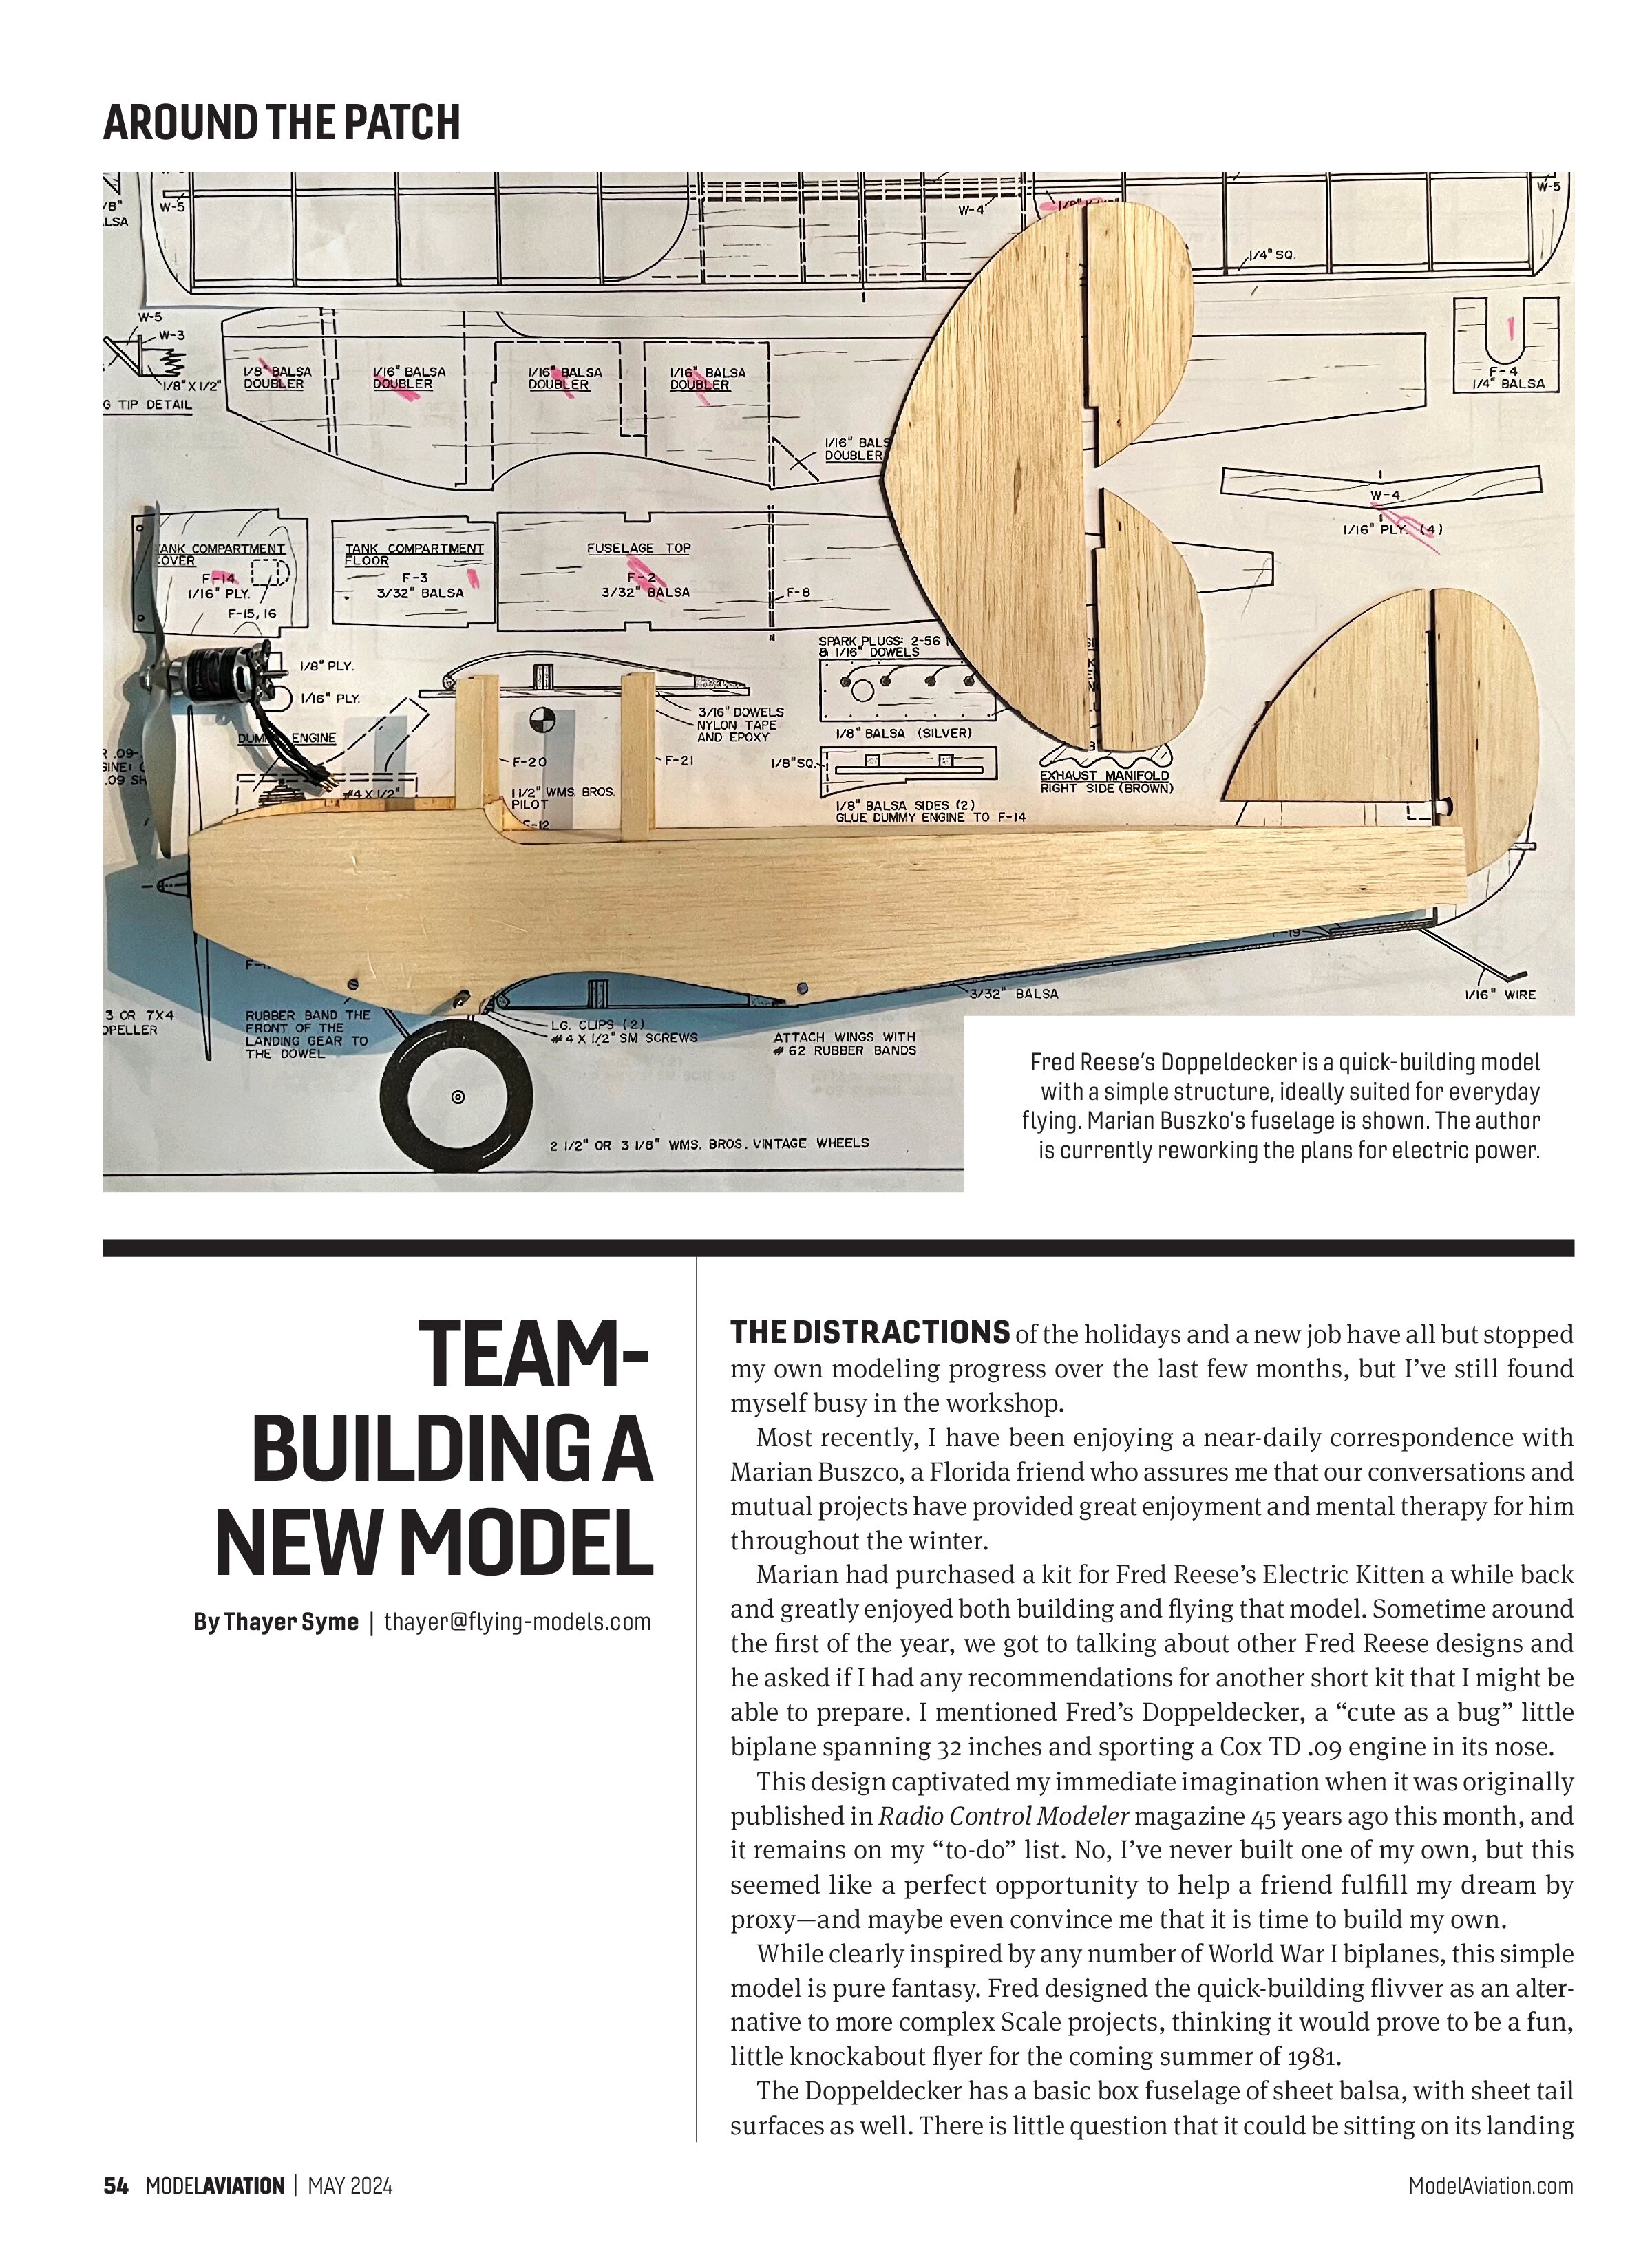
The Doppelecker has a basic box fuselage of sheet balsa, with sheet tail surfaces as well. There is little question that it could be sitting on its landing gear and waiting for some wings after just a few leisurely evenings at the workbench.
It would still make a fun glow model with a small engine and should be an easy electric conversion as well for a variety of power systems in the 150-watt range.
Speaking of wings, they are typical of Fred’s other simple sport designs. The basic aileron-free structures have 6° to 7° of dihedral on each side, and, again, look like a fast build. I’ve given a dihedral range here because the plywood spar joiners and wingtip blocking dimensions don’t seem to agree on where the tips should end up. I doubt most of us could tell the difference in the air though, and I am confident that satisfactory performance would be ensured as long as you get them close. Such disparity isn’t uncommon with hand-drawn plans.
Getting to the point, Marian has just received my first set of laser-cut parts, so we have just the one progress photo to share. The basic structure is readily apparent as his fuselage sits on the plans.
Sorting Out the Power
Choosing an electric power system for a new plans-built project can be confusing.

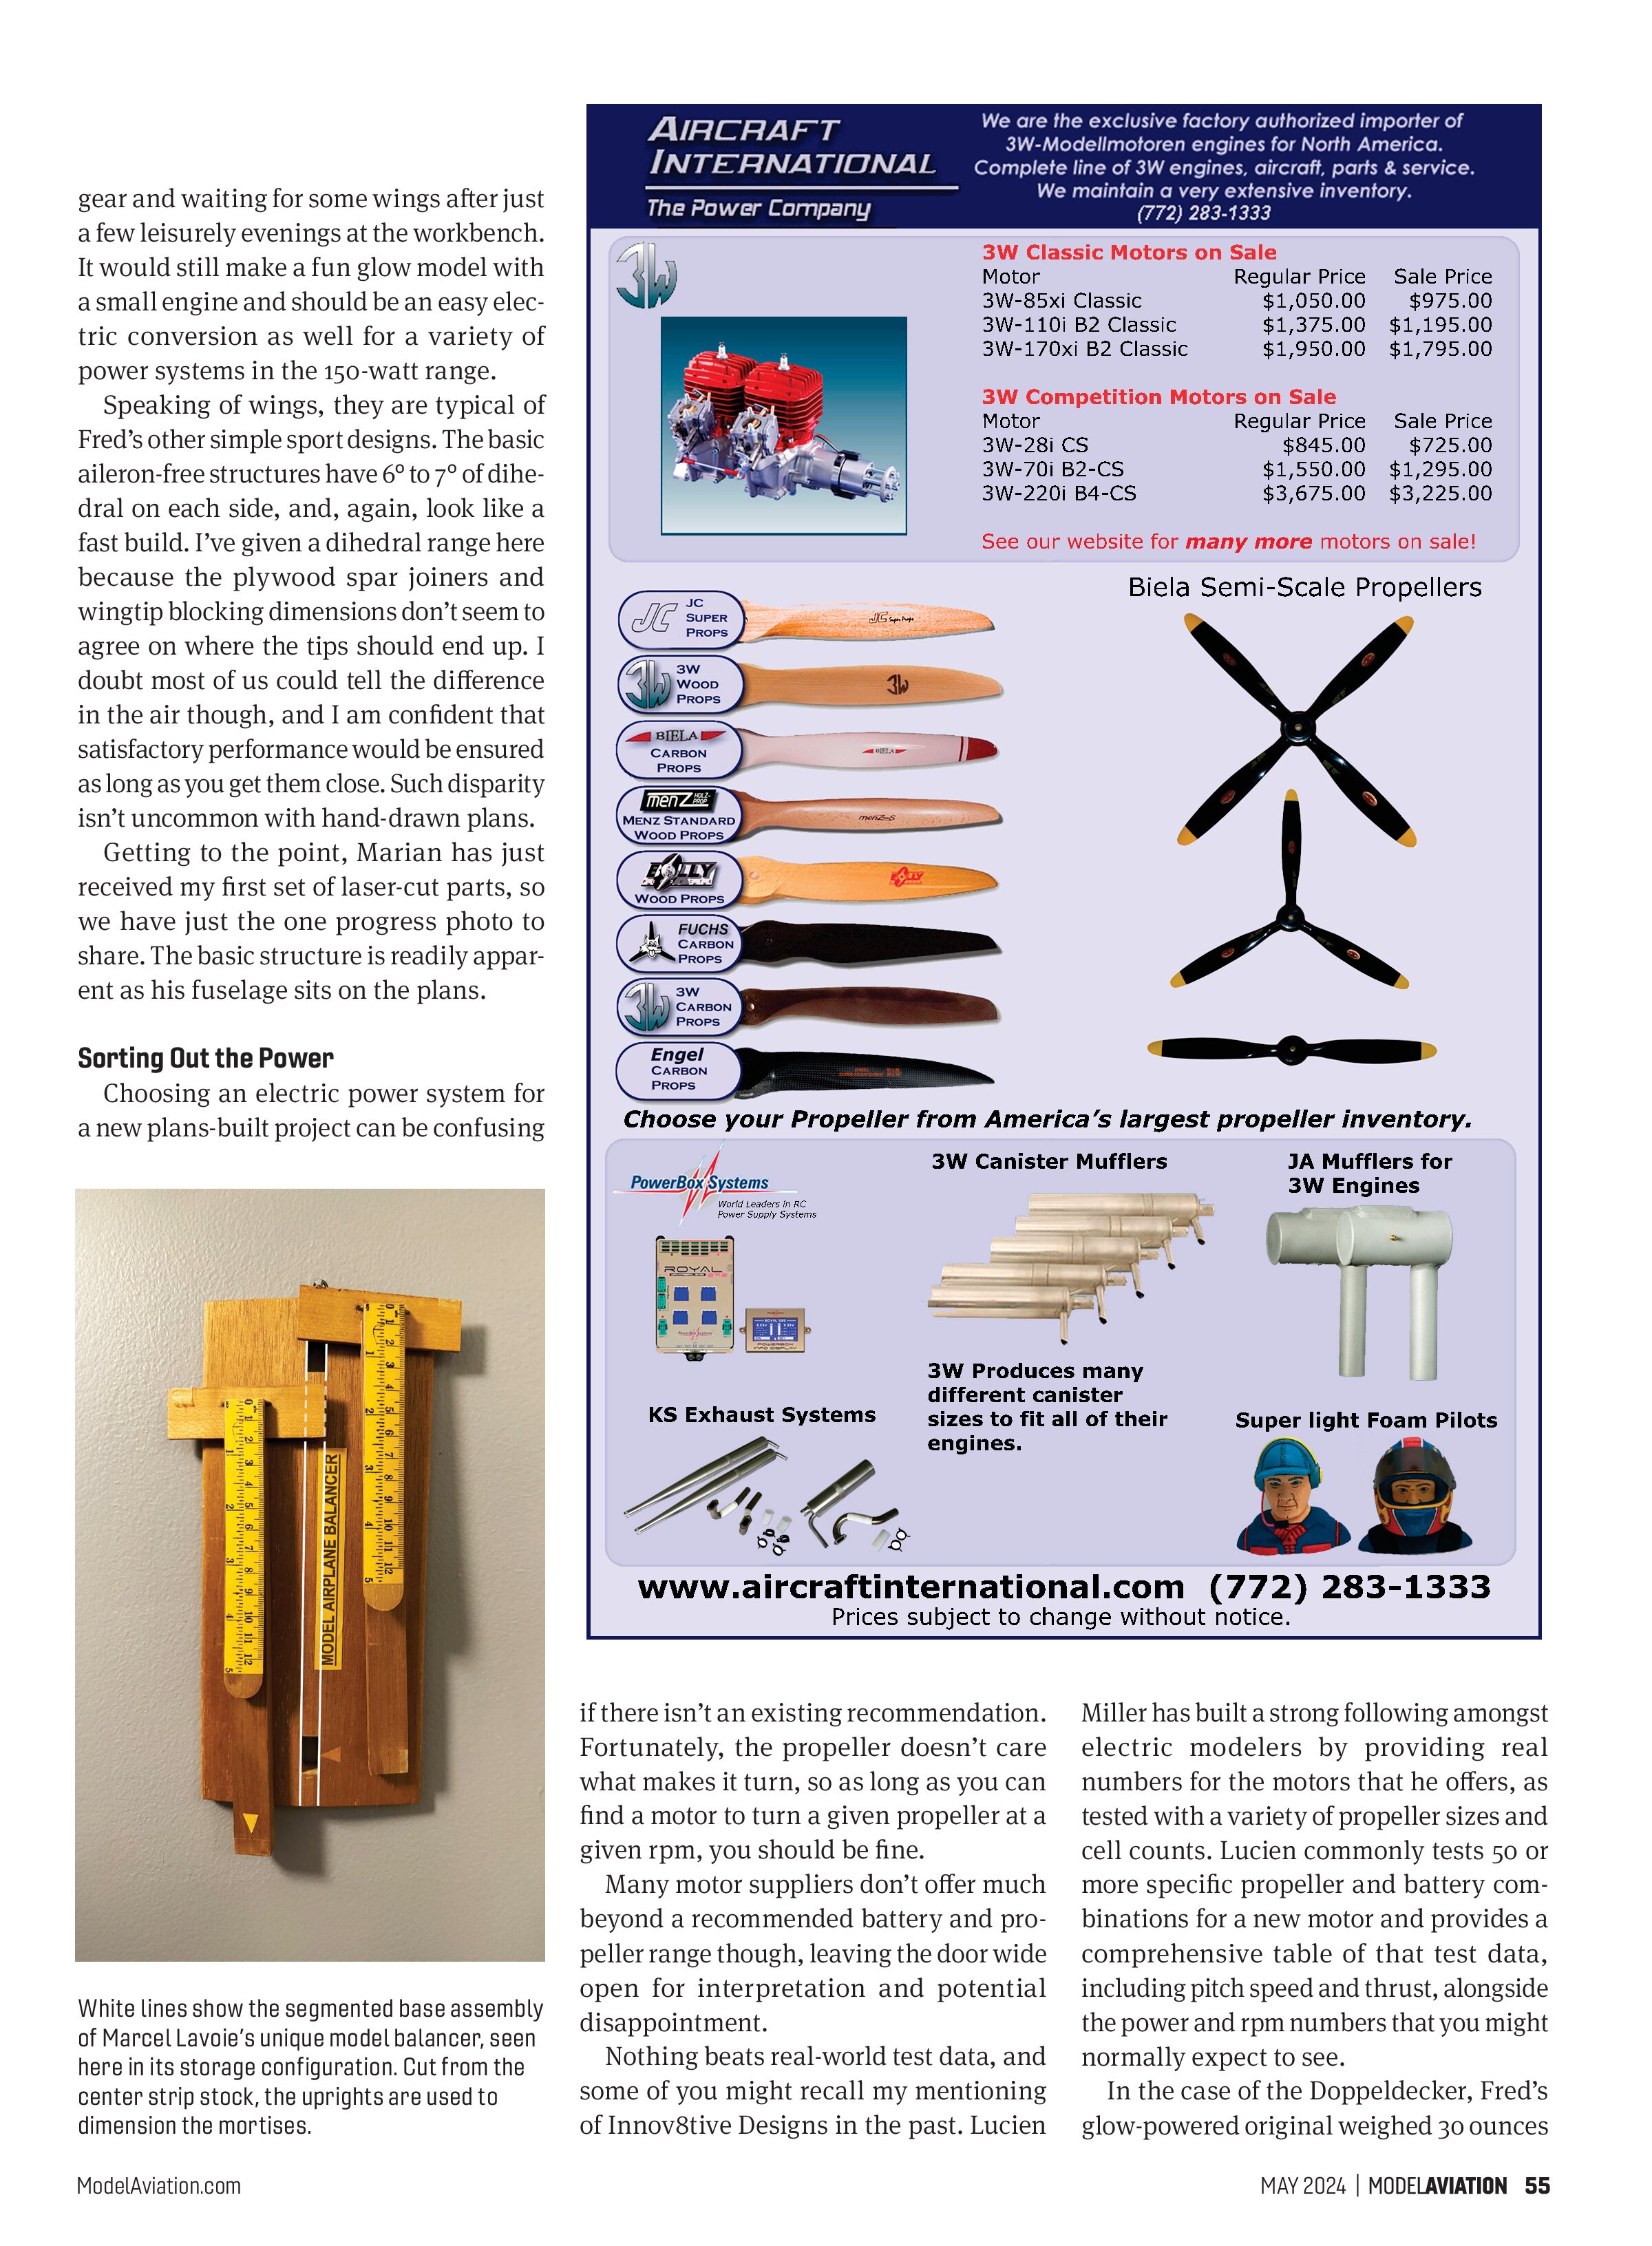
White lines show the segmented base assembly of Marcel Lavoie’s unique model balancer, seen here in its storage configuration. Cut from the center strip stock, the uprights are used to dimension the mortises.
if there isn’t an existing recommendation. Fortunately, the propeller doesn’t care what makes it turn, so as long as you can find a motor to turn a given propeller at a given rpm, you should be fine.
Many motor suppliers don’t offer much beyond a recommended battery and propeller range though, leaving the door wide open for interpretation and potential disappointment.
Nothing beats real-world test data, and some of you might recall my mentioning of Innov8tive Designs in the past. Lucien Miller has built a strong following amongst electric modelers by providing real numbers for the motors that he offers, as tested with a variety of propeller sizes and cell counts. Lucien commonly tests 50 or more specific propeller and battery combinations for a new motor and provides a comprehensive table of that test data, including pitch speed and thrust, alongside the power and rpm numbers that you might normally expect to see.
In the case of the Doppelecker, Fred’s glow-powered original weighed 30 ounces

and flew with a 7 x 3 or 7 x 4 propeller. There is plenty of clearance for an 8-inch propeller, and some might even push that to 9 inches.
Now all we need is a motor/battery/propeller combo that offers enough thrust and pitch speed for a biplane in the 2-pound range, or perhaps a little lighter.
A few minutes looking at the Innov8tive power charts shows that the Cobra 2213/18 motor will turn an APC 8 x 4E propeller on 3S at 11,400 rpm, providing 29 ounces of thrust with a pitch speed of 43 mph at 167 watts. That would be just under 100 watts per pound and sounds to me like a winning combination for cruising about with a small vintage-style biplane. A bit more speed can be had by dropping down to a 7 x 6 propeller if you want, at the expense of a bit of low-speed thrust.
Similar numbers are also shown for the BadAss 2310-1220 and Tempest 2808/1360 motors, as well as a few others on the Innov8tive website. I don’t know of any other motor supplier that offers such comprehensive data and makes it oh-so easy to select a power setup for a new project. I’ve bought close to 20 power systems from Lucien at this point, and all have worked out well.
Maintaining Balance
I’ve got one last tidbit to share this month, for those who are looking to ensure the best chance of a successful first flight.
Canadian modeler Marcel Lavoie was perhaps best known for his Lavoie Method of efficiently marking and cutting framing stock for stick-built models, and he had a few other tricks up his sleeve as well. While mourning his recent passing, his family offered me a couple of small boxes from his shop, which I feel honored to have received.
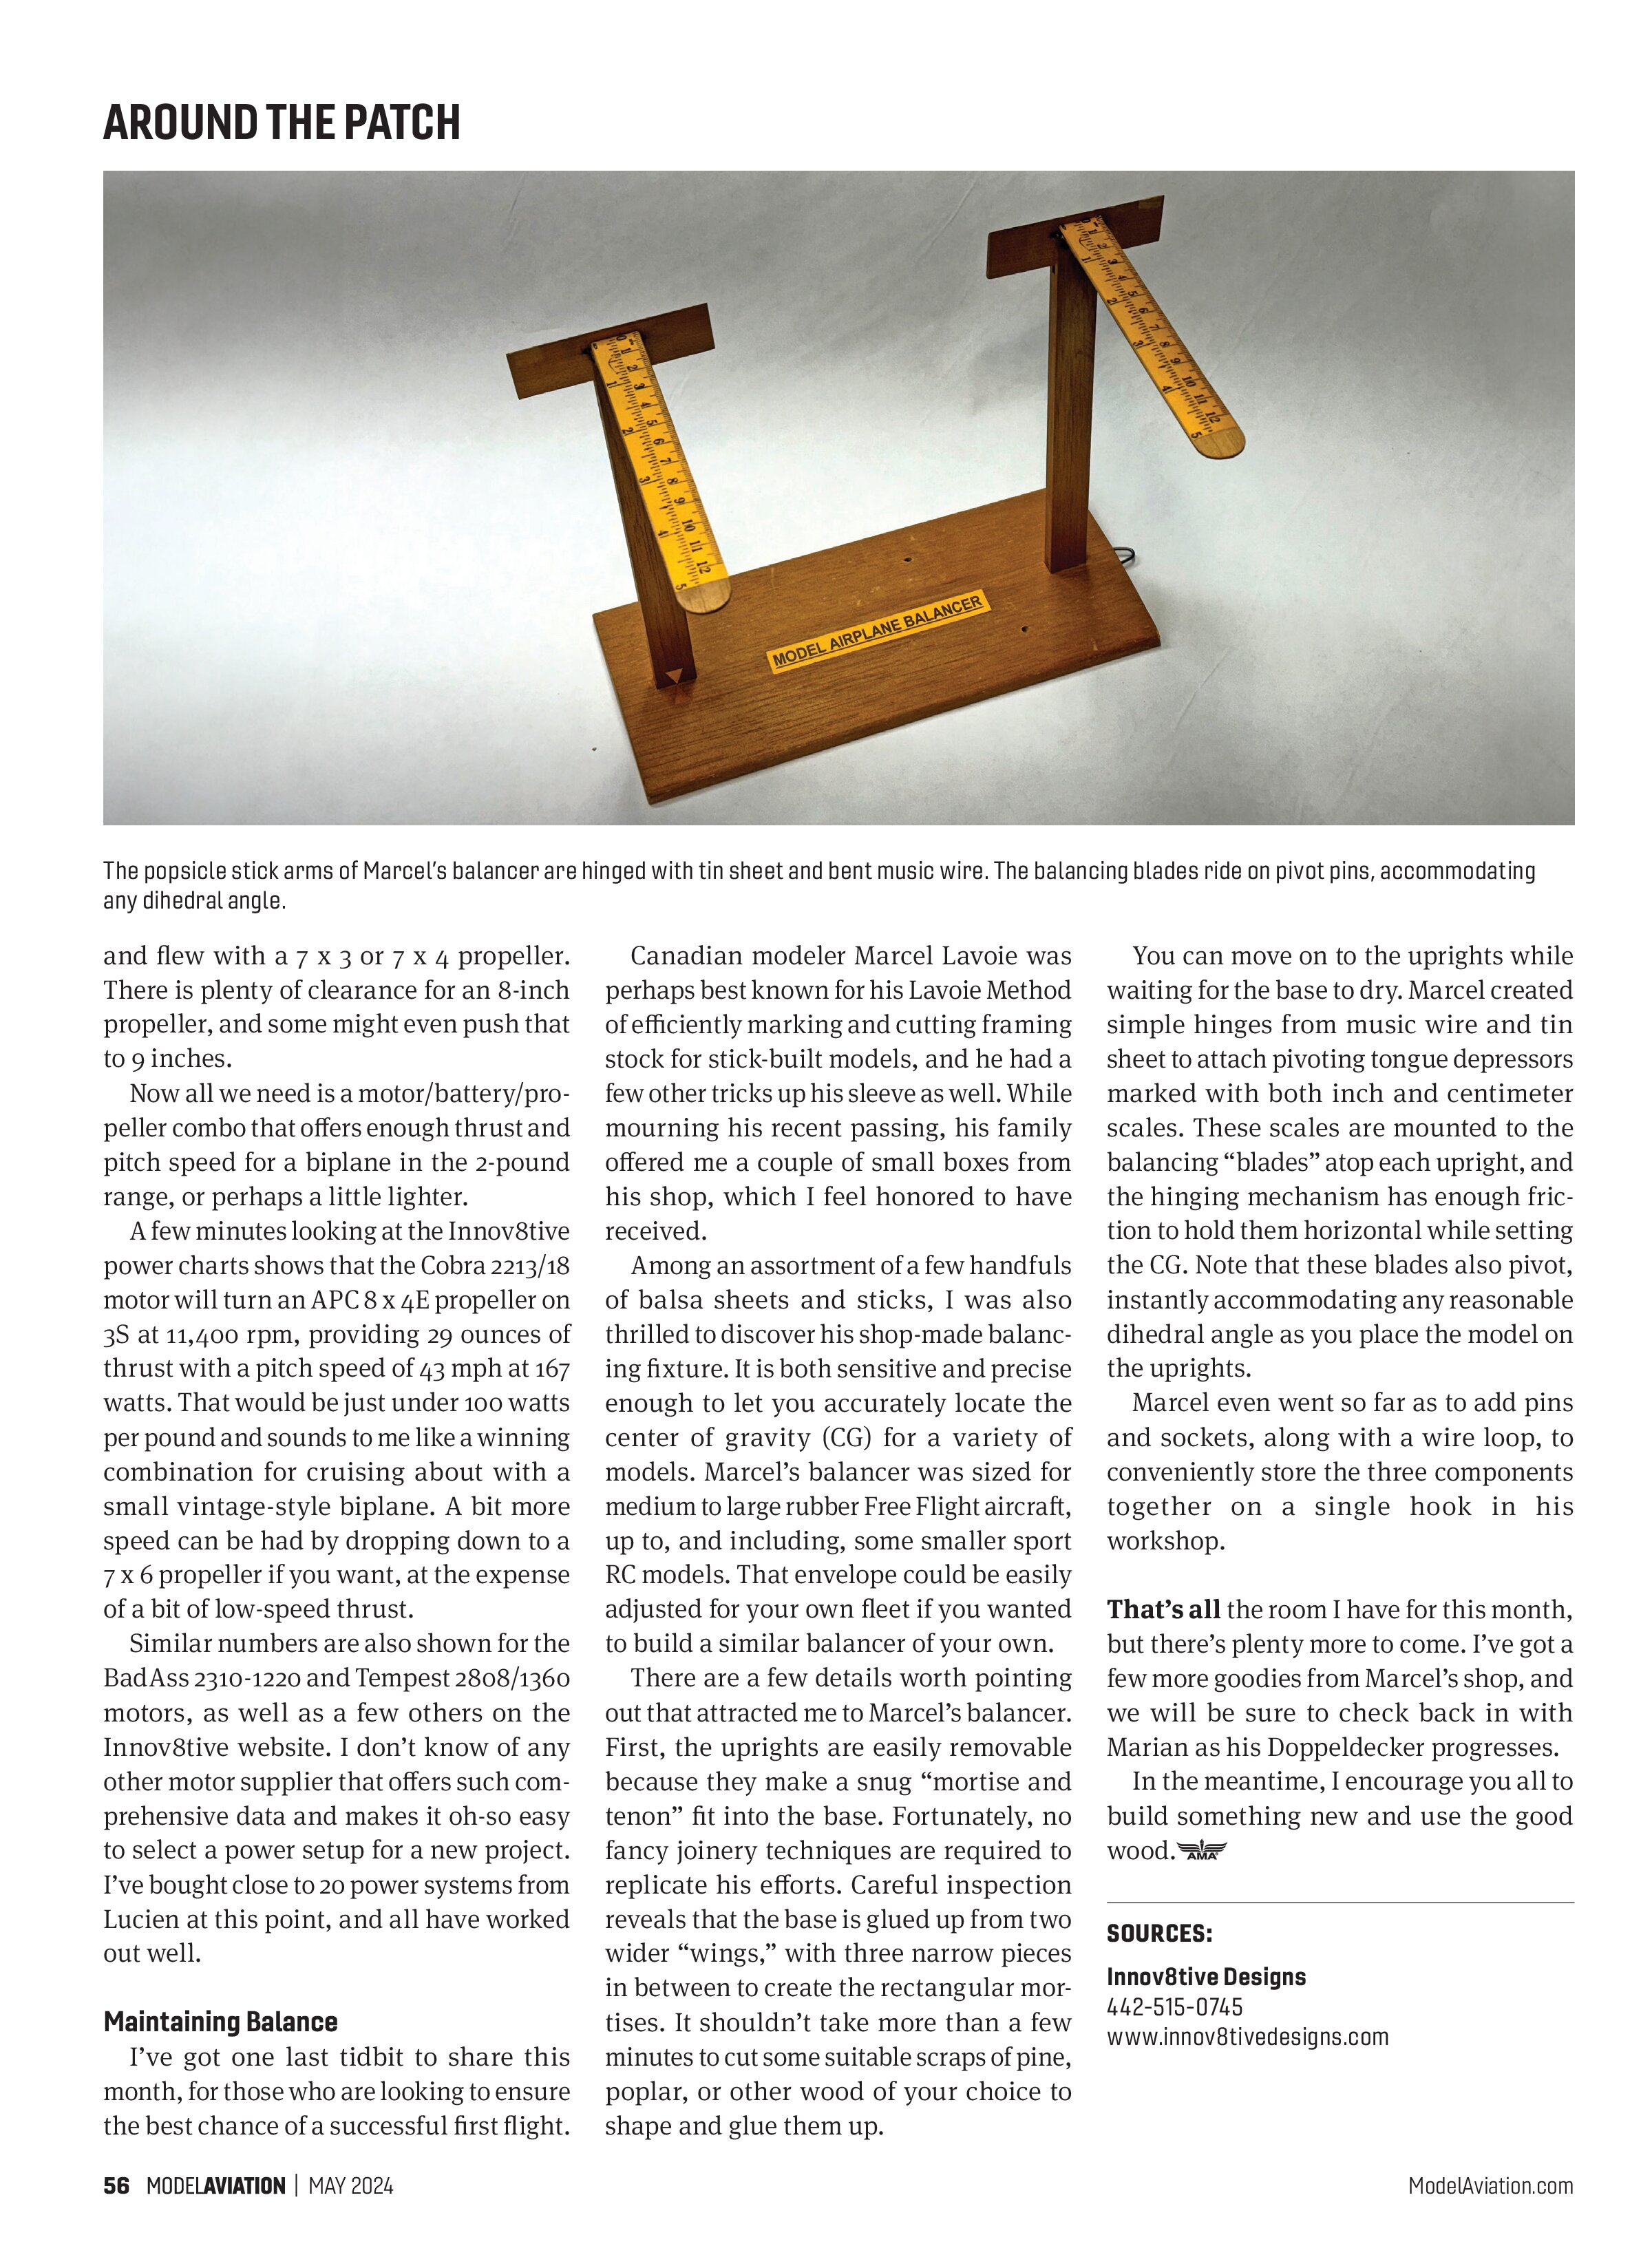
Among an assortment of a few handfuls of balsa sheets and sticks, I was also thrilled to discover his shop-made balancing fixture. It is both sensitive and precise enough to let you accurately locate the center of gravity (CG) for a variety of models. Marcel’s balancer was sized for medium to large rubber Free Flight aircraft, up to, and including, some smaller sport RC models. That envelope could be easily adjusted for your own fleet if you wanted to build a similar balancer of your own.
There are a few details worth pointing out that attracted me to Marcel’s balancer. First, the uprights are easily removable because they make a snug “mortise and tenon” fit into the base. Fortunately, no fancy joinery techniques are required to replicate his efforts. Careful inspection reveals that the base is glued up from two wider “wings,” with three narrow pieces in between to create the rectangular mortises. It shouldn’t take more than a few minutes to cut some suitable scraps of pine, poplar, or other wood of your choice to shape and glue them up.
You can move on to the uprights while waiting for the base to dry. Marcel created simple hinges from music wire and tin sheet to attach pivoting tongue depressors marked with both inch and centimeter scales. These scales are mounted to the balancing “blades” atop each upright, and the hinging mechanism has enough friction to hold them horizontal while setting the CG. Note that these blades also pivot, instantly accommodating any reasonable dihedral angle as you place the model on the uprights.
Marcel even went so far as to add pins and sockets, along with a wire loop, to conveniently store the three components together on a single hook in his workshop.
That’s all the room I have for this month, but there’s plenty more to come. I’ve got a few more goodies from Marcel’s shop, and we will be sure to check back in with Marian as his Doppeldecker progresses. In the meantime, I encourage you all to build something new and use the good wood.
SOURCES:
Innov8tive Designs
442-515-0745
www.innov8tivedesigns.com