DICK RUSS MODELS 1/2A STREAKER
Transform a box of balsa into a spiffy little sport flyer
By Jon Barnes | barnesjonr@yahoo.com
Photos by the author

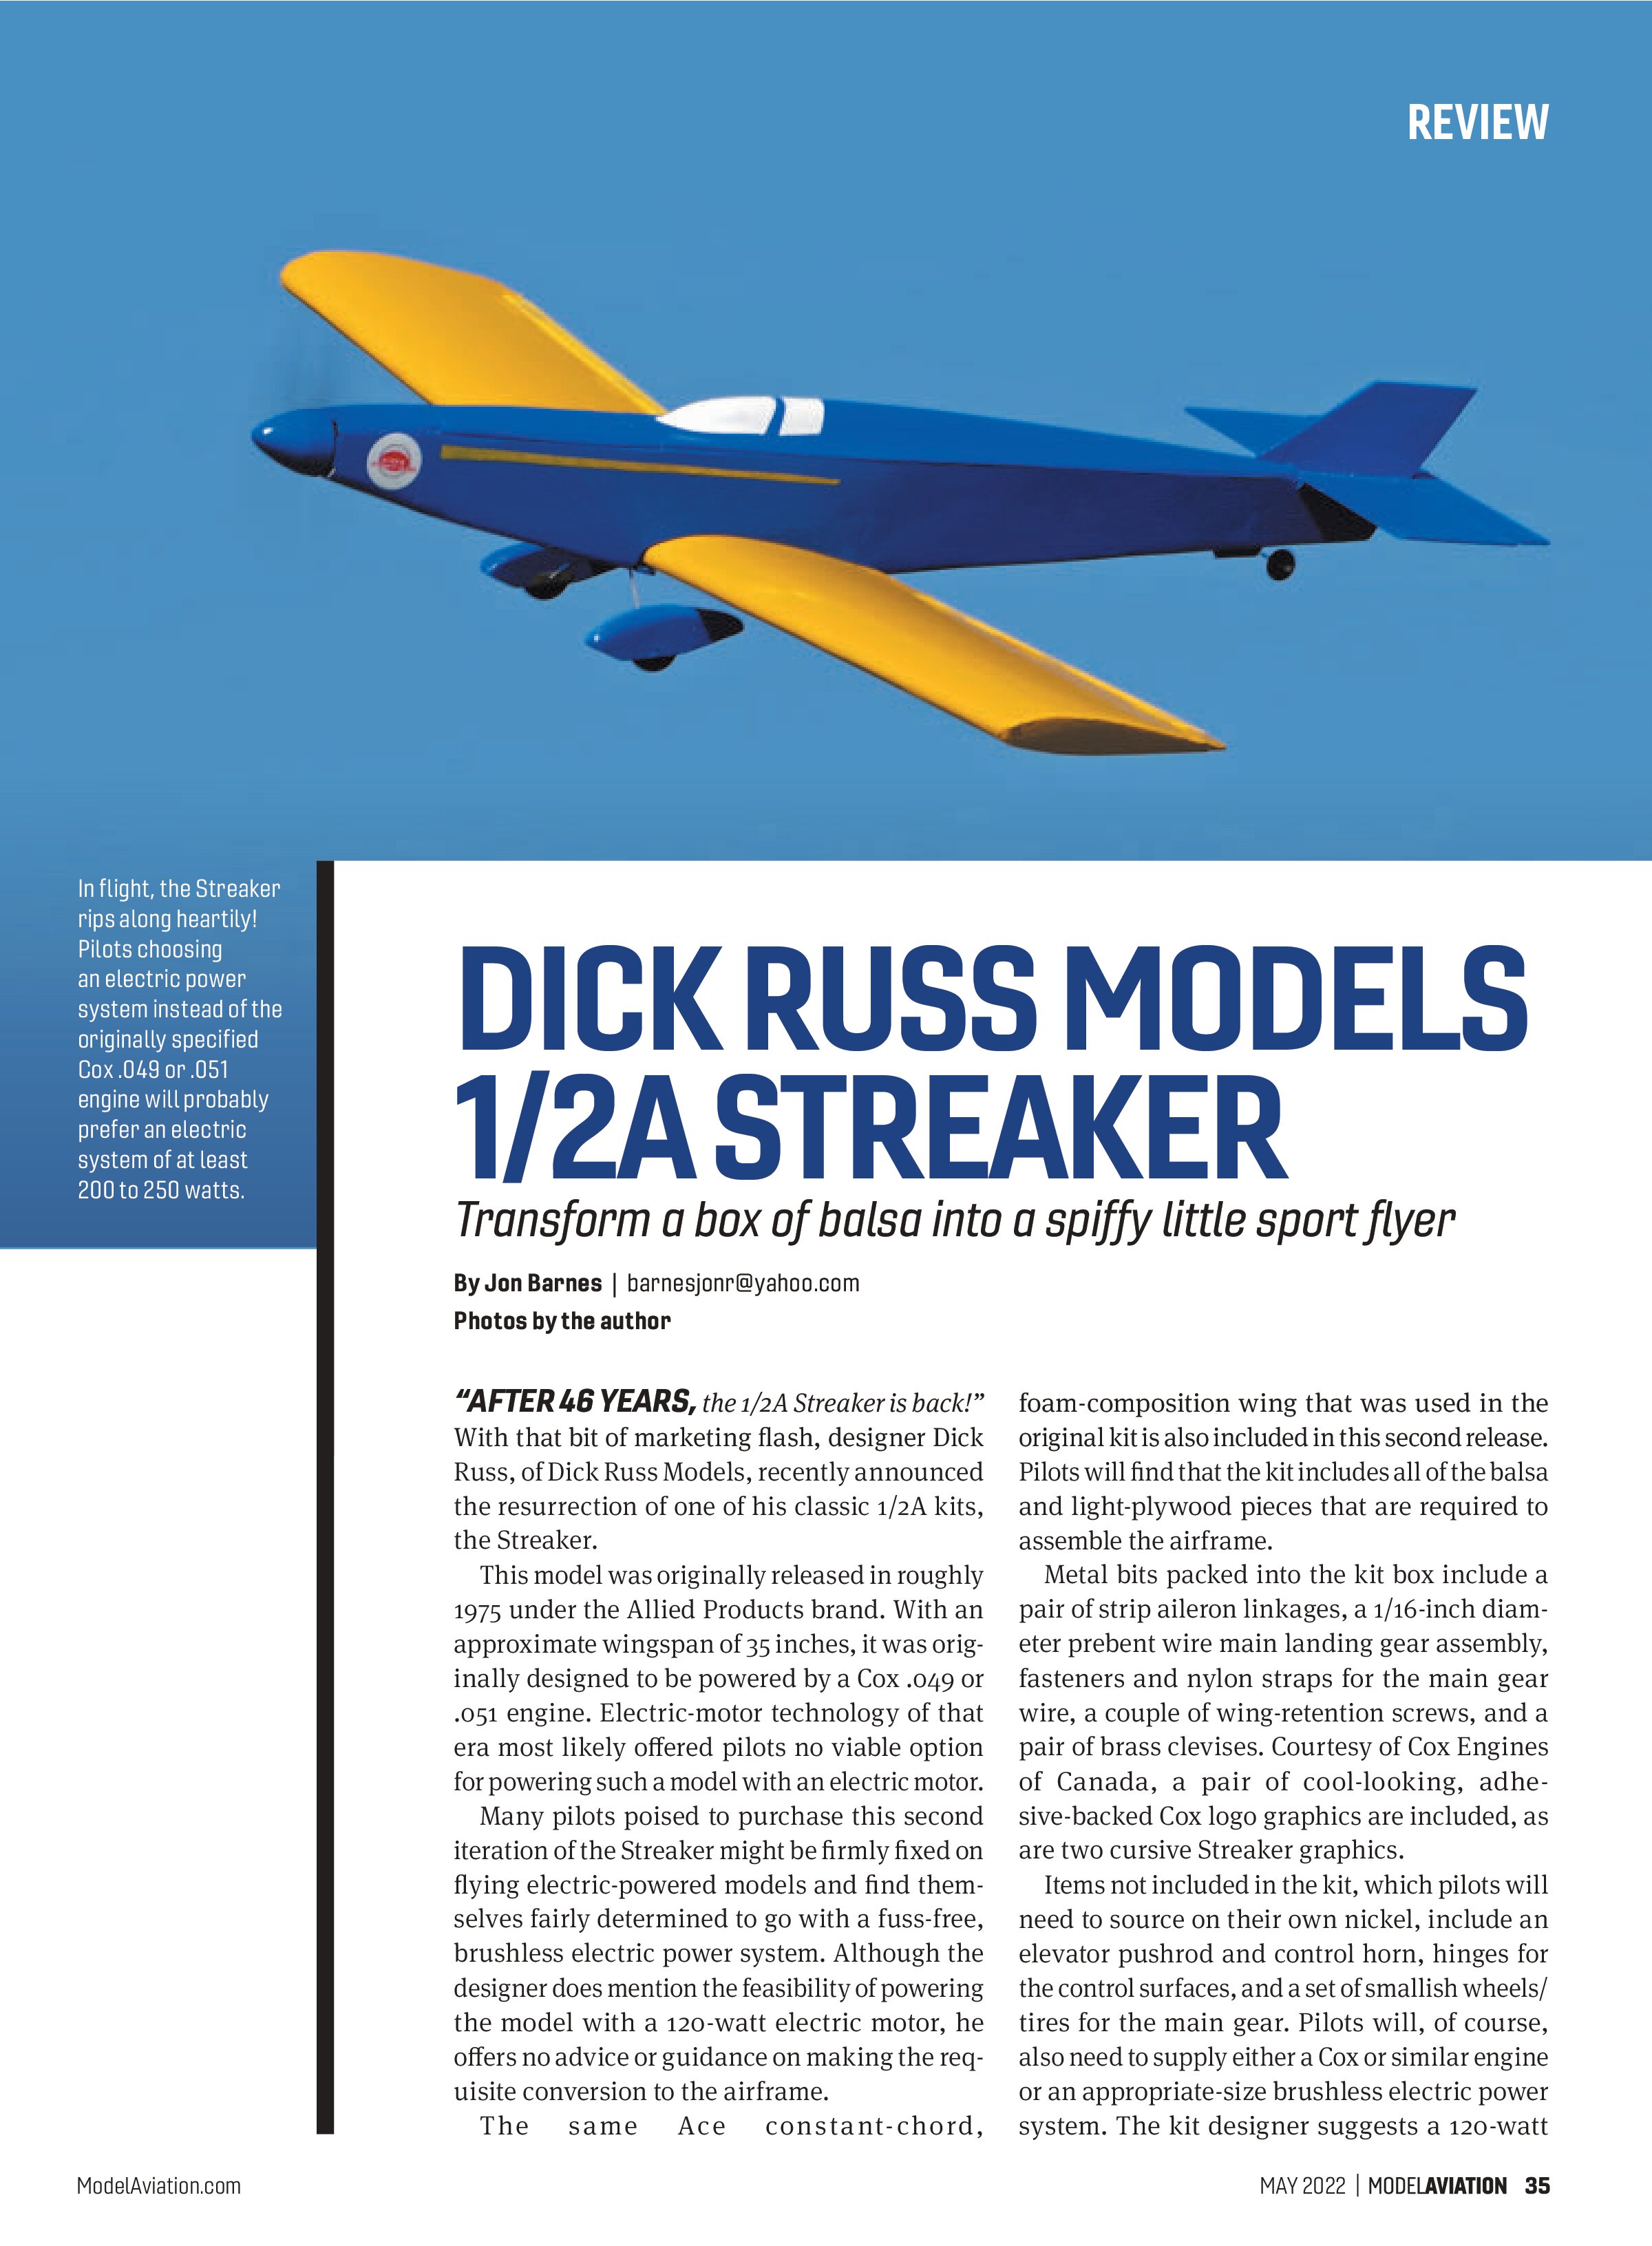
“AFTER 46 YEARS, the 1/2A Streaker is back!” With that bit of marketing flash, designer Dick Russ, of Dick Russ Models, recently announced the resurrection of one of his classic 1/2A kits, the Streaker.
This model was originally released in roughly 1975 under the Allied Products brand. With an approximate wingspan of 35 inches, it was originally designed to be powered by a Cox .049 or .051 engine. Electric-motor technology of that era most likely offered pilots no viable option for powering such a model with an electric motor.
Many pilots poised to purchase this second iteration of the Streaker might be firmly fixed on flying electric-powered models and find themselves fairly determined to go with a fuss-free, brushless electric power system. Although the designer does mention the feasibility of powering the model with a 120-watt electric motor, he offers no advice or guidance on making the requisite conversion to the airframe.
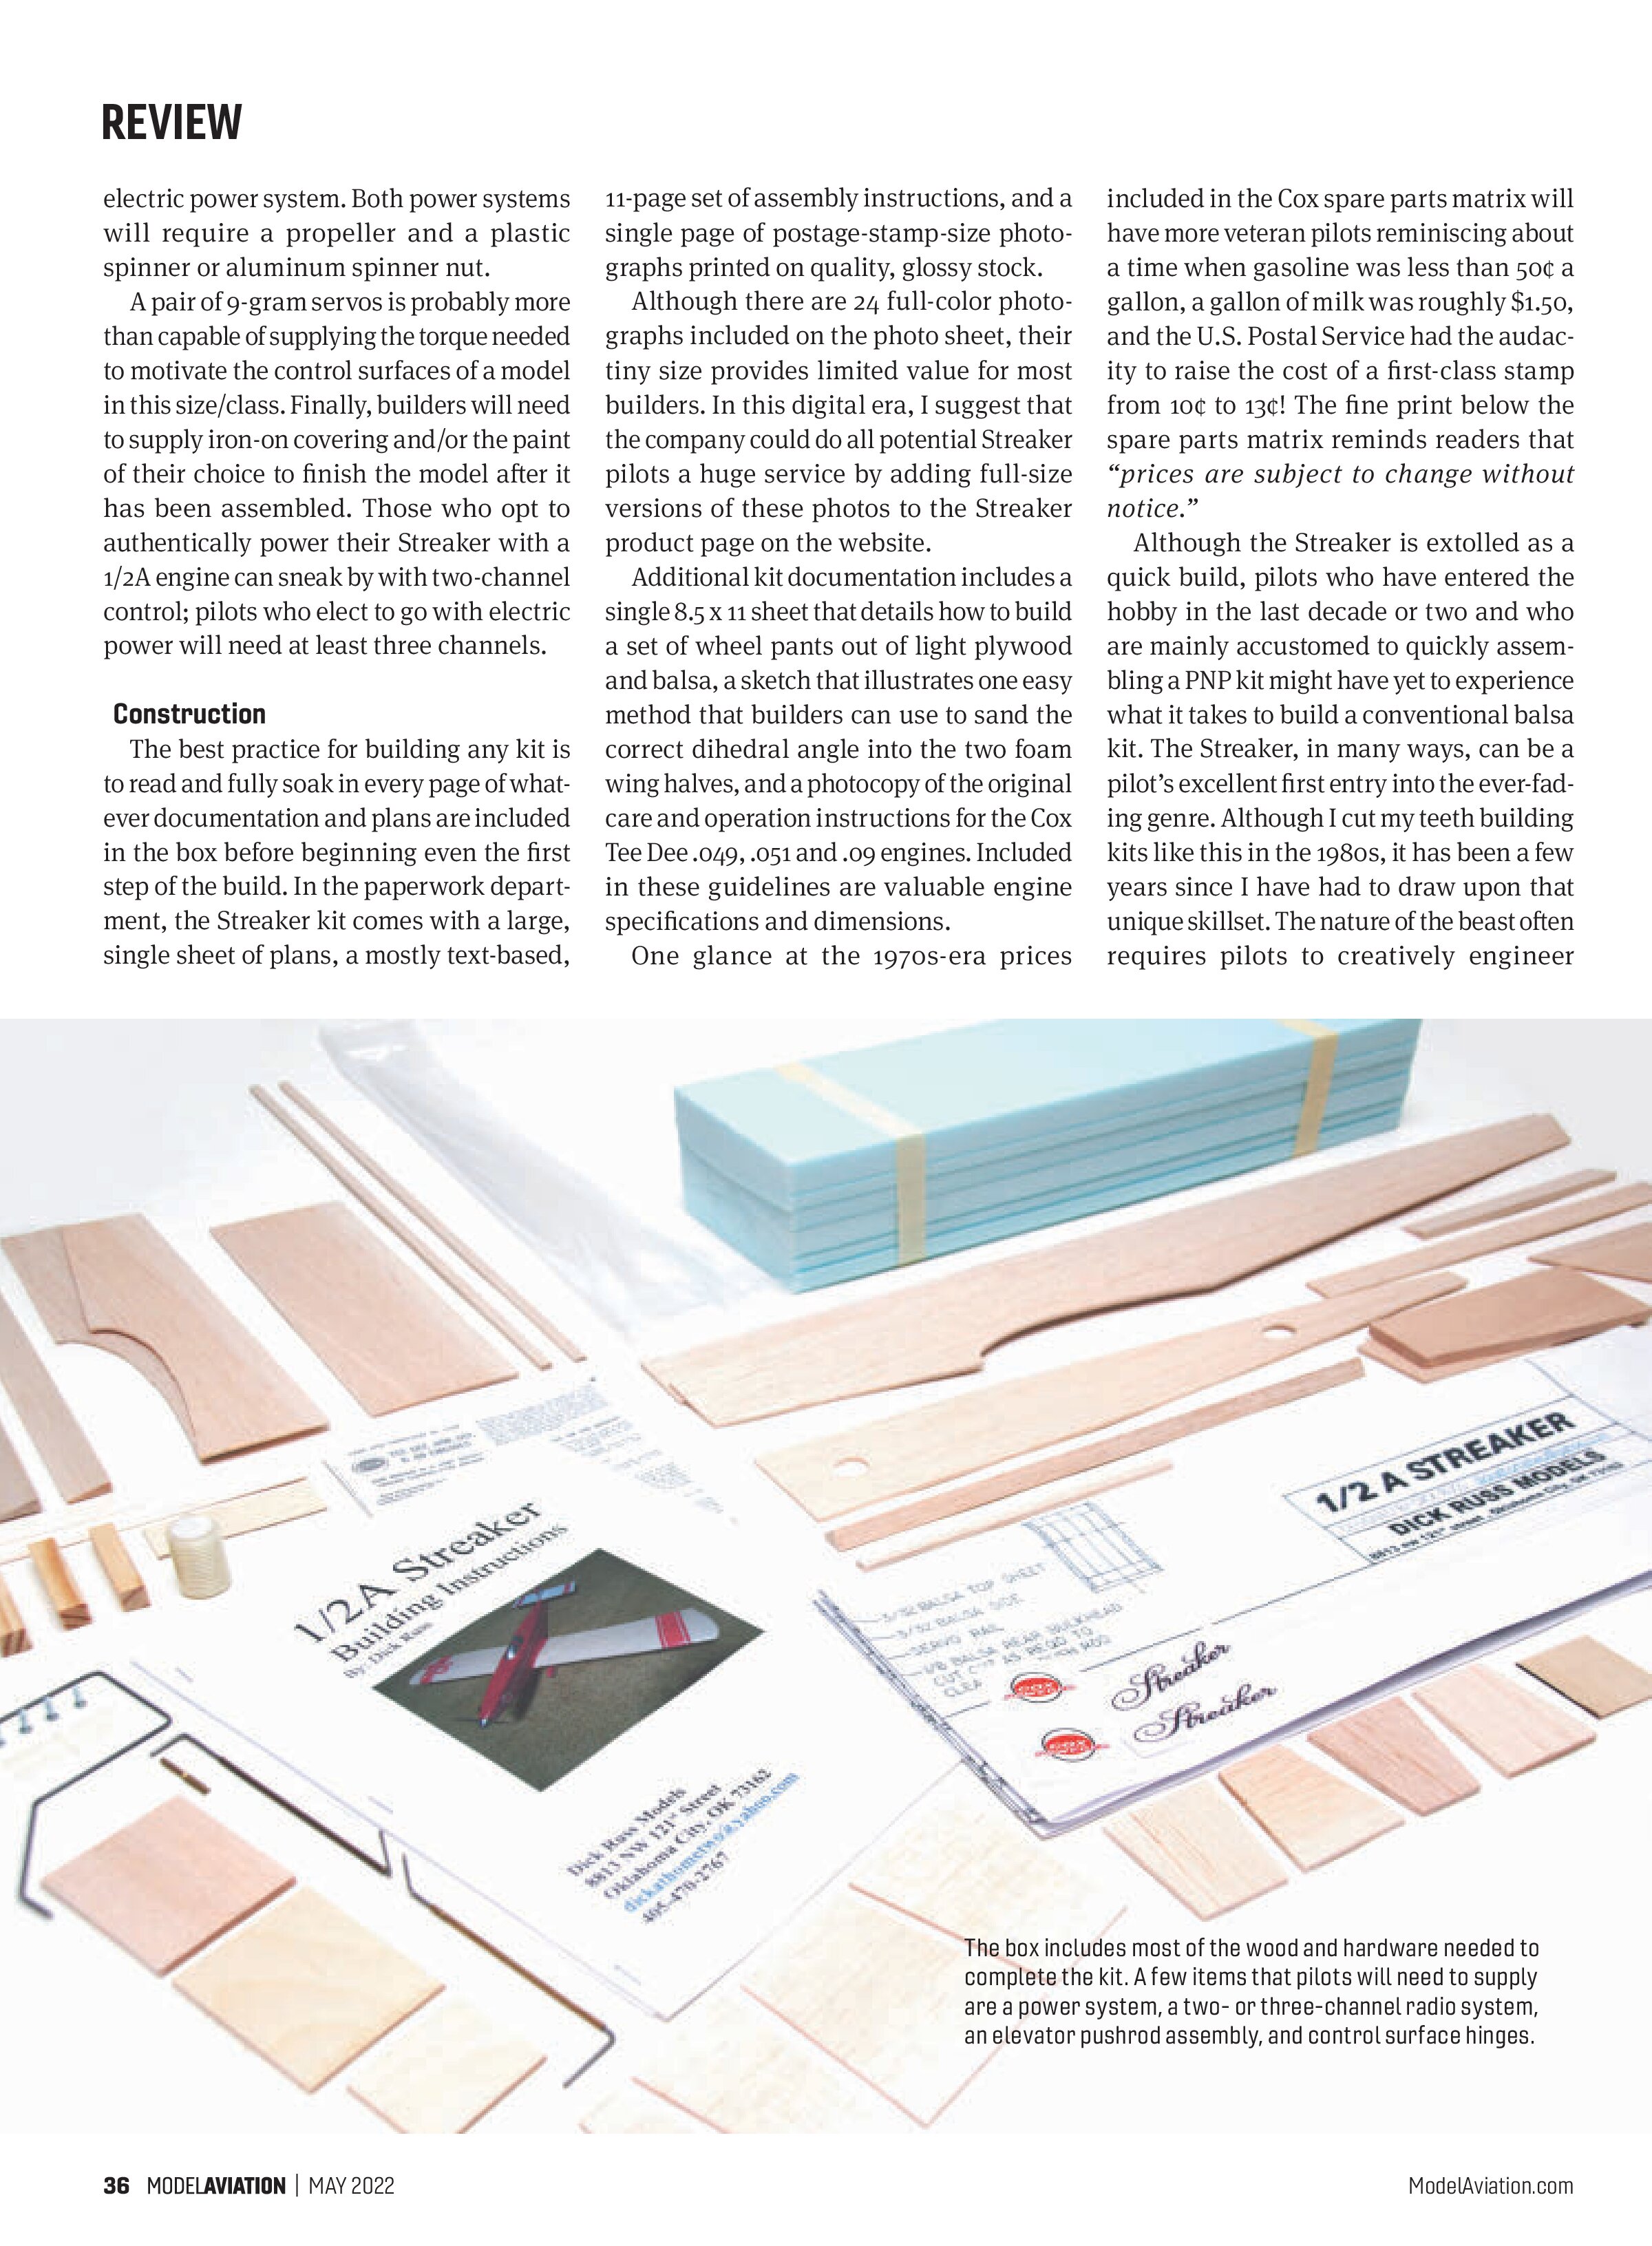
The same Ace constant-chord, foam-composition wing that was used in the original kit is also included in this second release. Pilots will find that the kit includes all of the balsa and light-plywood pieces that are required to assemble the airframe.
Metal bits packed into the kit box include a pair of strip aileron linkages, a 1/16-inch diameter prebent wire main landing gear assembly, fasteners and nylon straps for the main gear wire, a couple of wing-retention screws, and a pair of brass clevises. Courtesy of Cox Engines of Canada, a pair of cool-looking, adhesive-backed Cox logo graphics are included, as are two cursive Streaker graphics.
Items not included in the kit, which pilots will need to source on their own nickel, include an elevator pushrod and control horn, hinges for the control surfaces, and a set of smallish wheels/tires for the main gear. Pilots will, of course, also need to supply either a Cox or similar engine or an appropriate-size brushless electric power system. The kit designer suggests a 120-watt
electric power system. Both power systems will require a propeller and a plastic spinner or aluminum spinner nut.
A pair of 9-gram servos is probably more than capable of supplying the torque needed to motivate the control surfaces of a model in this size/class. Finally, builders will need to supply iron-on covering and/or the paint of their choice to finish the model after it has been assembled. Those who opt to authentically power their Streaker with a 1/2A engine can sneak by with two-channel control; pilots who elect to go with electric power will need at least three channels.
Construction
The best practice for building any kit is to read and fully soak in every page of whatever documentation and plans are included in the box before beginning even the first step of the build. In the paperwork department, the Streaker kit comes with a large, single sheet of plans, a mostly text-based,
11-page set of assembly instructions, and a single page of postage-stamp-size photographs printed on quality, glossy stock. Although there are 24 full-color photographs included on the photo sheet, their tiny size provides limited value for most builders. In this digital era, I suggest that the company could do all potential Streaker pilots a huge service by adding full-size versions of these photos to the Streaker product page on the website.
Additional kit documentation includes a single 8.5 x 11 sheet that details how to build a set of wheel pants out of light plywood and balsa, a sketch that illustrates one easy method that builders can use to sand the correct dihedral angle into the two foam wing halves, and a photocopy of the original care and operation instructions for the Cox Tee Dee .049, .051 and .09 engines. Included in these guidelines are valuable engine specifications and dimensions.
One glance at the 1970s-era prices included in the Cox spare parts matrix will have more veteran pilots reminiscing about a time when gasoline was less than 50¢ a gallon, a gallon of milk was roughly $1.50, and the U.S. Postal Service had the audacity to raise the cost of a first-class stamp from 10¢ to 13¢! The fine print below the spare parts matrix reminds readers that “prices are subject to change without notice.”
Although the Streaker is extolled as a quick build, pilots who have entered the hobby in the last decade or two and who are mainly accustomed to quickly assembling a PNP kit might have yet to experience what it takes to build a conventional balsa kit. The Streaker, in many ways, can be a pilot’s excellent first entry into the ever-fading genre. Although I cut my teeth building kits like this in the 1980s, it has been a few years since I have had to draw upon that unique skillset. The nature of the beast often requires pilots to creatively engineer

solutions and fill in any blanks that could exist in the plans and instructions.
Converting the Streaker to utilize a brushless electric power system is not rocket science, but it will require that a pilot’s gray matter be firing on all eight cylinders. The following errata, extracted from my mental build notes, might offer other pilots who plan to go with an electric power system valuable insight and help them more efficiently work their way through the Streaker’s assembly.
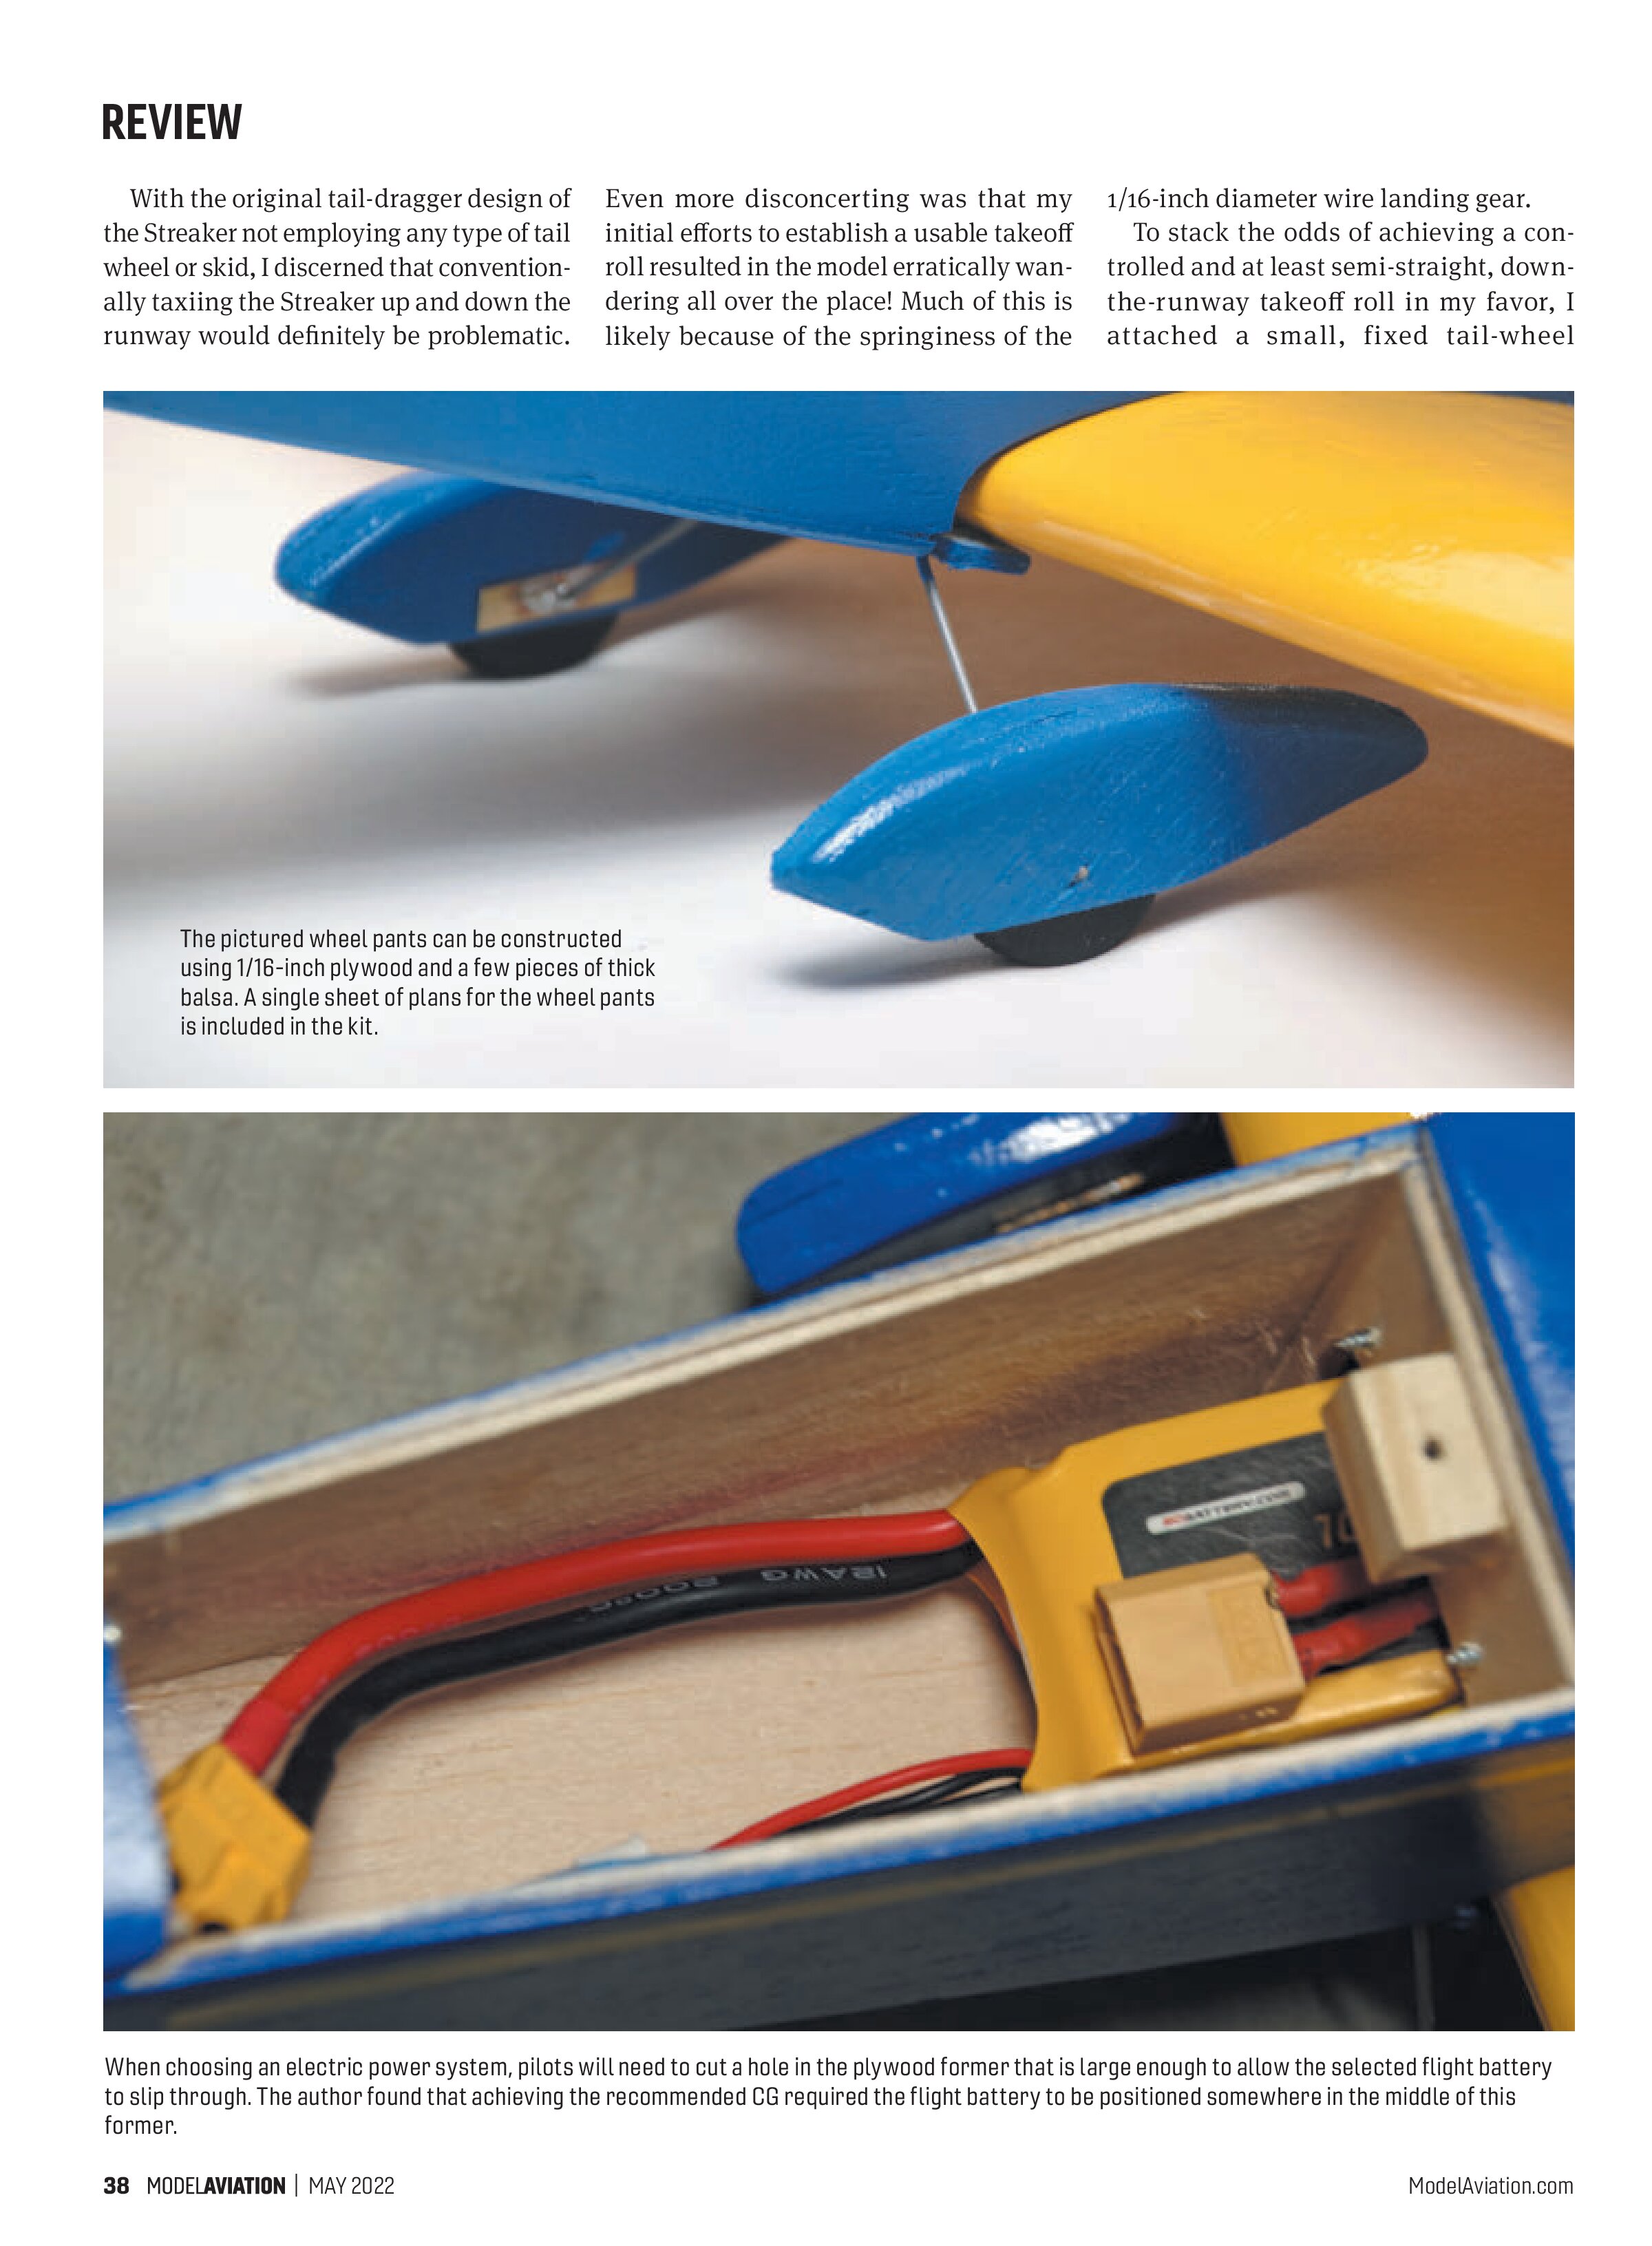
Electric fliers will most likely need to cut an opening into the forward plywood former (located at the leading edge [LE] of the wing saddle) in preparation for being able to properly position the flight battery fore and aft in order to hit the recommended center of gravity (CG; approximately 1.5 inches aft of the wing’s LE).
Roughly halfway through my build, I determined that I would need to shift/reposition the flight battery more rearward toward the CG in order for the balance to be workable. As a point of reference, the 2825-1950 Kv outrunner motor that I used is listed as having a weight of 60 grams; a Cox .049 to .051 engine is listed at 42 grams. Preparing the plywood former to allow optimal positioning of the battery is most easily done before bonding the former to the fuselage sides.
being pushed to its limit, a small hole or two cut into the firewall, the fuselage formers, and the underside of the aft fuselage sheeting is an inexpensive and easily installed insurance policy.
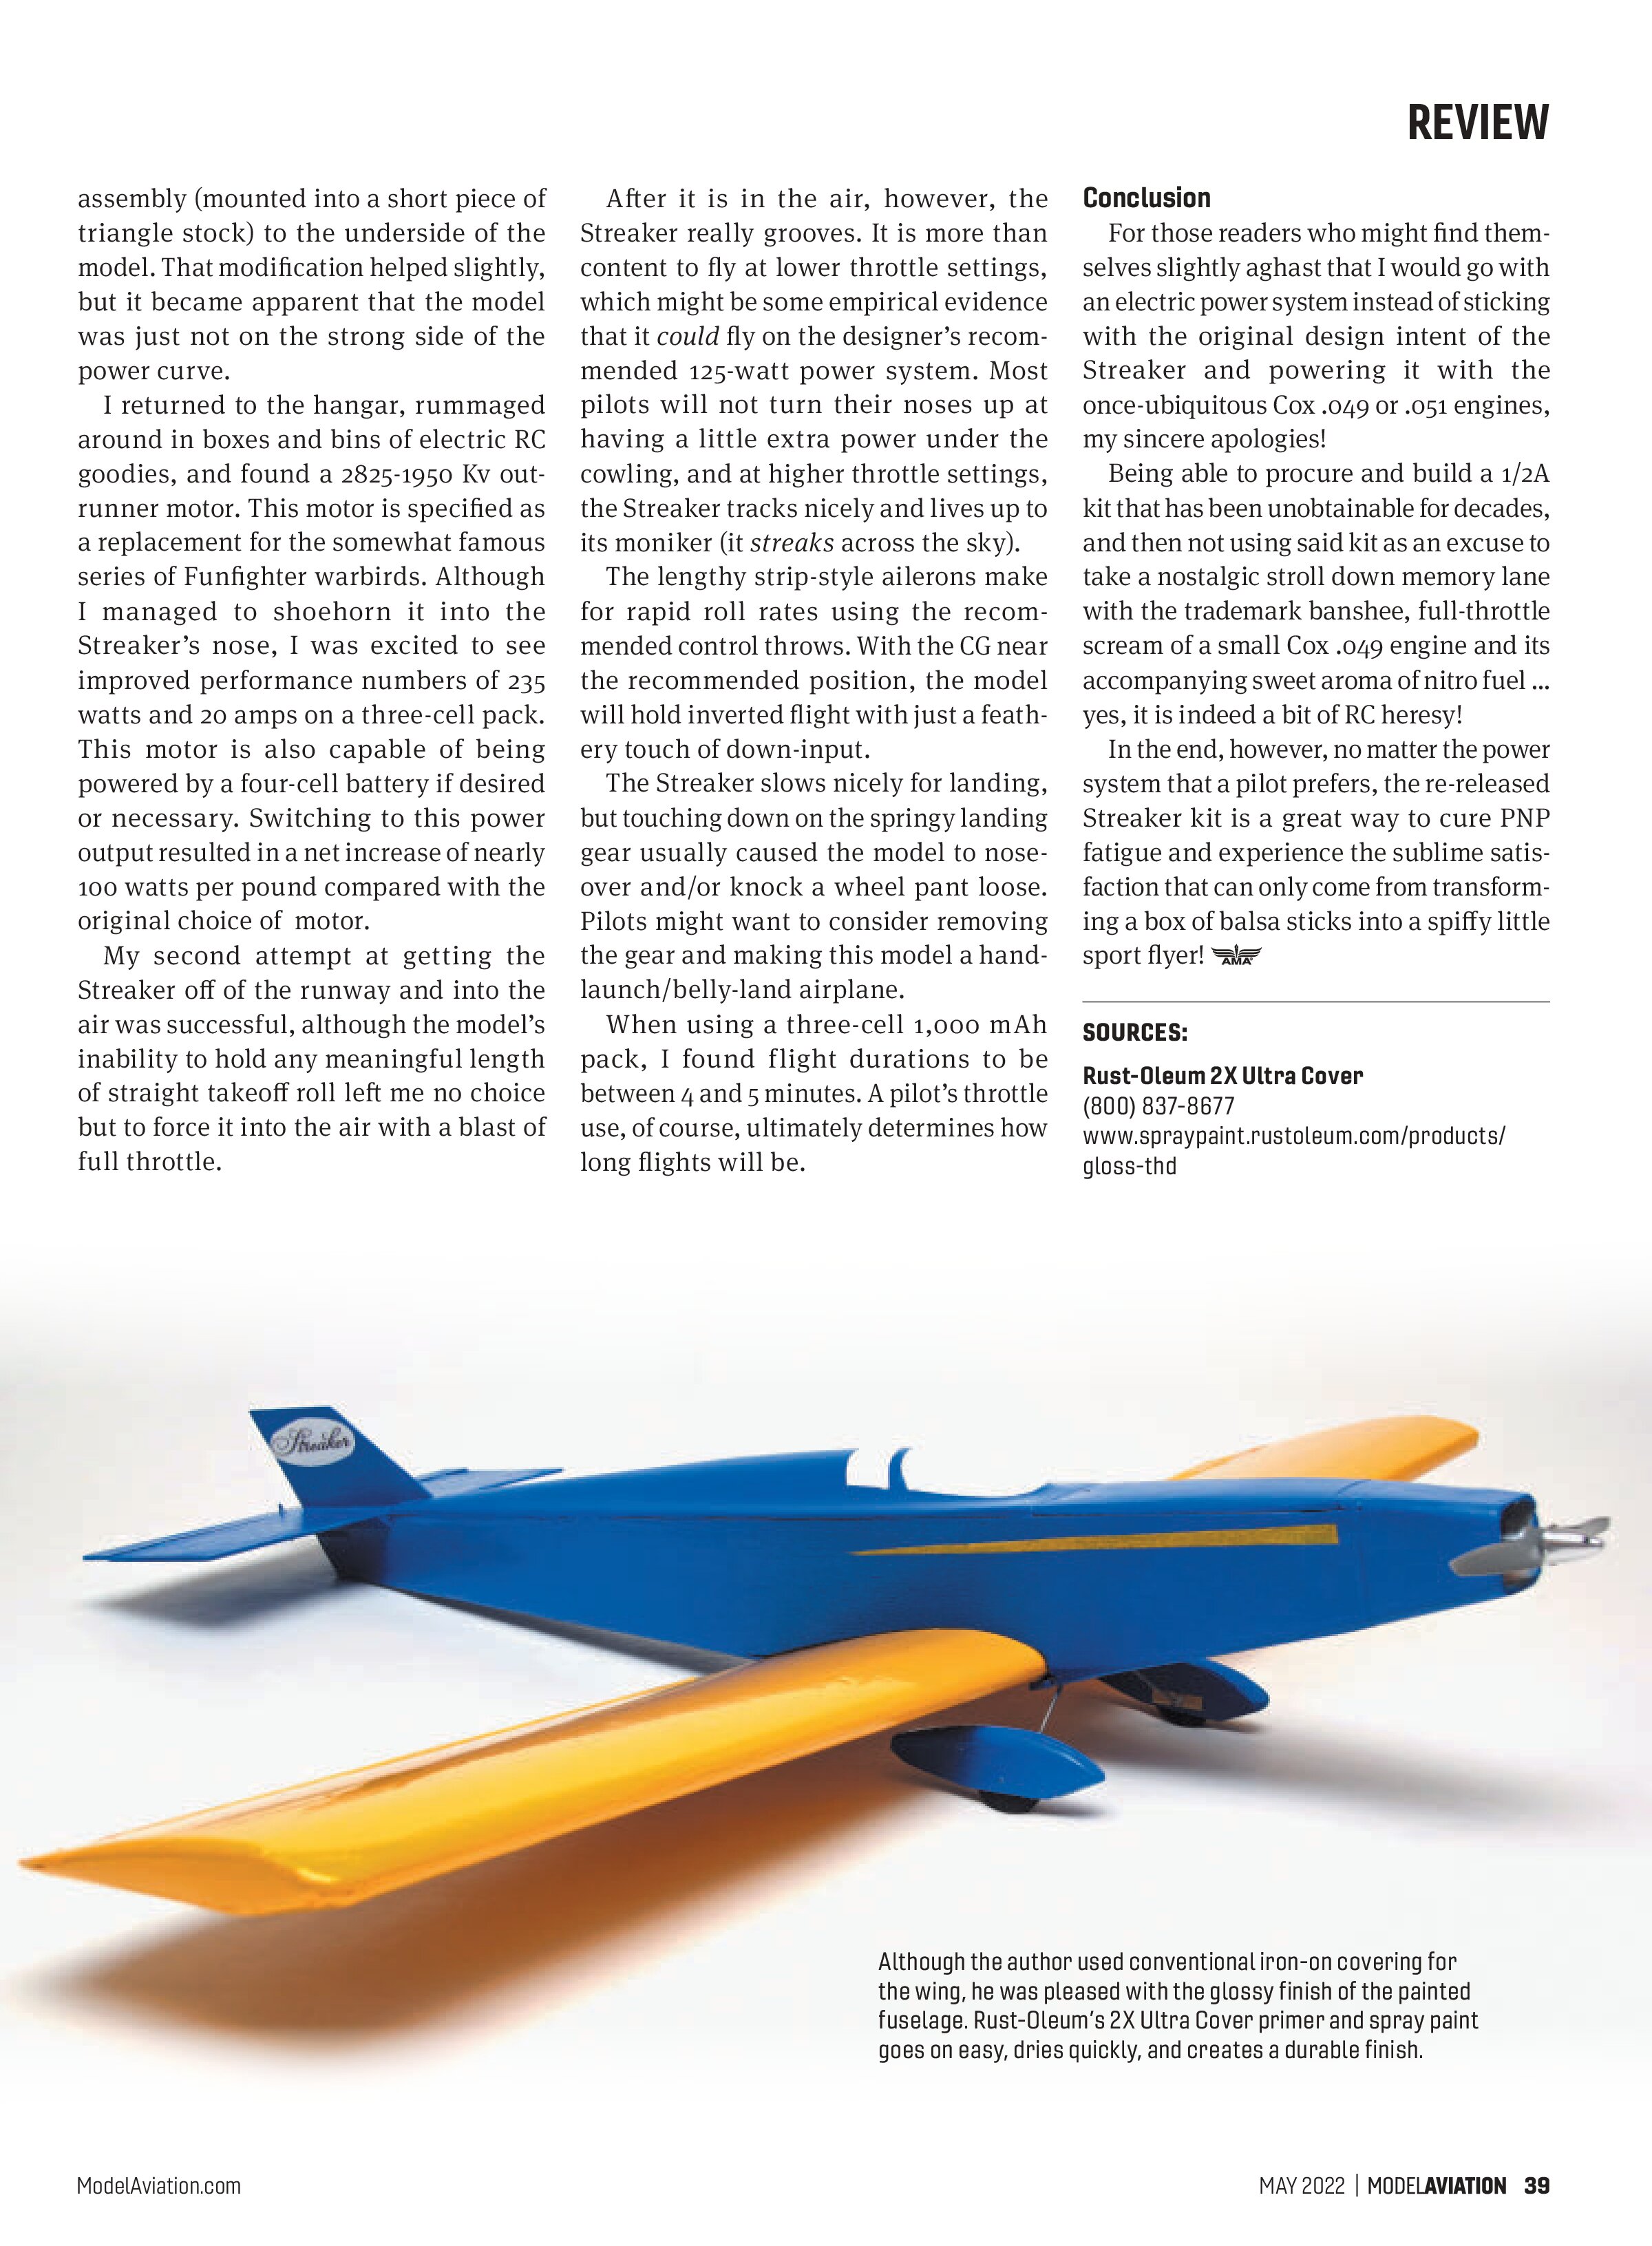
I painted the entire fuselage, plastic canopy, and empennage with Rust-Oleum 2X Ultra Cover rattle-can paint, listed as being suitable for wood, plastic, and metal surfaces. I was impressed with how nicely the white primer and blue paint went on and the glossy finish that it cured to.
I used traditional iron-on covering for the foam wing. Although I used clear-drying canopy glue when bonding the canopy to its balsa base, the blue paint that I used 100% covered the cured adhesive joint. Pilots who plan to paint their canopy and fuselage can use other adhesives without worrying about whether the glue dries clear.
Flying
As expected, getting the CG in the recommended location resulted in the flight battery straddling the plywood former that is located at the wing’s LE. A strategically located small strip of hook-and-loop material mounted to the forward section of the wing supplemented the battery’s snug fit in the former’s cutout.
The lengthy, strip-style ailerons make for rapid roll rates using the recommended control throws. With the CG near the recommended position, the model will hold inverted flight with just a feathery touch of down-input.
Unfortunately, I cut the opening in mine afterward using a Dremel rotary tool and mini sanding drum. Working the rotary tool into position in the assembled fuselage was tricky. To his credit, Dick does also warn builders to make the cut before assembly. Another consideration that those installing an electric motor might have to address is the need to create a path for air to flow through the fuselage in order to cool the potentially completely hidden ESC. Although cooling airflow is not typically as critical when a power system is not
I originally installed a 125-watt outrunner motor in my Streaker. With an EagleTree eLogger attached, running up this motor for several 10-second runs at wide-open throttle resulted in a net static power reading of 125 watts, with a current draw of roughly 10 amps. My Streaker’s all-up weight came in at exactly 17 ounces, which calculates out to a performance number of 125 watts per pound. The wing loading works out to 11.9 ounces per square foot, with a wing cube loading number of 10 (earning the model an “aerobatic” designation).
At a Glance
Specifications
Model type: 1/2A racer/sport flyer
Skill level: Intermediate
Wingspan: 35 inches (889mm)
Wing area: 205 sq. in.
Length: 29.3 inches (744mm)
Weight: 19 to 23 ounces (539 to 652 grams)
Power system: Cox .049 to .051 engine or electric motor
Radio: Two channels required; three channels if using an electric power system
Construction: Balsa, light plywood, and foam
Covering/finish: Paint/covering
Price: $79.95
Test-Model Details
Motor: HobbyKing 2825-1950 Kv
ESC: CoolRunning 25-amp with a 3-amp BEC
Battery: RCBattery 4.0C 11.1-volt 1,000 mAh
Propeller: 6 x 5
Radio system: RadioMaster T16S MAX 16-channel transmitter; LemonRX LM0034 six-channel receiver
Ready-to-fly weight (with a 3S 1,000 mAh pack): 17.4 ounces (493 grams)
Flight duration: 4 to 5 minutes
Pluses
- Nostalgia comes to life with the re-release of this nearly 50-year-old legacy 1/2A kit.
- Precut foam-core wing halves and formed plastic canopy.
- Single sheet of full-size construction plans.
- Relatively quick assembly time.
Minuses
- Postage-stamp size assembly photographs offer builders limited assistance.
- No included guidance or instructions for pilots who might prefer to use an electric power system.
- The main gear is a small, 1/16-inch diameter wire that is excessively springy and flexible and exacerbates the wild ground tracking created by the model’s lack of a tail wheel.
Manufacturer/Distributor
Dick Russ Models
(405) 470-2767
www.dickrussmodels.com
Review
With the original tail-dragger design of the Streaker not employing any type of tail wheel or skid, I discerned that conventionally taxiing the Streaker up and down the runway would definitely be problematic.
Even more disconcerting was that my initial efforts to establish a usable takeoff roll resulted in the model erratically wandering all over the place! Much of this is likely because of the springiness of the 1/16-inch diameter wire landing gear.
To stack the odds of achieving a controlled and at least semi-straight, down-the-runway takeoff roll in my favor, I attached a small, fixed tail-wheel


After it is in the air, however, the Streaker really grooves. It is more than content to fly at lower throttle settings, which might be some empirical evidence that it could fly on the designer’s recommended 125-watt power system. Most pilots will not turn their noses up at having a little extra power under the cowling, and at higher throttle settings, the Streaker tracks nicely and lives up to its moniker (it streaks across the sky).
The lengthy strip-style ailerons make for rapid roll rates using the recommended control throws. With the CG near the recommended position, the model will hold inverted flight with just a feathery touch of down-input.
The Streaker slows nicely for landing, but touching down on the springy landing gear usually caused the model to nose-over and/or knock a wheel pant loose. Pilots might want to consider removing the gear and making this model a hand-launch/belly-land airplane.
When using a three-cell 1,000 mAh pack, I found flight durations to be between 4 and 5 minutes. A pilot’s throttle use, of course, ultimately determines how long flights will be.
Conclusion
For those readers who might find themselves slightly aghast that I would go with an electric power system instead of sticking with the original design intent of the Streaker and powering it with the once-ubiquitous Cox .049 or .051 engines, my sincere apologies!
Being able to procure and build a 1/2A kit that has been unobtainable for decades, and then not using said kit as an excuse to take a nostalgic stroll down memory lane with the trademark banshee, full-throttle scream of a small Cox .049 engine and its accompanying sweet aroma of nitro fuel ... yes, it is indeed a bit of RC heresy!
In the end, however, no matter the power system that a pilot prefers, the re-released Streaker kit is a great way to cure PNP fatigue and experience the sublime satisfaction that can only come from transforming a box of balsa sticks into a spiffy little sport flyer!

Sources:
Rust-Oleum 2X Ultra Cover
(800) 837-8677
www.spraypaint.rustoleum.com/products/gloss-thd