RC FlexGear
Service, transport,
and stow your
aircraft without
a scratch
By Ed Sm&etak
edsmetak@alumni.cmu.edu
Photos by the author

How many times has your most prized aircraft come down with a serious case of hangar rash? You might be a builder, as I am, who invests months of effort to meticulously construct an aircraft, or you might prefer to skip the build time and get straight out to the field with a state-of-the-art ARF.
Either way, you probably end up with more dings, dents, and bruises on your aircraft during the road trip to the field than you get after a full season of flying. You might be an experienced pilot, but your beat-up, ragtag airplanes make it look as though you just finished your first solo flight.
I started flying RC decades ago, but I took a “brief” 15-year hiatus from RC to partner with my wife to raise our daughter. She is flying solo now, so after my retirement last year, I could not wait to jump back into our great sport!
Building has always been half of the fun for me, so I decided to get back to my building roots with a Bruce Tharpe Engineering (BTE) Venture 60 kit. This kit turned out to be my most satisfying aircraft build ever (and there have been many throughout the years!). Kudos to Bruce for providing quality kits that preserve the joy of building your own RC aircraft.
I spent a few incredibly fun months in my shop building and customizing my Venture 60, and it turned out just as I had hoped. But the rush vanished as soon as I imagined the horrible hangar rash that was sure to infect my carefully crafted creation.
As I gazed at the perfectly smooth finish on the model, my thoughts turned toward designing a set of integrated components that could help me service, transport, and stow my airplane without a scratch. It took a while, but I landed on some ideas that not only solved my problems with hangar rash, but also provided an integrated set of rugged components that simplified the process of getting my airplanes out to the field and flying.
RC FlexGear is the name I cooked up to refer to the components collectively. The set includes:
- RC FlexStand: Adjustable stand
- RC FlexSkid: Transportation skid
- RC FlexRack: Adjustable storage rack
I fly mostly 60-size glow-powered models that have 72-inch wingspans and weigh roughly 10 pounds; however, the RC FlexGear components, as designed, should easily accommodate models that weigh as much as 15 pounds or even more (with slight modifications). All of the components can be constructed with common shop tools from readily available materials—mostly standard-size lumber.
Let me make a disclaimer up front: the drawings in the article are snapshots of my hand-drawn design sketches. I put a lot of thought into dimensioning the various components, leaving leeway to accommodate a range of RC aircraft. You might need to adjust some of the details to handle the specifics of your own fleet of aircraft and road vehicles.
So, let’s move into action with an overview of the RC FlexGear components and specifics on how to build them.
RC FlexStand
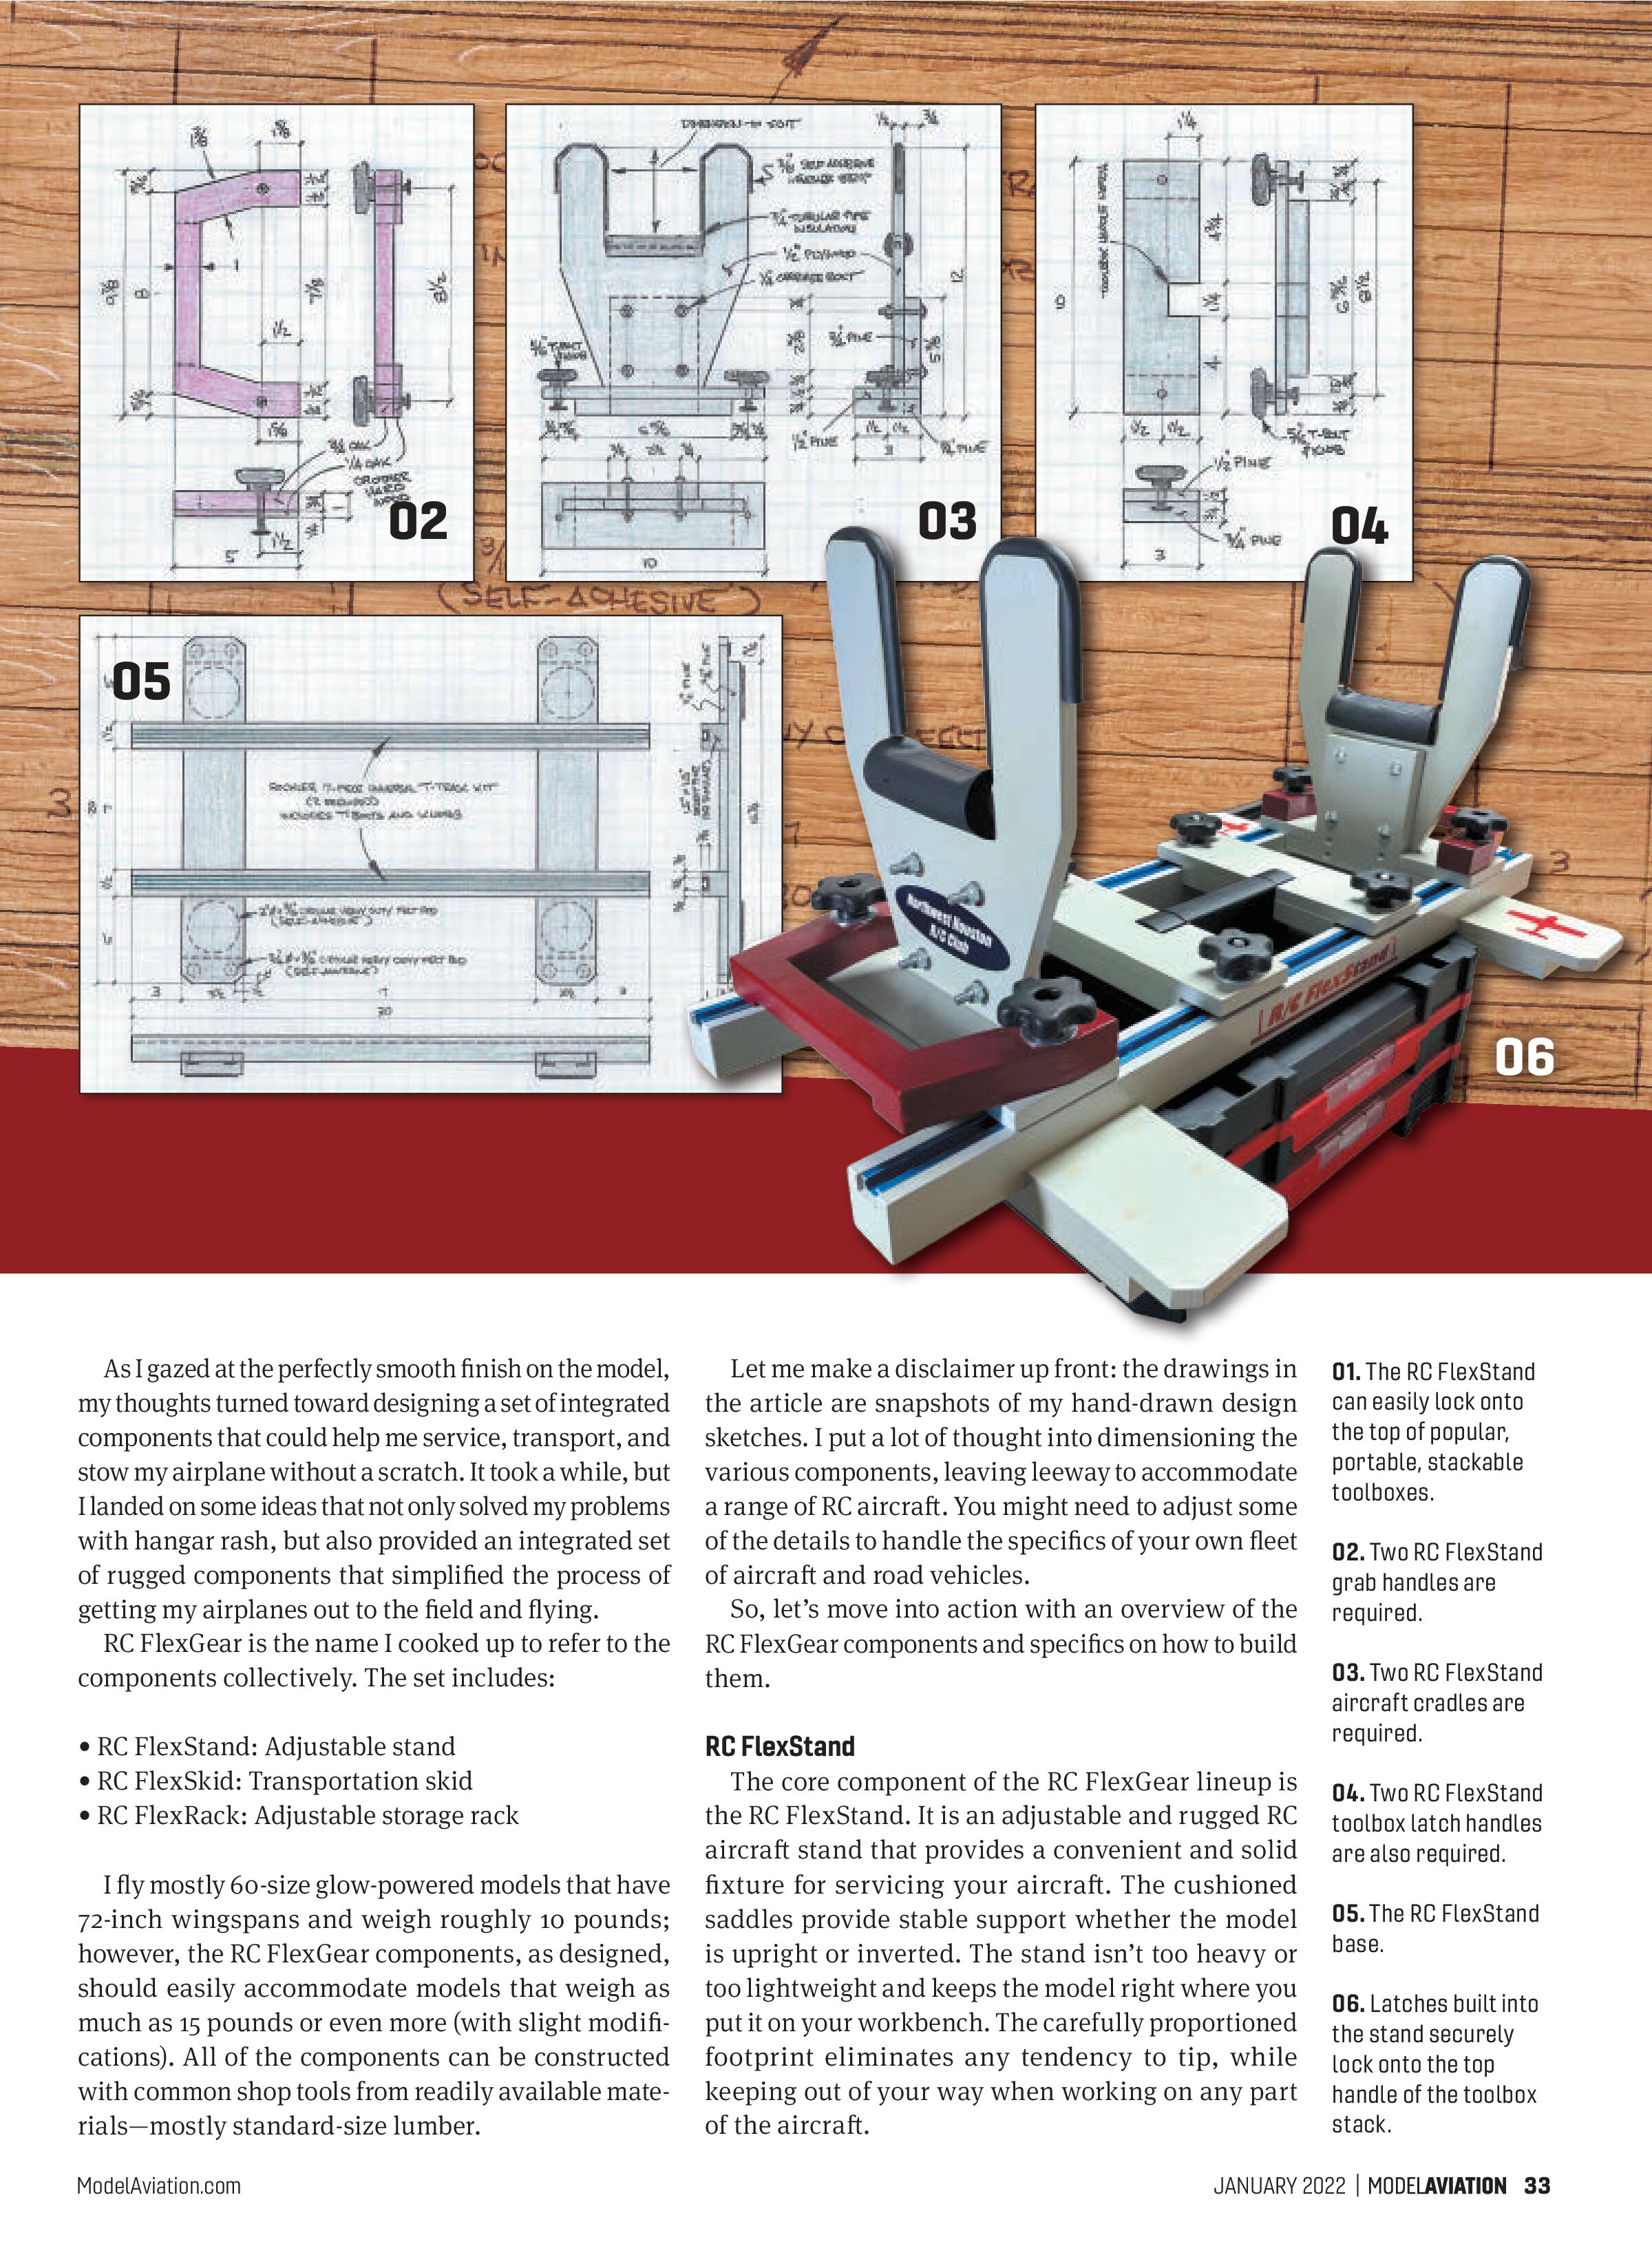
The core component of the RC FlexGear lineup is the RC FlexStand. It is an adjustable and rugged RC aircraft stand that provides a convenient and solid fixture for servicing your aircraft. The cushioned saddles provide stable support whether the model is upright or inverted. The stand isn’t too heavy or too lightweight and keeps the model right where you put it on your workbench. The carefully proportioned footprint eliminates any tendency to tip, while keeping out of your way when working on any part of the aircraft.


The saddles are longitudinally adjustable and can be easily unbolted and changed out to accommodate varying fuselage designs. The sturdy, well-positioned, balanced grab handles make it safe and easy to lift and move the stand and aircraft together as a single unit.
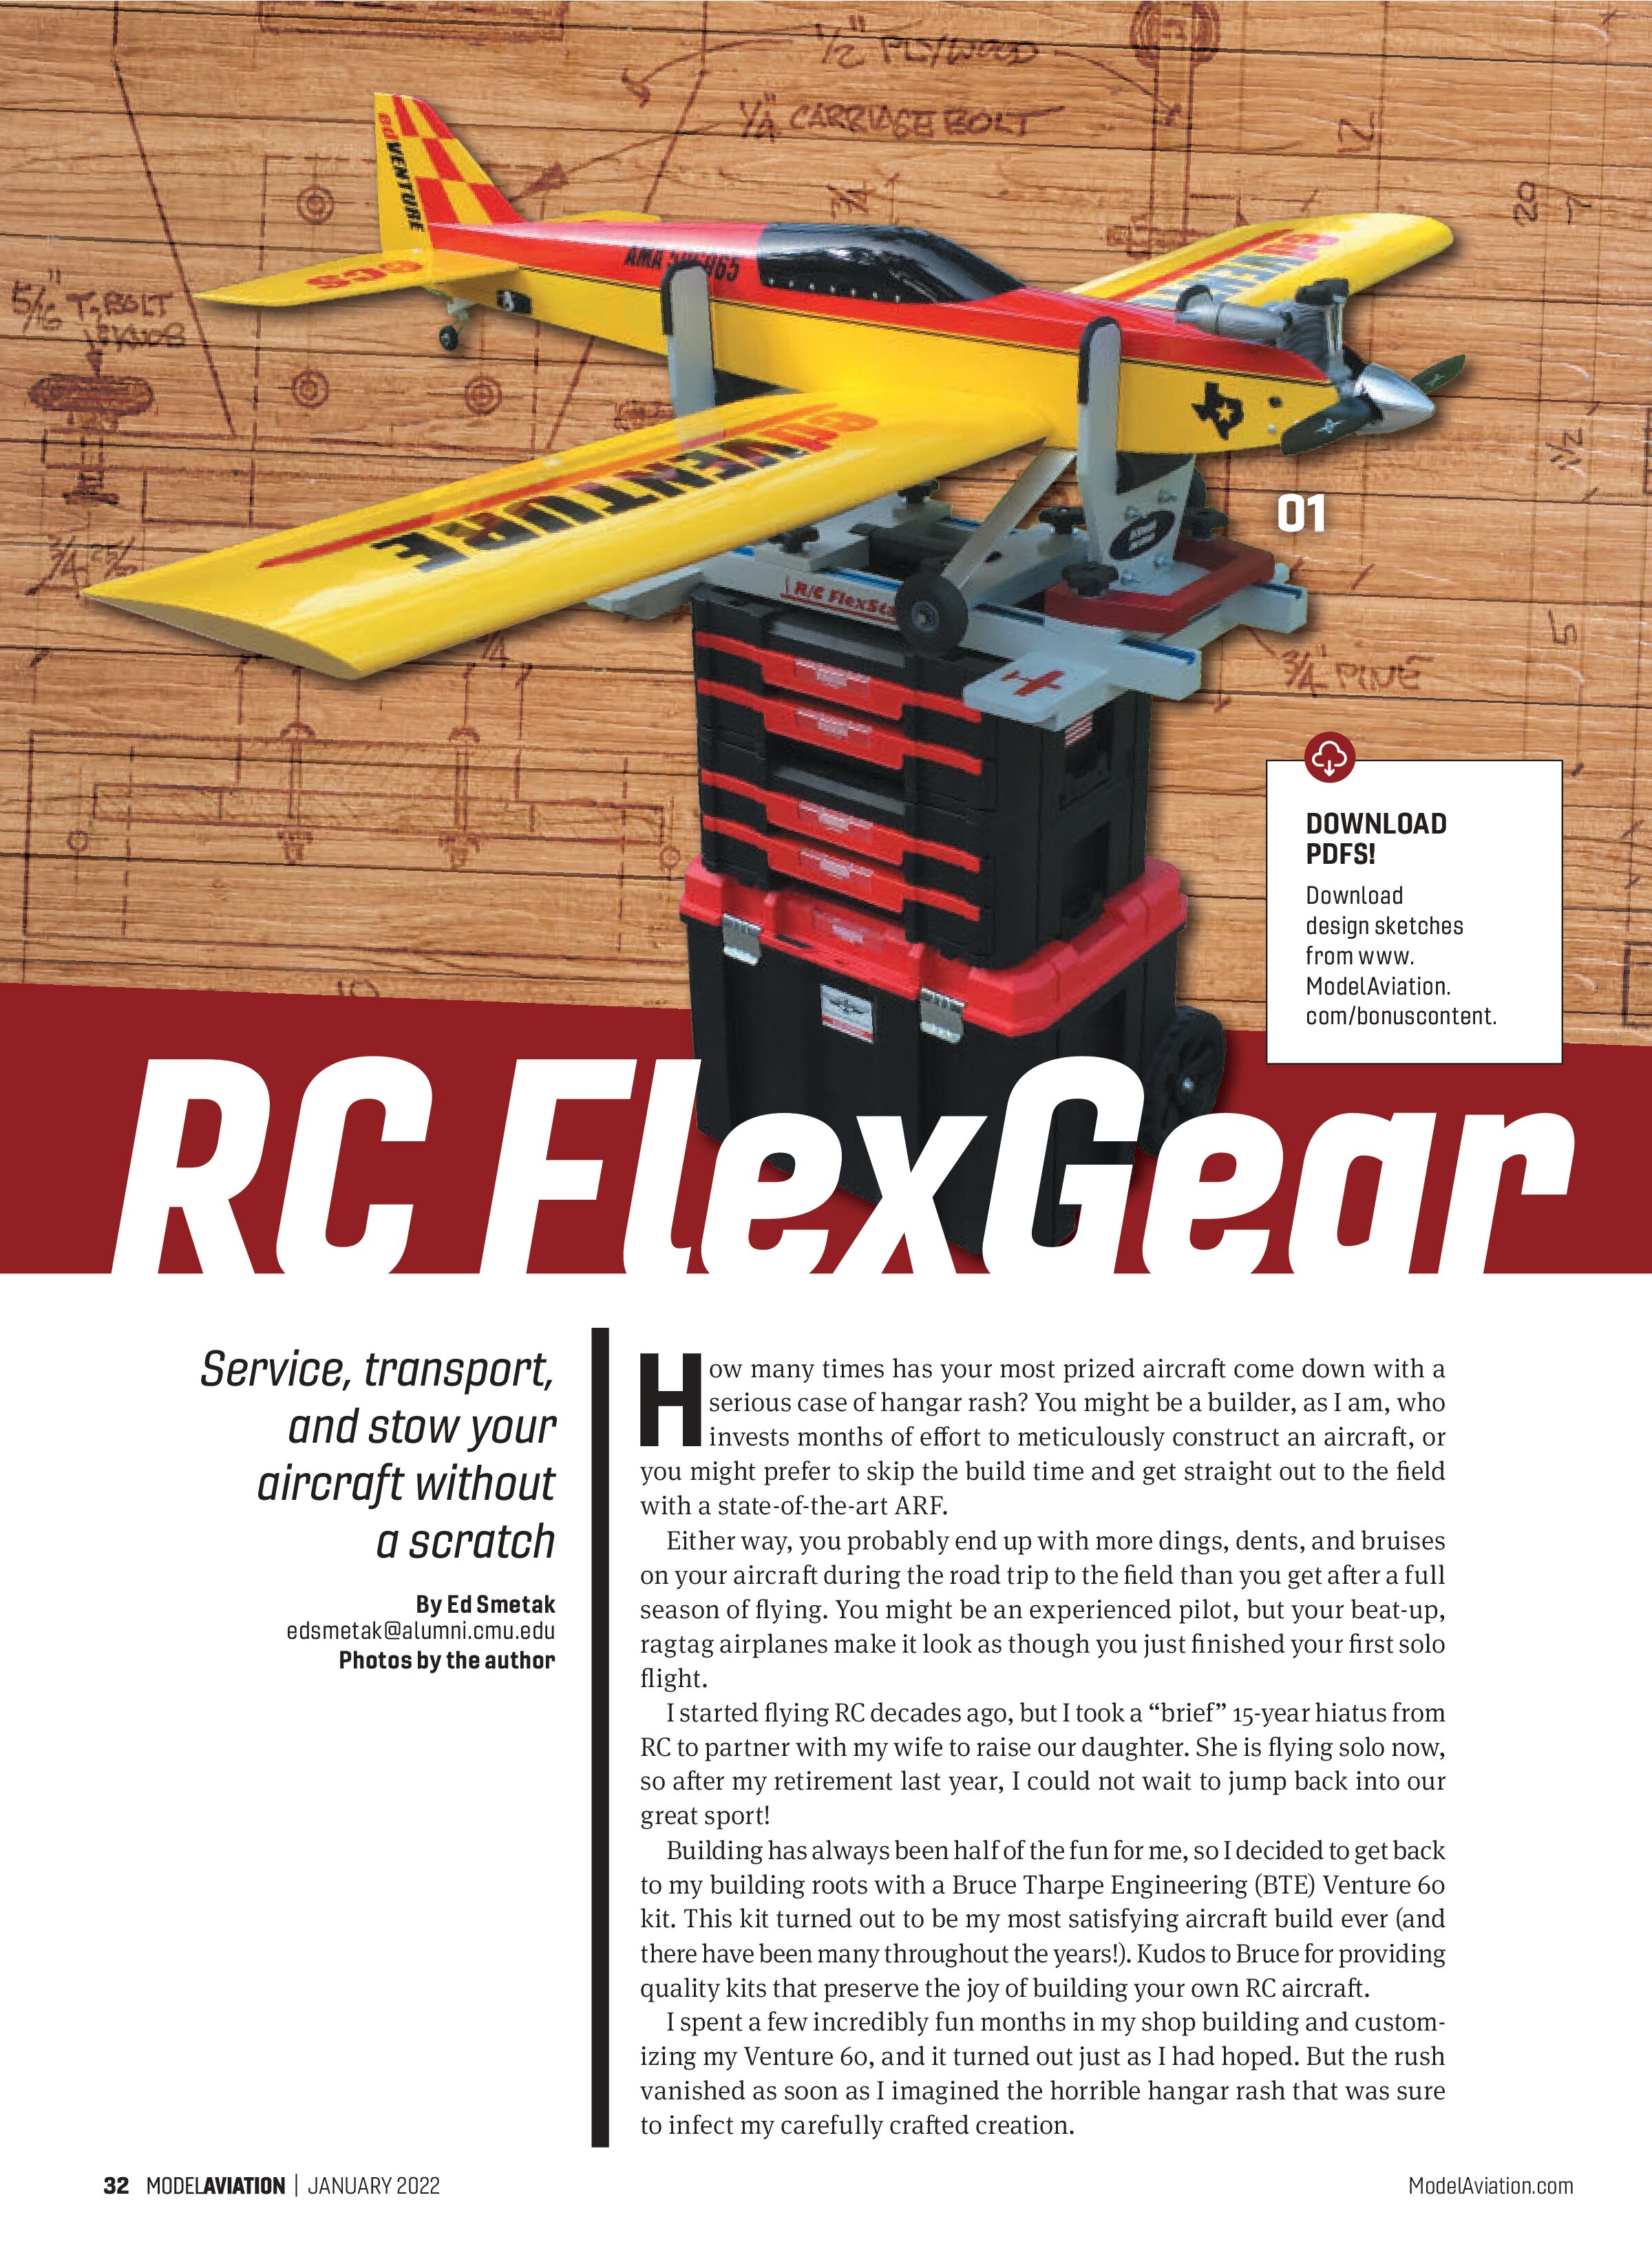
But what about out at the field? Of course, the RC FlexStand will work on the workbenches at your field if it has them; however, a handy feature is that the RC FlexStand can solidly latch onto the top of a Craftsman Versastack portable, stackable toolbox (or other popular brands with slight modifications).
The toolbox handle latches that are built into the stand lock around the top handle on the toolbox stack, making it impossible for the stand to shift. The center of gravity of the aircraft and stand are nearly centered on the top of the toolbox stack, resulting in excellent stability with no tendency to tip over, even in windy conditions. All of your tools and supplies are in the toolbox drawers, and the airplane sits in a convenient position for mounting or removing the wing and performing other maintenance tasks.

RC FlexSkid
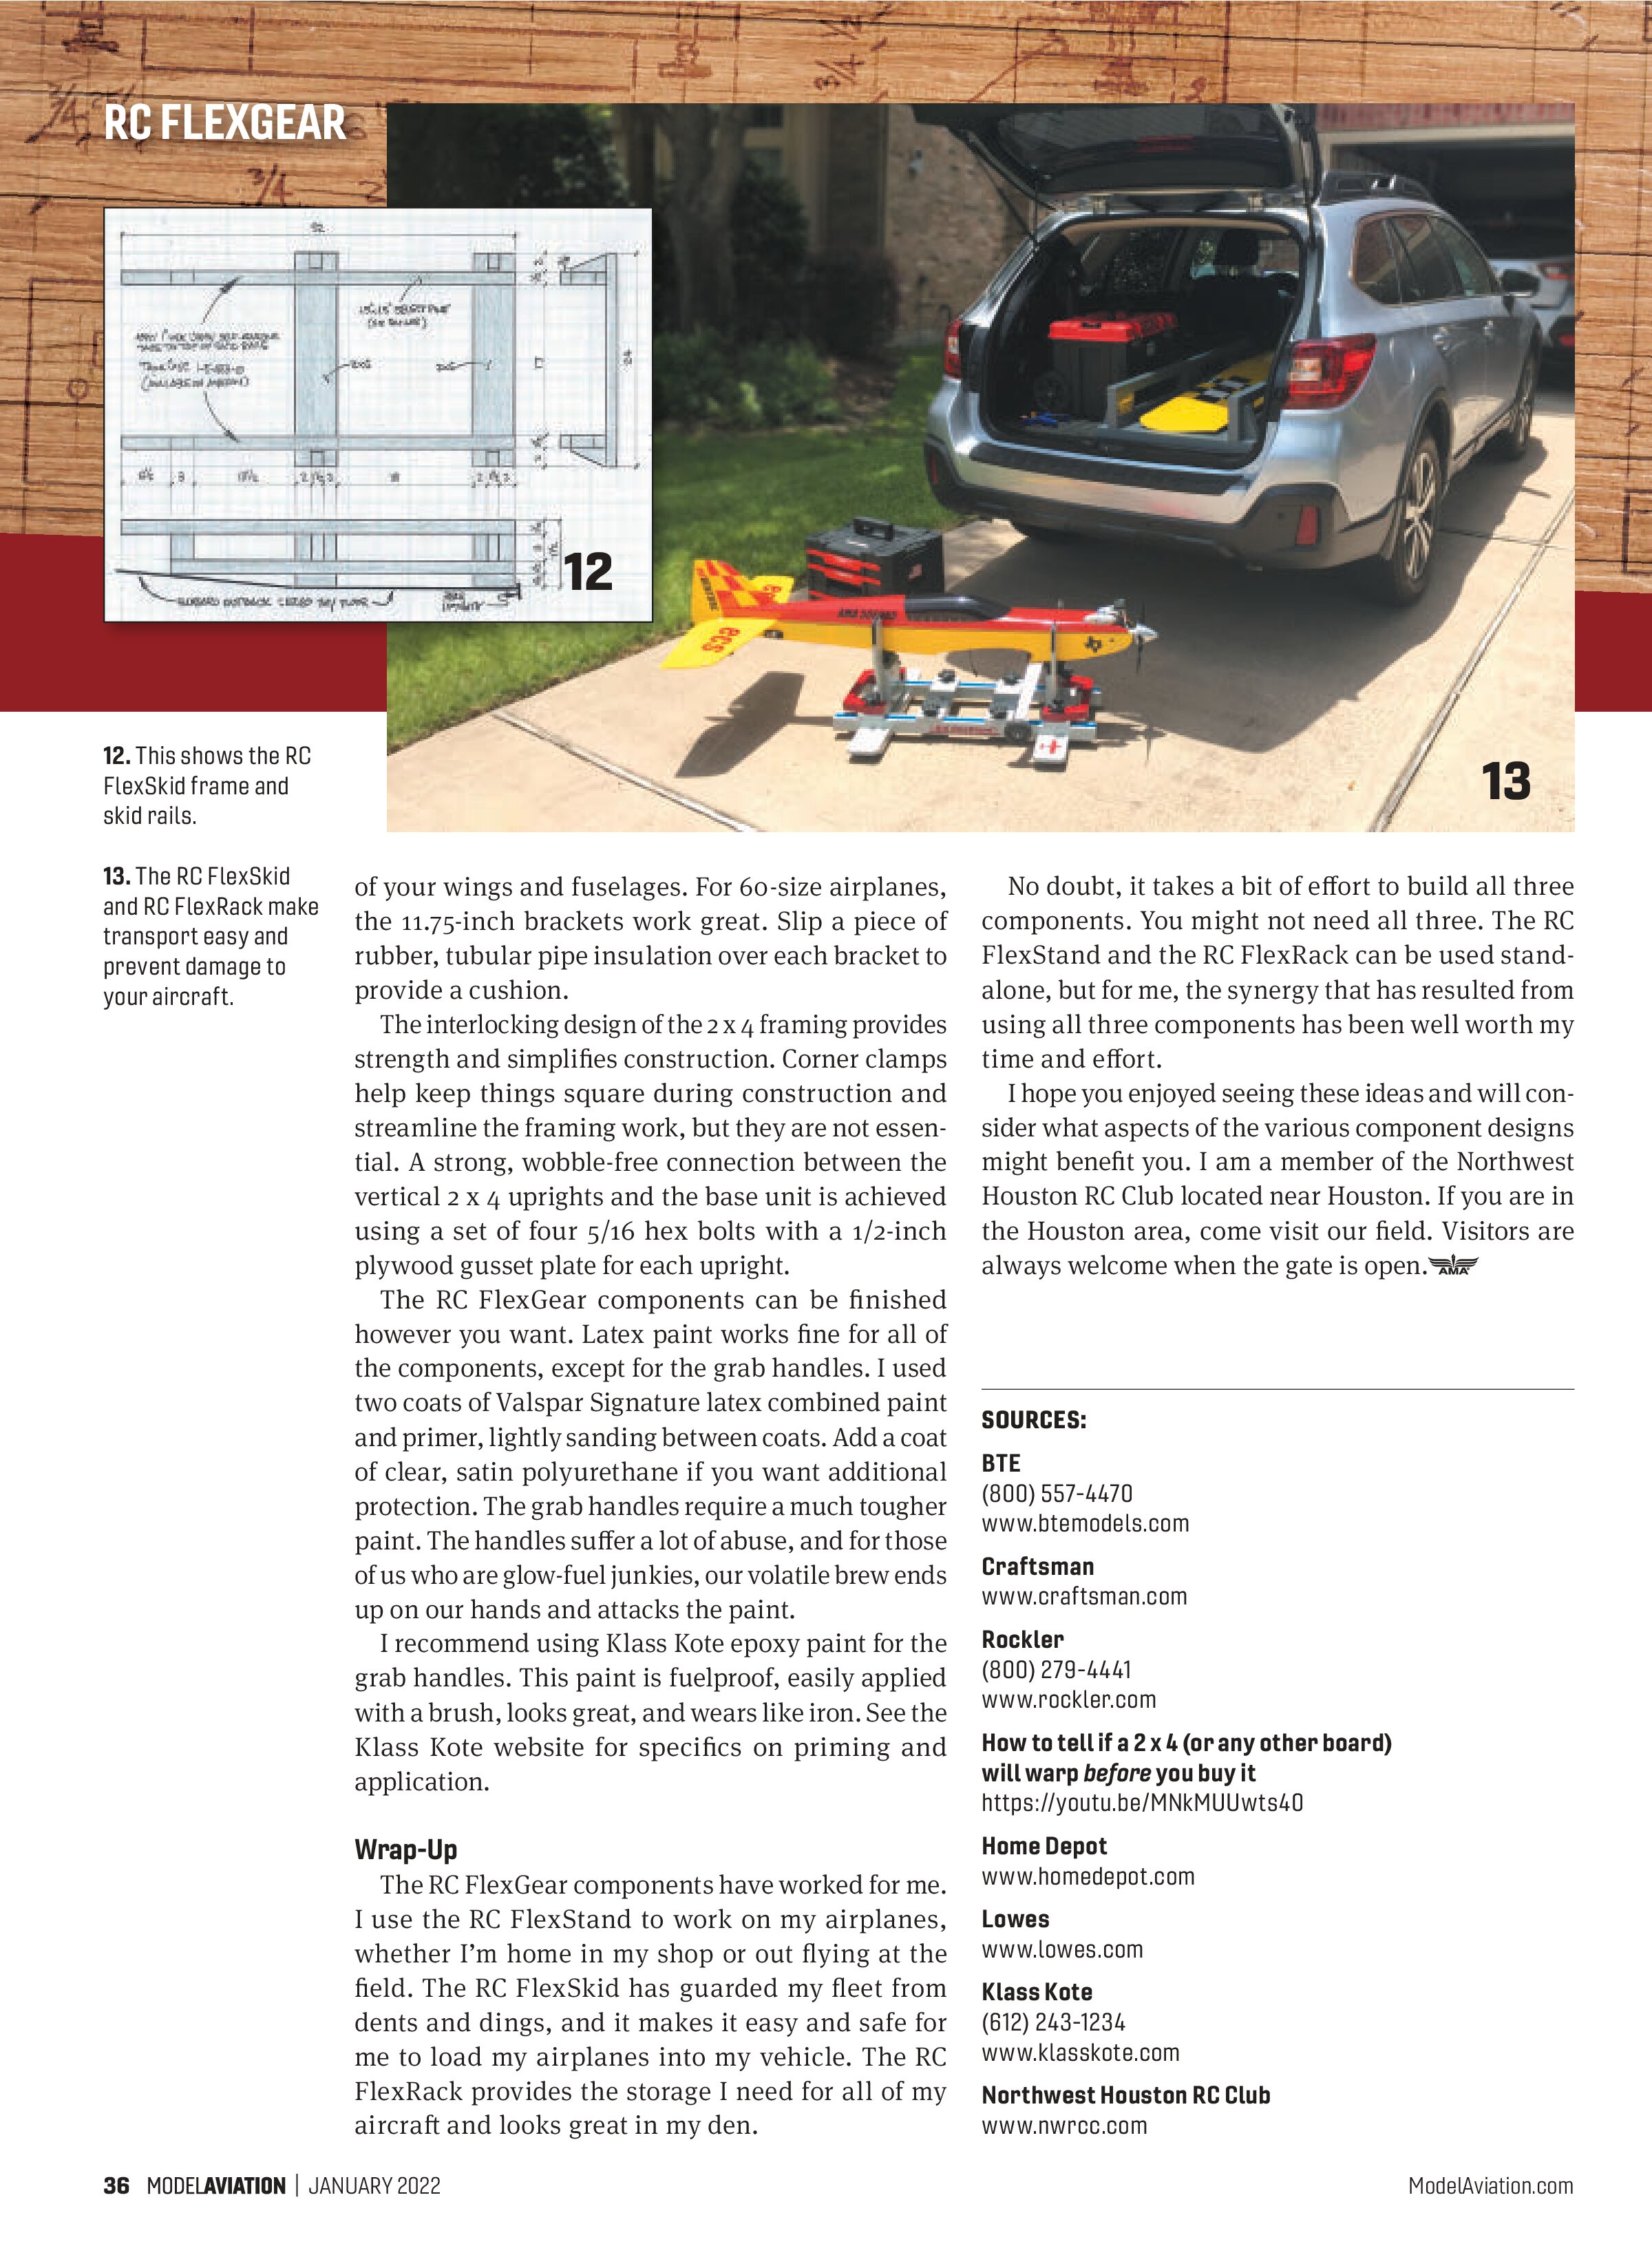
The next RC FlexGear component is the RC FlexSkid, which is a frame with skid rails that cradles and guards your airplane in the rear cargo area of your road vehicle. Besides protecting your airplane, RC FlexSkid helps organize and lock down your toolboxes and other gear so things won’t bang around in your cargo area. With the RC FlexSkid, your aircraft will survive even the bumpiest road trip without a scratch.
RC FlexSkid simply sits on the floor of your vehicle’s cargo compartment. I own a Subaru Outback. The Outback is relatively narrow, making it nimble in traffic, but it has a long cargo area to easily accommodate my 72-inch wingspan airplanes. The weight of the skid on the rubber cargo-area mat keeps the skid securely positioned, even when traversing rough terrain. Nothing will slide around, as long as you have a rubber cargo-area mat.
As you can see in the photos, the wing rests inside the bottom of the skid frame between the side rails. It’s a snap to use the grab handles on the RC FlexStand to safely lift the airplane and stand as a single unit on the back of the skid, then slide the stand and fuselage into the vehicle until the propeller clears the liftgate.
The grab handles are balanced, so lifting the fuselage onto the skid rails is safe and easy, even for an older person such as I. The four support lugs on the corners of the stand drop down inside of the skid rails to lock everything in place laterally. Woodworking spring clamps provide an easy and secure way to lock the stand onto the rails and keep it from sliding longitudinally, should there be any sudden starts or stops.
RC FlexRack
RC aircraft are both bulky and fragile, so storing and displaying them in your shop or home can be challenging. There are many competing demands for space. Your RC storage solution needs to be compact and use available space wisely. Finally, don’t ignore aesthetics if you want to keep everyone in the household happy with the visual impact of your hobby on your home’s interior design!
The RC FlexRack is the last of the RC FlexGear components and meets the storage challenge head-on. The RC FlexRack checks off all of the requirements for storing and displaying your aircraft:
- Compact: Stacking wings with fuselages optimizes use of space.
- Freestanding: Nothing attached to walls.
- Solid: Won’t wobble, even with heavier aircraft.
- Adjustable: Arrange varying types of airplanes.
- Stylish: Makes your models look great in any room.
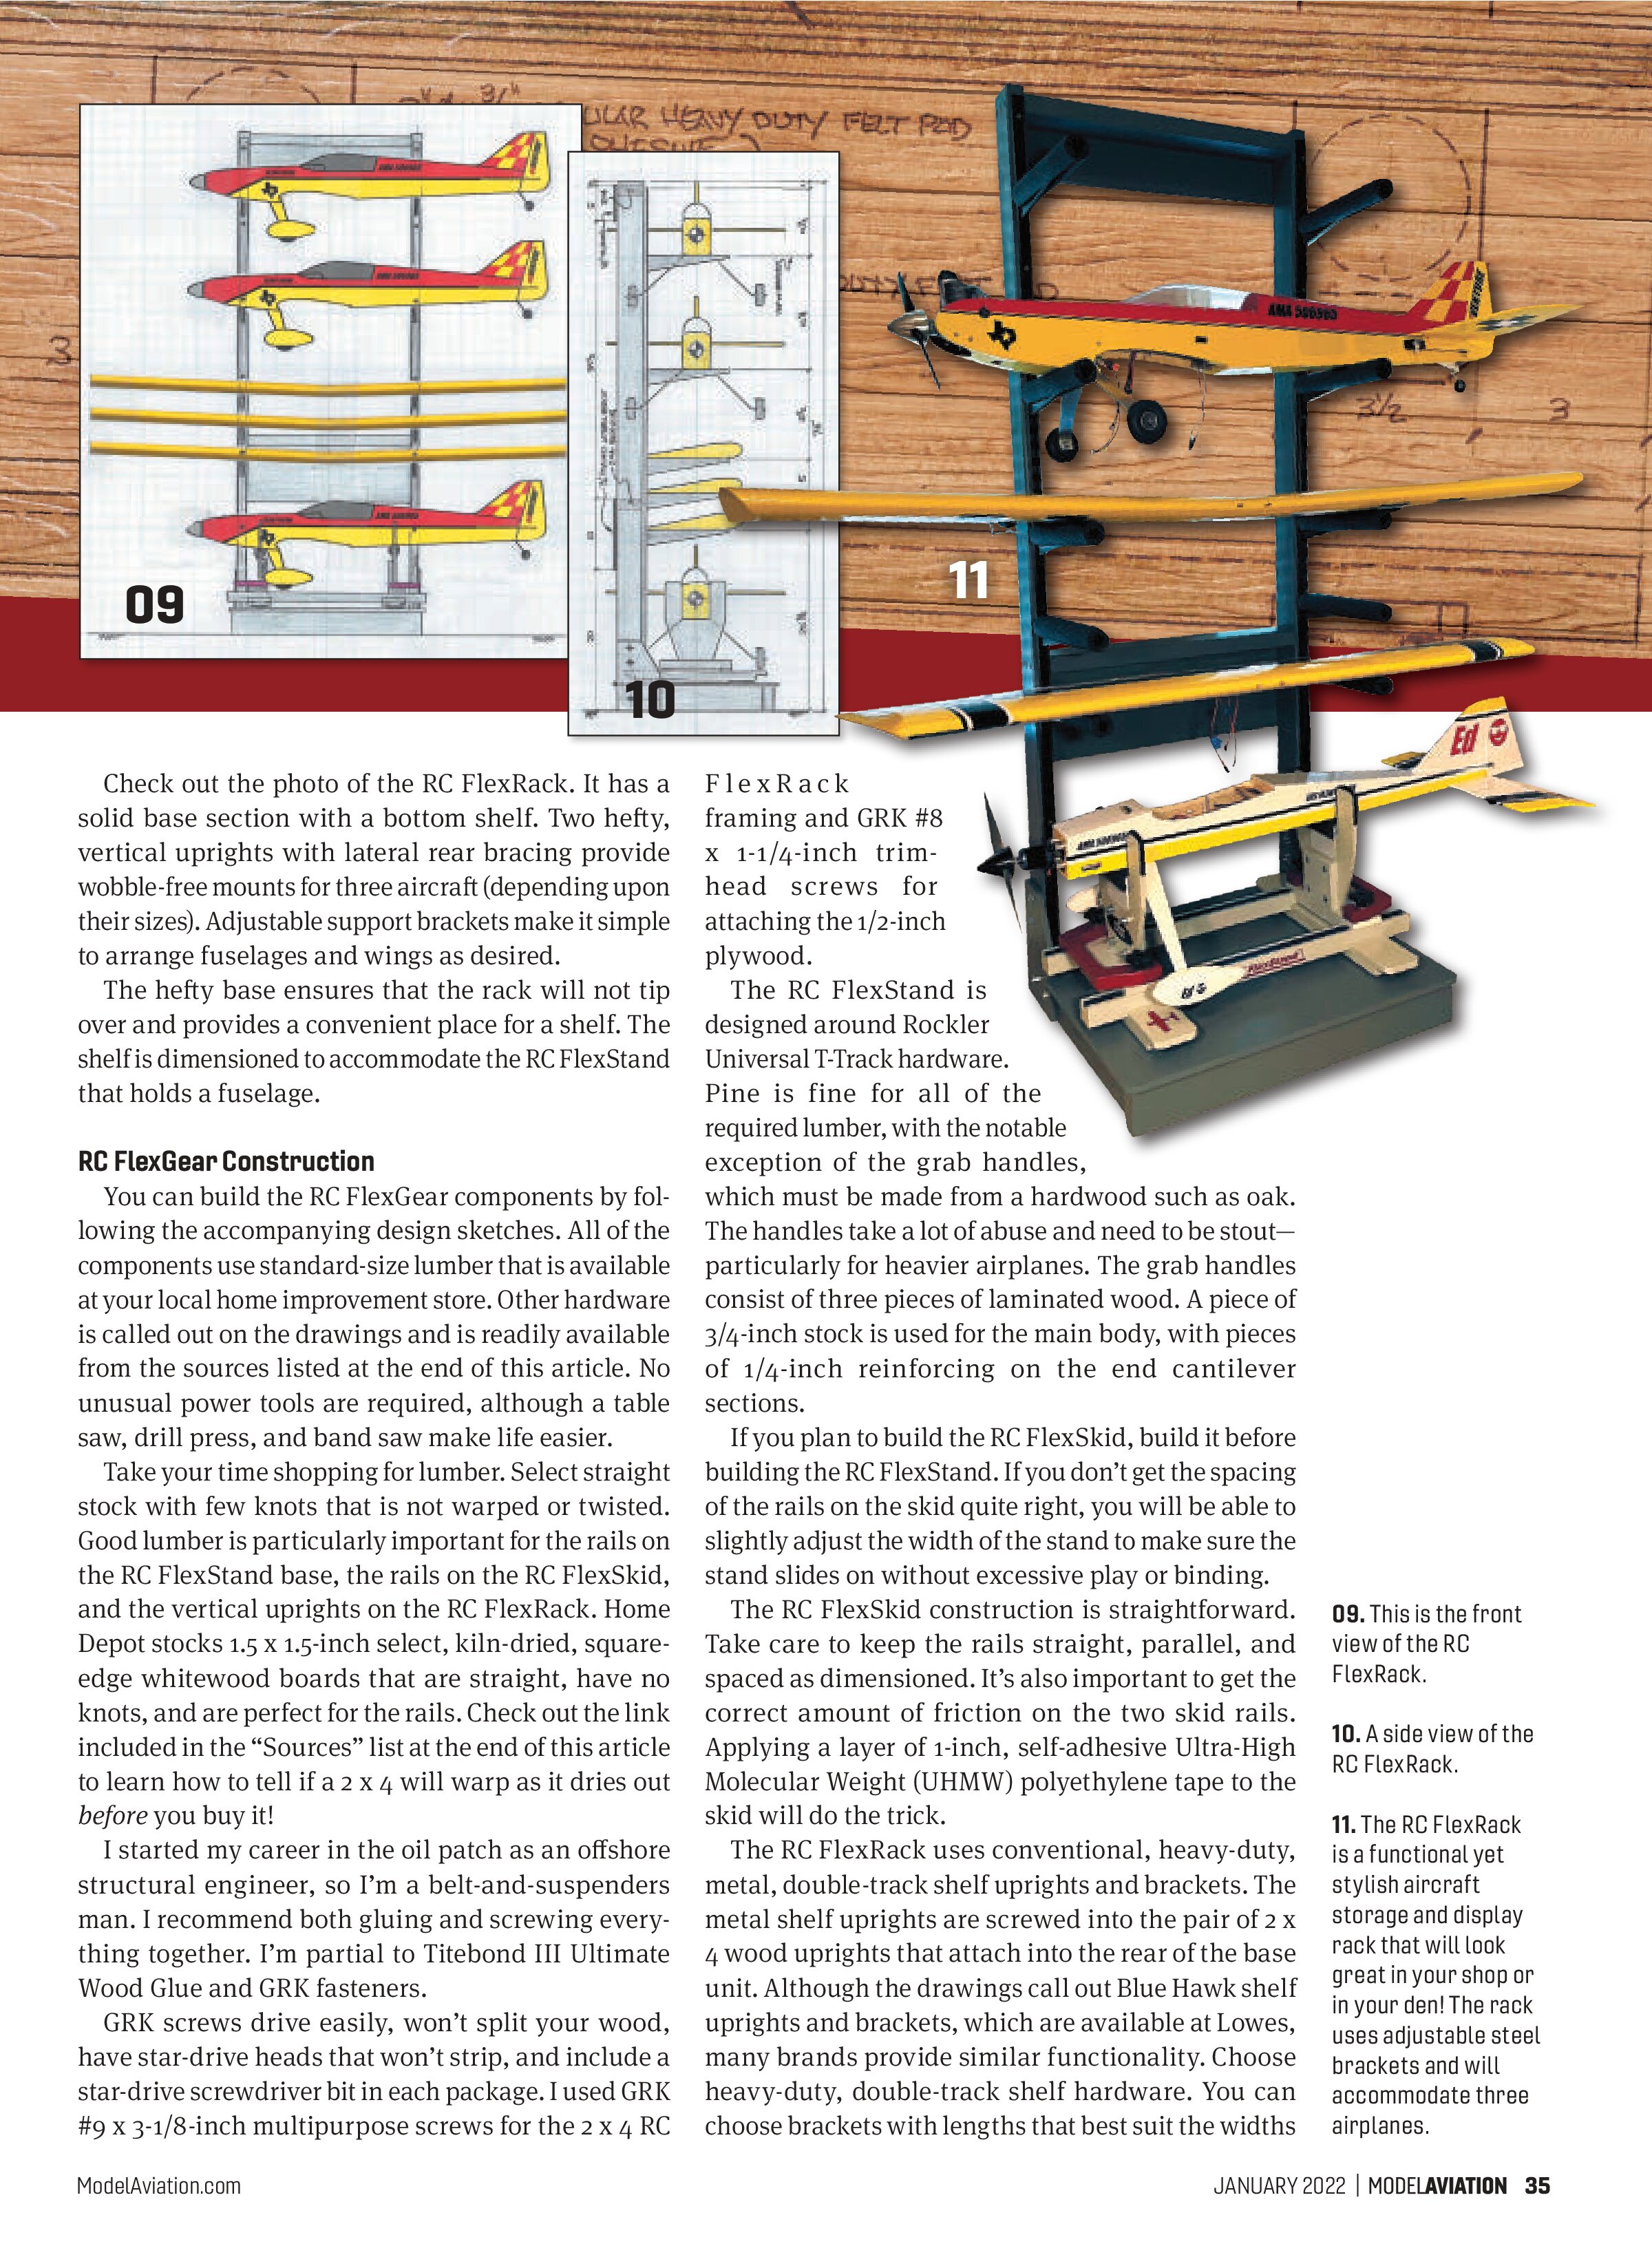
Check out the photo of the RC FlexRack. It has a solid base section with a bottom shelf. Two hefty, vertical uprights with lateral rear bracing provide wobble-free mounts for three aircraft (depending upon their sizes). Adjustable support brackets make it simple to arrange fuselages and wings as desired.
The hefty base ensures that the rack will not tip over and provides a convenient place for a shelf. The shelf is dimensioned to accommodate the RC FlexStand that holds a fuselage.
RC FlexGear Construction
You can build the RC FlexGear components by following the accompanying design sketches. All of the components use standard-size lumber that is available at your local home improvement store. Other hardware is called out on the drawings and is readily available from the sources listed at the end of this article. No unusual power tools are required, although a table saw, drill press, and band saw make life easier.
Take your time shopping for lumber. Select straight stock with few knots that is not warped or twisted. Good lumber is particularly important for the rails on the RC FlexStand base, the rails on the RC FlexSkid, and the vertical uprights on the RC FlexRack. Home Depot stocks 1.5 x 1.5-inch select, kiln-dried, square-edge whitewood boards that are straight, have no knots, and are perfect for the rails. Check out the link included in the “Sources” list at the end of this article to learn how to tell if a 2 x 4 will warp as it dries out before you buy it!
I started my career in the oil patch as an offshore structural engineer, so I’m a belt-and-suspenders man. I recommend both gluing and screwing everything together. I’m partial to Titebond III Ultimate Wood Glue and GRK fasteners.
GRK screws drive easily, won’t split your wood, have star-drive heads that won’t strip, and include a star-drive screwdriver bit in each package. I used GRK #9 x 3-1/8-inch multipurpose screws for the 2 x 4 RC FlexRack framing and GRK #8 x 1-1/4-inch trim-head screws for attaching the 1/2-inch plywood.
The RC FlexStand is designed around Rockler Universal T-Track hardware. Pine is fine for all of the required lumber, with the notable exception of the grab handles, which must be made from a hardwood such as oak. The handles take a lot of abuse and need to be stout—particularly for heavier airplanes. The grab handles consist of three pieces of laminated wood. A piece of 3/4-inch stock is used for the main body, with pieces of 1/4-inch reinforcing on the end cantilever sections.
If you plan to build the RC FlexSkid, build it before building the RC FlexStand. If you don’t get the spacing of the rails on the skid quite right, you will be able to slightly adjust the width of the stand to make sure the stand slides on without excessive play or binding.
The RC FlexSkid construction is straightforward. Take care to keep the rails straight, parallel, and spaced as dimensioned. It’s also important to get the correct amount of friction on the two skid rails. Applying a layer of 1-inch, self-adhesive Ultra-High Molecular Weight (UHMW) polyethylene tape to the skid will do the trick.
The RC FlexRack uses conventional, heavy-duty, metal, double-track shelf uprights and brackets. The metal shelf uprights are screwed into the pair of 2 x 4 wood uprights that attach into the rear of the base unit. Although the drawings call out Blue Hawk shelf uprights and brackets, which are available at Lowes, many brands provide similar functionality. Choose heavy-duty, double-track shelf hardware. You can choose brackets with lengths that best suit the widths.


of your wings and fuselages. For 60-size airplanes, the 11.75-inch brackets work great. Slip a piece of rubber, tubular pipe insulation over each bracket to provide a cushion.
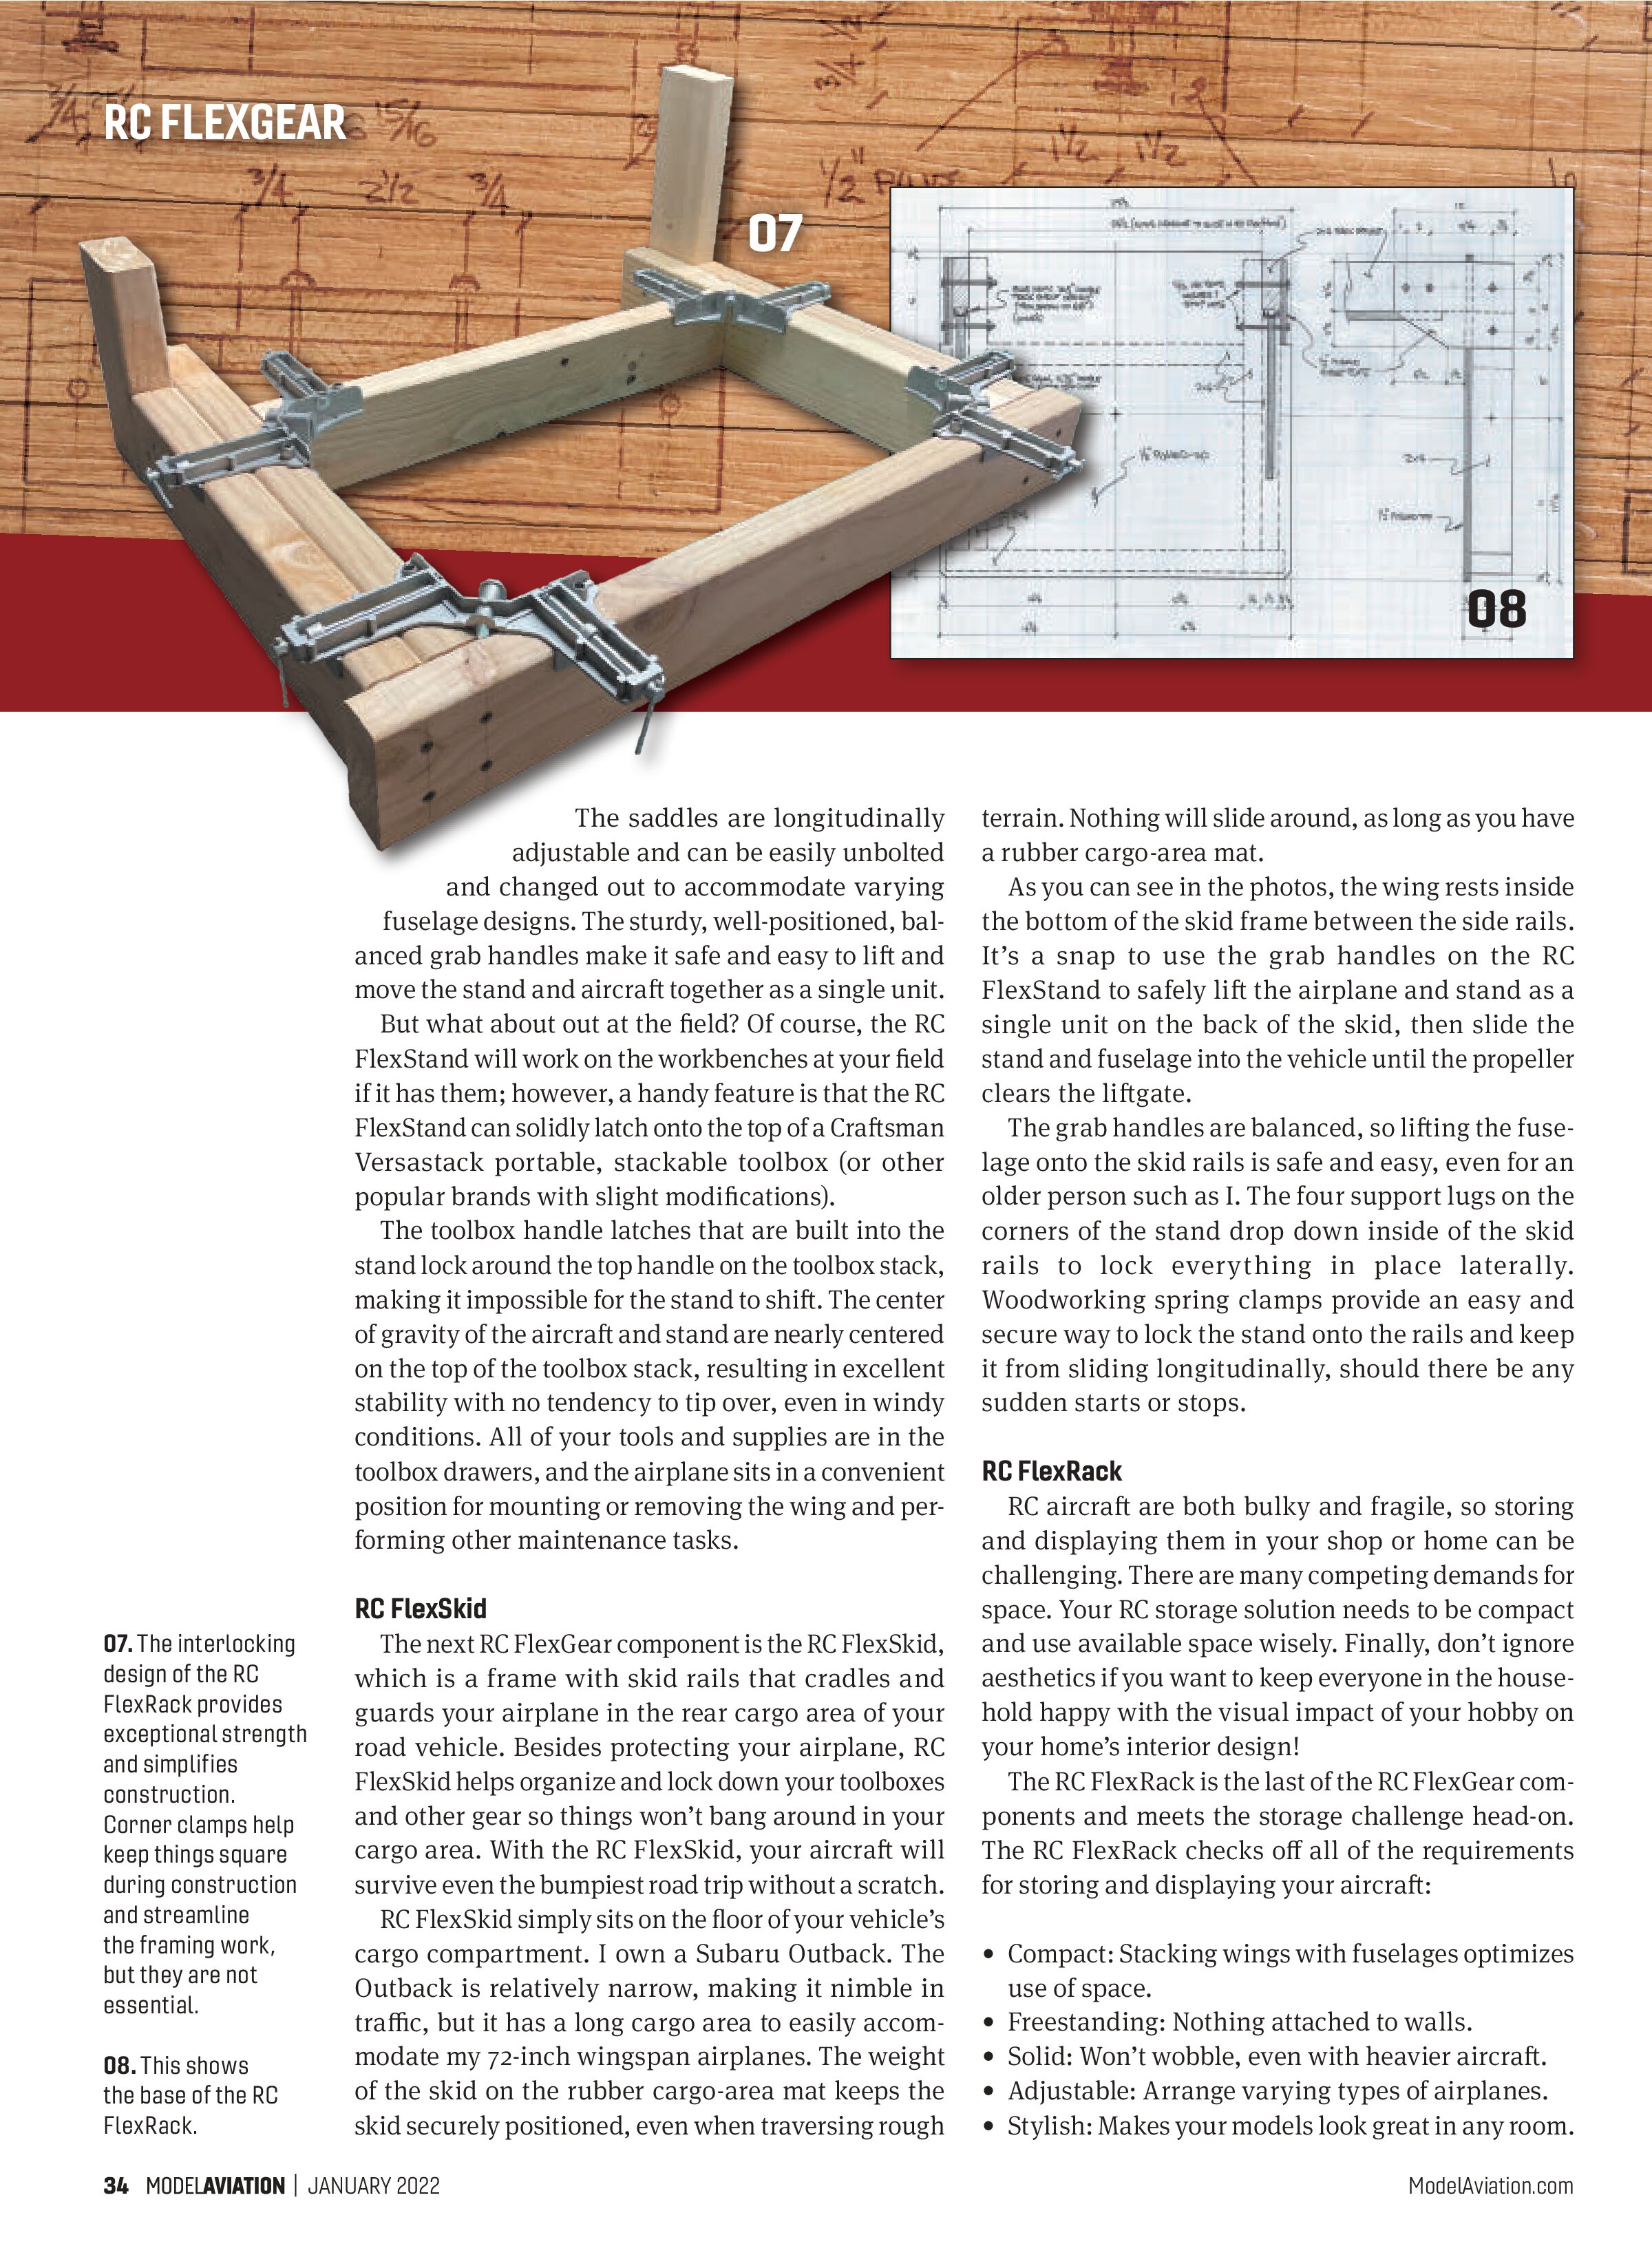
The interlocking design of the 2 x 4 framing provides strength and simplifies construction. Corner clamps help keep things square during construction and streamline the framing work, but they are not essential. A strong, wobble-free connection between the vertical 2 x 4 uprights and the base unit is achieved using a set of four 5/16 hex bolts with a 1/2-inch plywood gusset plate for each upright.
The RC FlexGear components can be finished however you want. Latex paint works fine for all of the components, except for the grab handles. I used two coats of Valspar Signature latex combined paint and primer, lightly sanding between coats. Add a coat of clear, satin polyurethane if you want additional protection. The grab handles require a much tougher paint. The handles suffer a lot of abuse, and for those of us who are glow-fuel junkies, our volatile brew ends up on our hands and attacks the paint.
I recommend using Klass Kote epoxy paint for the grab handles. This paint is fuelproof, easily applied with a brush, looks great, and wears like iron. See the Klass Kote website for specifics on priming and application.
Wrap-Up
The RC FlexGear components have worked for me. I use the RC FlexStand to work on my airplanes, whether I’m home in my shop or out flying at the field. The RC FlexSkid has guarded my fleet from dents and dings, and it makes it easy and safe for me to load my airplanes into my vehicle. The RC FlexRack provides the storage I need for all of my aircraft and looks great in my den.
No doubt, it takes a bit of effort to build all three components. You might not need all three. The RC FlexStand and the RC FlexRack can be used stand-alone, but for me, the synergy that has resulted from using all three components has been well worth my time and effort.
I hope you enjoyed seeing these ideas and will consider what aspects of the various component designs might benefit you. I am a member of the Northwest Houston RC Club located near Houston. If you are in the Houston area, come visit our field. Visitors are always welcome when the gate is open.
SOURCES:
BTE
(800) 557-4470
www.btemodels.com
Craftsman
www.craftsman.com
Rockler
(800) 279-4441
www.rockler.com
How to tell if a 2 x 4 (or any other board) will warp before you buy it
https://youtu.be/MNkMUUwts40
Home Depot
www.homedepot.com
Lowes
www.lowes.com
Klass Kote
(612) 243-1234
www.klasskote.com
Northwest Houston RC Club
www.nwrcc.com