AROUND THE PATCH

SPRING CLEANING
By Thayer Syme | thayer@flying-models.com
MAY BRINGS AN ANNUAL TRADITION of spring cleaning to many households, and although some might feel such domestic obligations impinge upon our hobby time, it’s not a bad idea to take into our workshop as well.
Many of us slowly accumulate everything from questionable swap meet finds to treasured relics from the estates of friends who have long passed into unused corners of our workspace. I suggest taking a critical look around your workshop and inventory what you might have set aside for “someday” but has since devolved to progress-impinging clutter.
Yes, now is a good time to purge the old and useless stuff that has been hanging around forever. With honest examination, I expect you will find much of it as obsolete as that bedraggled, old bison head that has been hanging on your grandfather’s cabin wall, likely since long before your earliest childhood visits decades ago.
In all honesty, it has been more than a couple of months since I have made any meaningful progress on hobby projects, specifically for this reason. As I write this in mid-February, my primary workbench is layered with several inches of debris, dating back to Christmas present projects and before—although not a bison head. Sure, I might blame some delay on the pandemic, but that is just an excuse. My workshop has been shrinking for years.
A Twist on Hinging
Before we start the housework, let me show off a great building technique that can help all of us. I’ve previously featured Tandy Walker’s awe-inspiring craftsmanship in this column, and now I bring you a great building tip from him.
Tandy’s elevator hinging process for his latest project is equally applicable to scratch-built projects and ARF assembly, all but ensuring free-moving control surfaces. He begins:
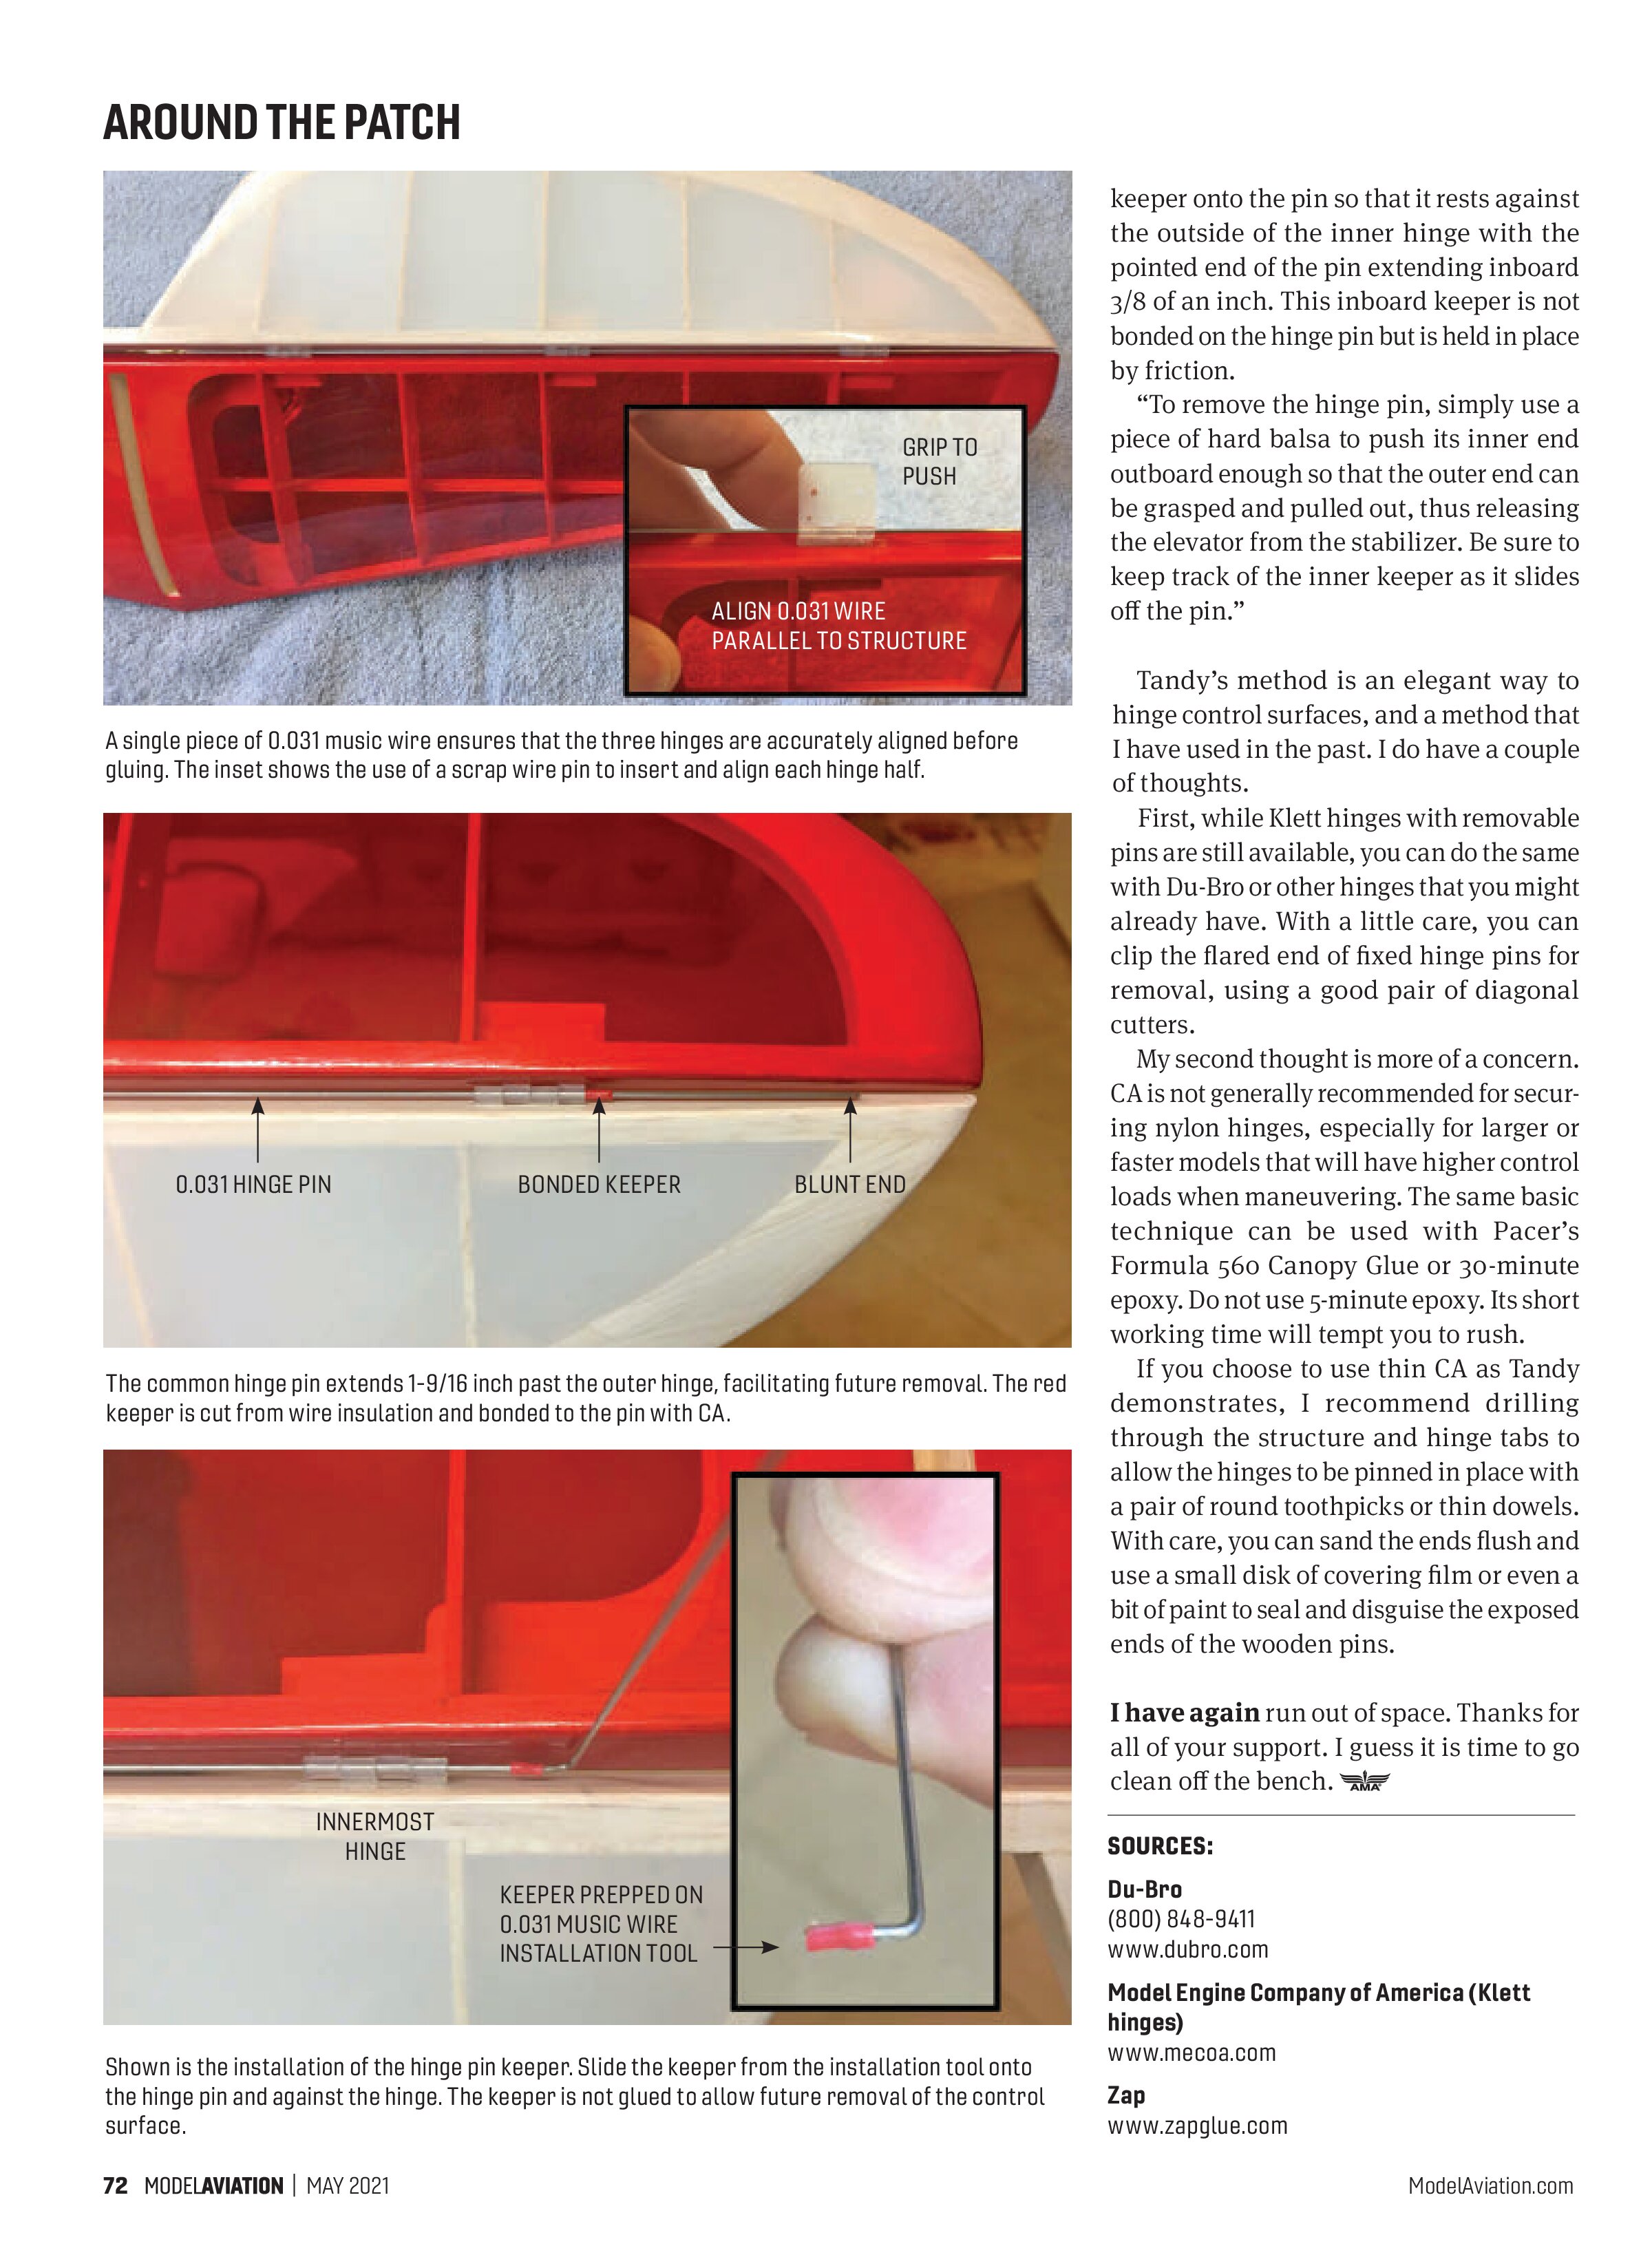
“One of the first things I did today was install, align, and bond 12 hinge halves in the stabilizer and elevator. The elevators are hinged using the two-part Klett nylon hinge shown. The short hinge pins were discarded and made two long, single pins from 1/32-inch (0.031) music wire instead. I smoothed one end and sharpened the other to help thread it through the hinges.
“I hinged the elevator during initial construction but did not glue in the hinges until after covering the horizontal tail surfaces. A short piece of music wire was used to join two hinge pieces to help push one hinge half into its slot and also to align the hinge axis parallel to the stabilizer’s leading edge.
“After each hinge half was in place, I used the longer wire pin to check the axial alignment of the three hinge halves on each side. The elevator was then hinged to the stabilizer with the extended hinge pin to complete the three combined hinge alignments. Moving the elevator up and down several times will verify its freedom of movement.
“I then carefully removed both hinge pins and separated the elevator and stabilizer before wicking CA into the slots to secure the hinges in place. This takes a pretty steady hand and care has to be taken to keep the CA from wicking into the hinge loops.
“Years ago, my late friend, James Lollar of Ada, Oklahoma, showed me how to accomplish this almost effortlessly. He used a sewing needle with the eye ground open. The resulting fork can hold a drop of thin CA because of surface tension. When the fork is touched to the desired spot, the CA will flow into the opening.
“I secured all 12 hinge halves into the structure in less than an hour. With the hinges in place, the elevator hinge pins must now be secured to prevent them from working loose. However, it is wise to make the pin removable for possible future damage repair.
“Perfect little keepers can be made from short lengths of wire insulation that can slide onto the music wire with a tight fit. I made my keepers from a scrap of servo wire and chose the red lead to match the covering. I then cut off 5/32-inch lengths of insulation to equal the width of one hinge loop.
“I slipped a keeper onto the pin, positioning it to rest against the outside of the outer hinges with the hinge pin end extended outboard 1-9/16 inch. This keeps the outboard end below the surface of the tapered tip. However, the pin can be pushed far enough from the other end to be grasped and pulled out.
“This outboard keeper is permanently bonded to the hinge pin with thin CA and serves as a stop when inserting the pin.
“Now install the removable keeper on the inboard end of the pin. A short bend is made on a piece of 0.031 wire to make the keeper tool. Slip the red keeper onto the bent end but only enough to retain it. I use this tool to push the keeper partway onto the hinge pin.
“Now comes the tricky part. I use the back edge of an X-Acto blade to hold the keeper on the pin as I remove the tool. The keeper is then pushed onto the hinge pin with a piece of 3/32-inch hard balsa. Again, the back of the blade is used to slide the
keeper onto the pin so that it rests against the outside of the inner hinge with the pointed end of the pin extending inboard 3/8 of an inch. This inboard keeper is not bonded on the hinge pin but is held in place by friction.
“To remove the hinge pin, simply use a piece of hard balsa to push its inner end outboard enough so that the outer end can be grasped and pulled out, thus releasing the elevator from the stabilizer. Be sure to keep track of the inner keeper as it slides off the pin.”
Tandy’s method is an elegant way to hinge control surfaces, and a method that I have used in the past. I do have a couple of thoughts.
First, while Klett hinges with removable pins are still available, you can do the same with Du-Bro or other hinges that you might already have. With a little care, you can clip the flared end of fixed hinge pins for removal, using a good pair of diagonal cutters.
My second thought is more of a concern. CA is not generally recommended for securing nylon hinges, especially for larger or faster models that will have higher control loads when maneuvering. The same basic technique can be used with Pacer’s Formula 560 Canopy Glue or 30-minute epoxy. Do not use 5-minute epoxy. Its short working time will tempt you to rush.
If you choose to use thin CA as Tandy demonstrates, I recommend drilling through the structure and hinge tabs to allow the hinges to be pinned in place with a pair of round toothpicks or thin dowels. With care, you can sand the ends flush and use a small disk of covering film or even a bit of paint to seal and disguise the exposed ends of the wooden pins.


I have again run out of space. Thanks for all of your support. I guess it is time to go clean off the bench.
SOURCES:
Du-Bro
(800) 848-9411
www.dubro.com
Model Engine Company of America (Klett hinges)
www.mecoa.com