JETTLC AND
MAINTENANCE
By Jim Hiller | jetmodeler@earthlink.net

I LIVE IN THE NORTH, so winter is our building and maintenance season. Right now, my jets need some serious maintenance and upgrades. I flew them often and hard last summer, and they need some TLC before the little things become big things.
Let’s start off with my Der Jet Cougar. It’s a great model that I fly from paved runways and grass fields. The landing gear receives some serious wear and tear because it weighs more than 38 pounds on takeoff—and not all grass runways are smooth.
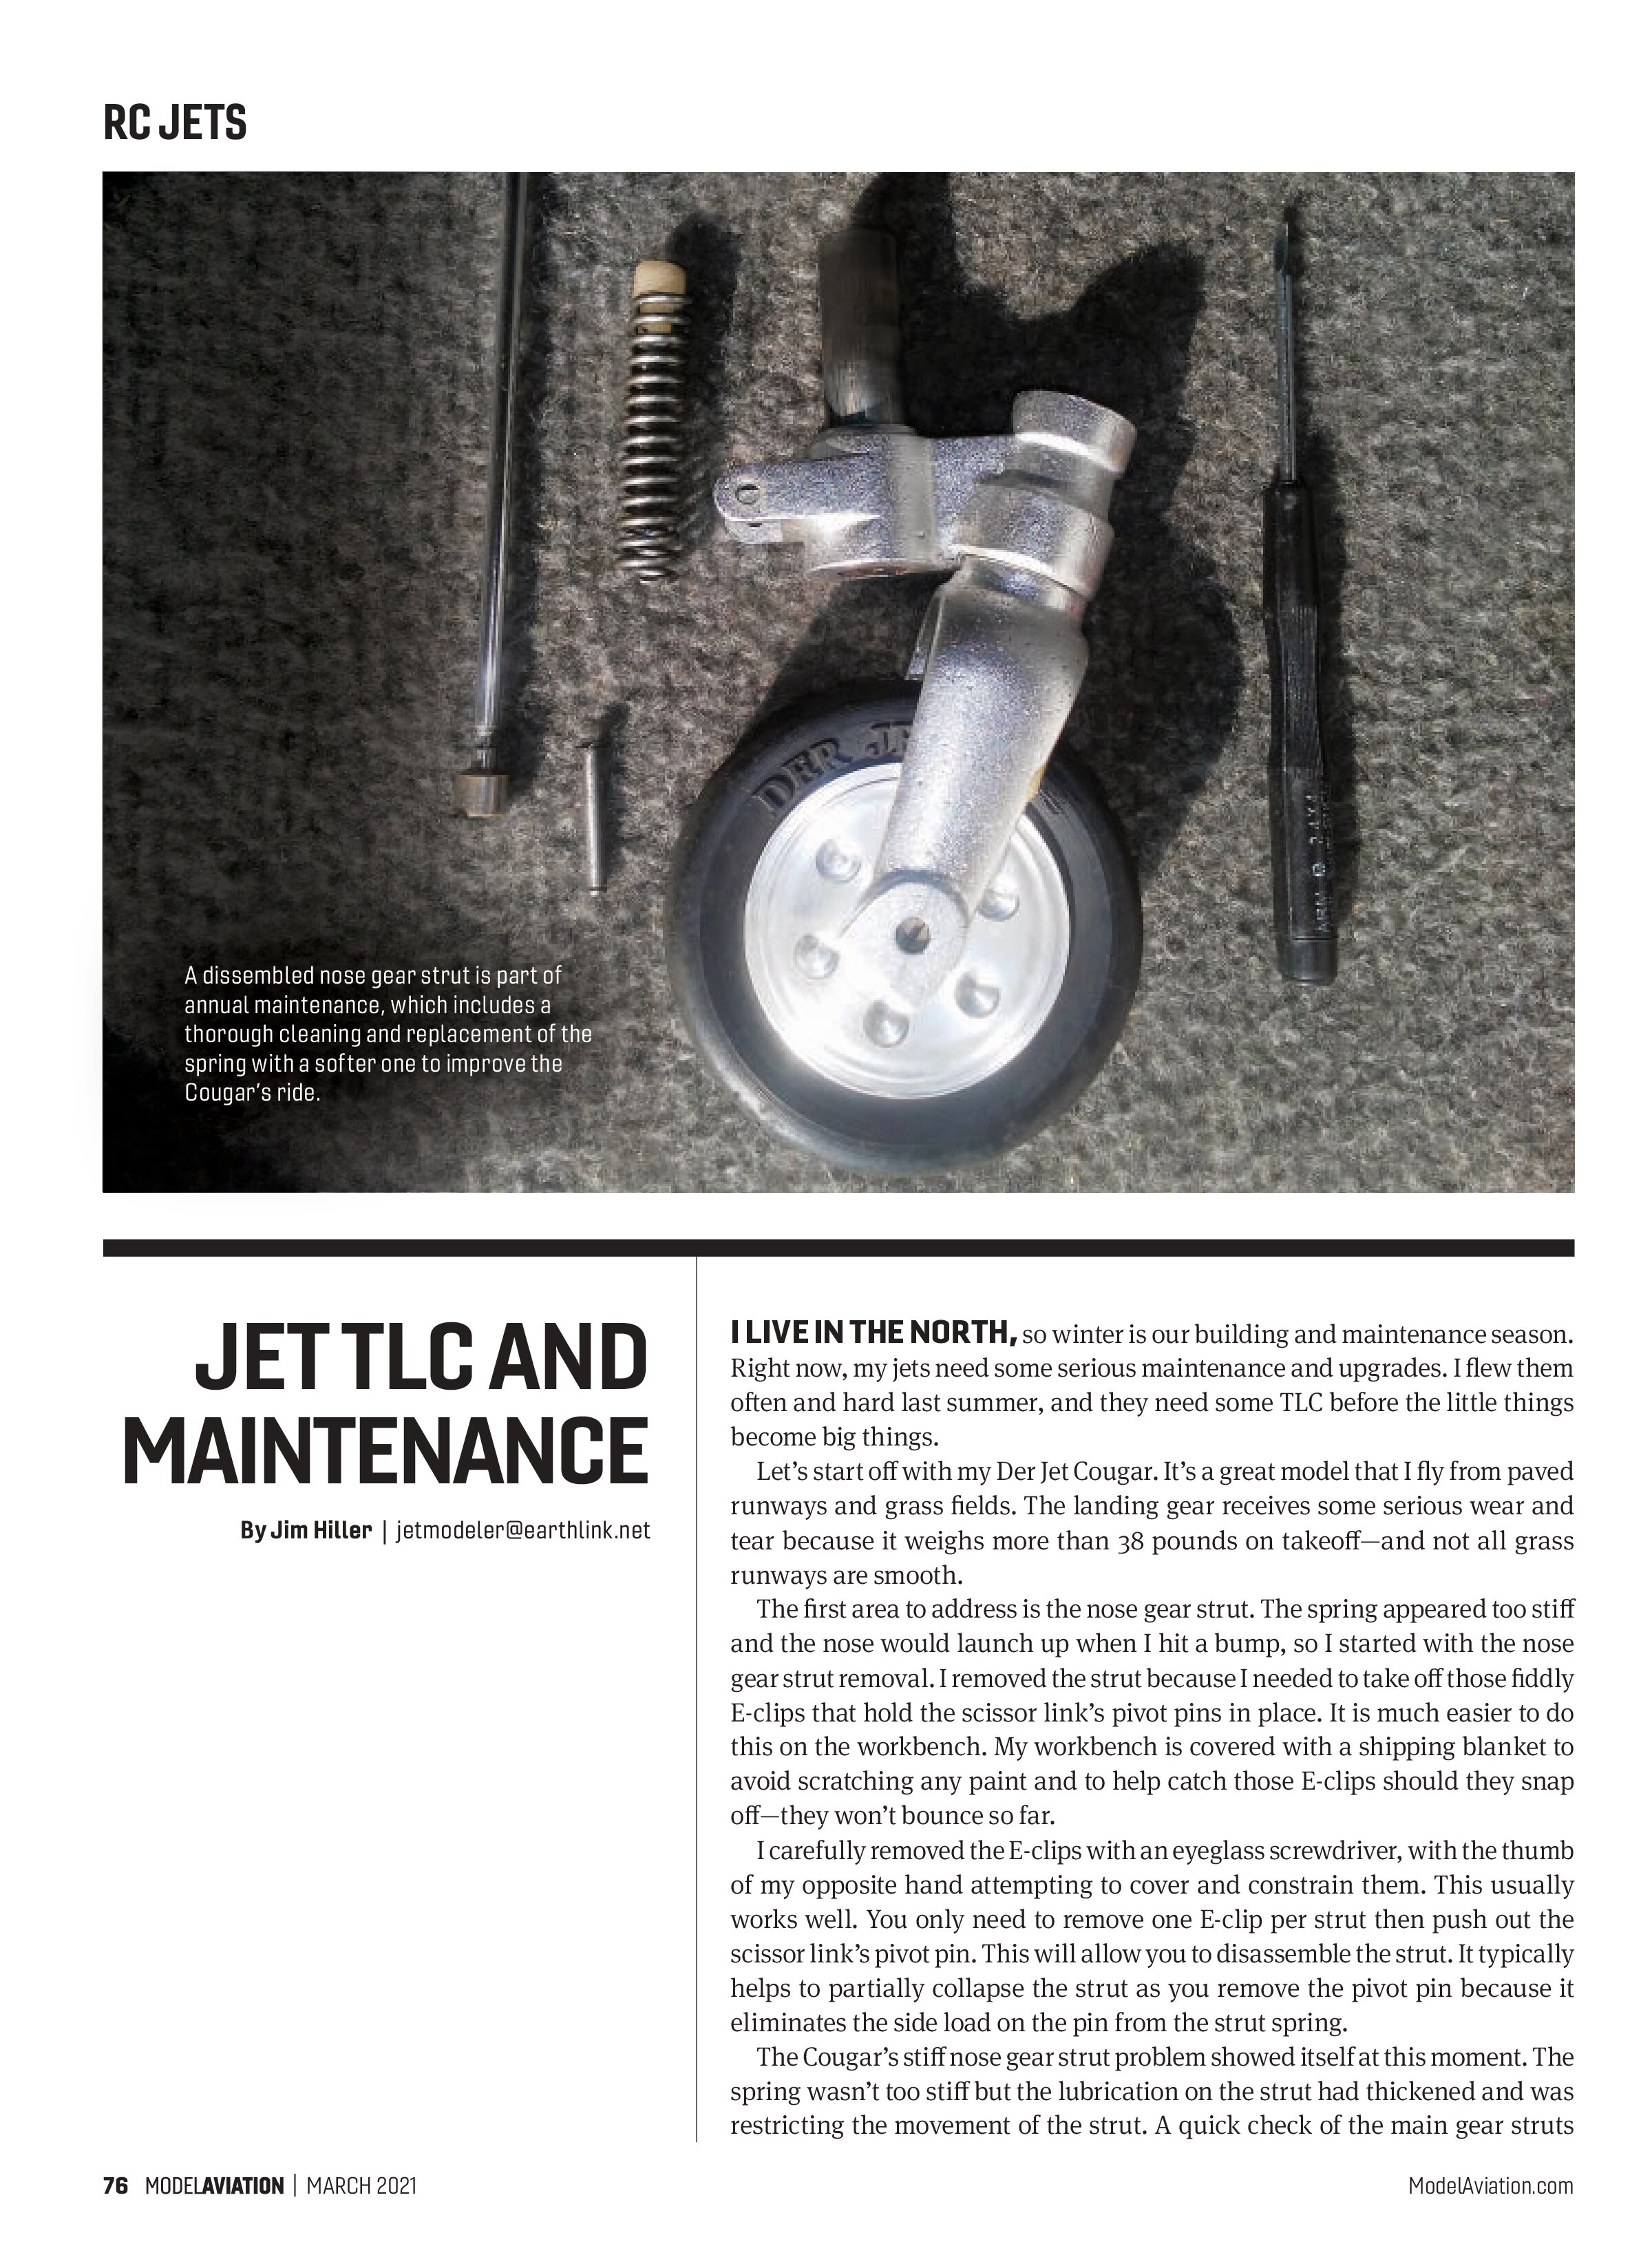
The first area to address is the nose gear strut. The spring appeared too stiff and the nose would launch up when I hit a bump, so I started with the nose gear strut removal. I removed the strut because I needed to take off those fiddly E-clips that hold the scissor link’s pivot pins in place. It is much easier to do this on the workbench. My workbench is covered with a shipping blanket to avoid scratching any paint and to help catch those E-clips should they snap off—they won’t bounce so far.
I carefully removed the E-clips with an eyeglass screwdriver, with the thumb of my opposite hand attempting to cover and constrain them. This usually works well. You only need to remove one E-clip per strut then push out the scissor link’s pivot pin. This will allow you to disassemble the strut. It typically helps to partially collapse the strut as you remove the pivot pin because it eliminates the side load on the pin from the strut spring.
The Cougar’s stiff nose gear strut problem showed itself at this moment. The spring wasn’t too stiff but the lubrication on the strut had thickened and was restricting the movement of the strut. A quick check of the main gear struts found the same problem. This turned into simply cleaning, applying fresh lubrication, and reassembling the struts. I like to use thin oil, such as sewing machine oil or even Mobil DTE Light, for this application. It’s a nice, thin lubricant that I normally apply without disassembly.
The tricky part follows with reassembling the landing gear strut. The first difficult part is getting the scissor link’s pivot pin aligned and pushed into place. The nose gear spring on this model was soft enough to simply collapse with pressure, pushing against the workbench and pushing the pin in place. The main gear had stronger springs. For the stronger springs on larger models, I use my bench vise to collapse the strut while inserting the scissor link pins. It’s much simpler to let the vice do the hard work.
Reinstalling E-clips can be difficult. The E-clips that are on today’s ARF jets tend to be loose when they are reused because they stretch out of shape when removed. They can be reused, but some rework is usually necessary. The simplest repair for a loose E-clip is to take needle-nose pliers and give it a squeeze while it is installed.
With the soft metal on some E-clips, this sometimes works well because it bends so easily. Another technique before reusing an E-clip and before assembly is to tighten it back to shape with a squeeze of needle-nose pliers.
Replacement E-clips can sometimes be found at local hardware stores, but a reliable source for me has always been McMaster-Carr. Throughout the years, I have acquired a few spares.
I am surprised at how often I find loose screws that mount the retract landing gear to the airplane. It seems that once a year, I tighten these screws on each of my jets.
Semipermanent Loctite threadlocker cures the issue with screws that thread into metal. With sheet-metal-type screws that go into plywood, a small amount of CA glue usually eliminates this problem. Use the CA sparingly because you might want to remove these screws someday.
Lights have become a popular option on our models these days, and I am not immune to the lure of them. A nice little project I took on for my Top RC Odyssey was to install a landing light flush with the leading edge (LE) of the wing. I wanted it to be cleaner than simple, plastic sheet rolled over the outside skin of the LE. It takes an extra step to complete, but it is easy.
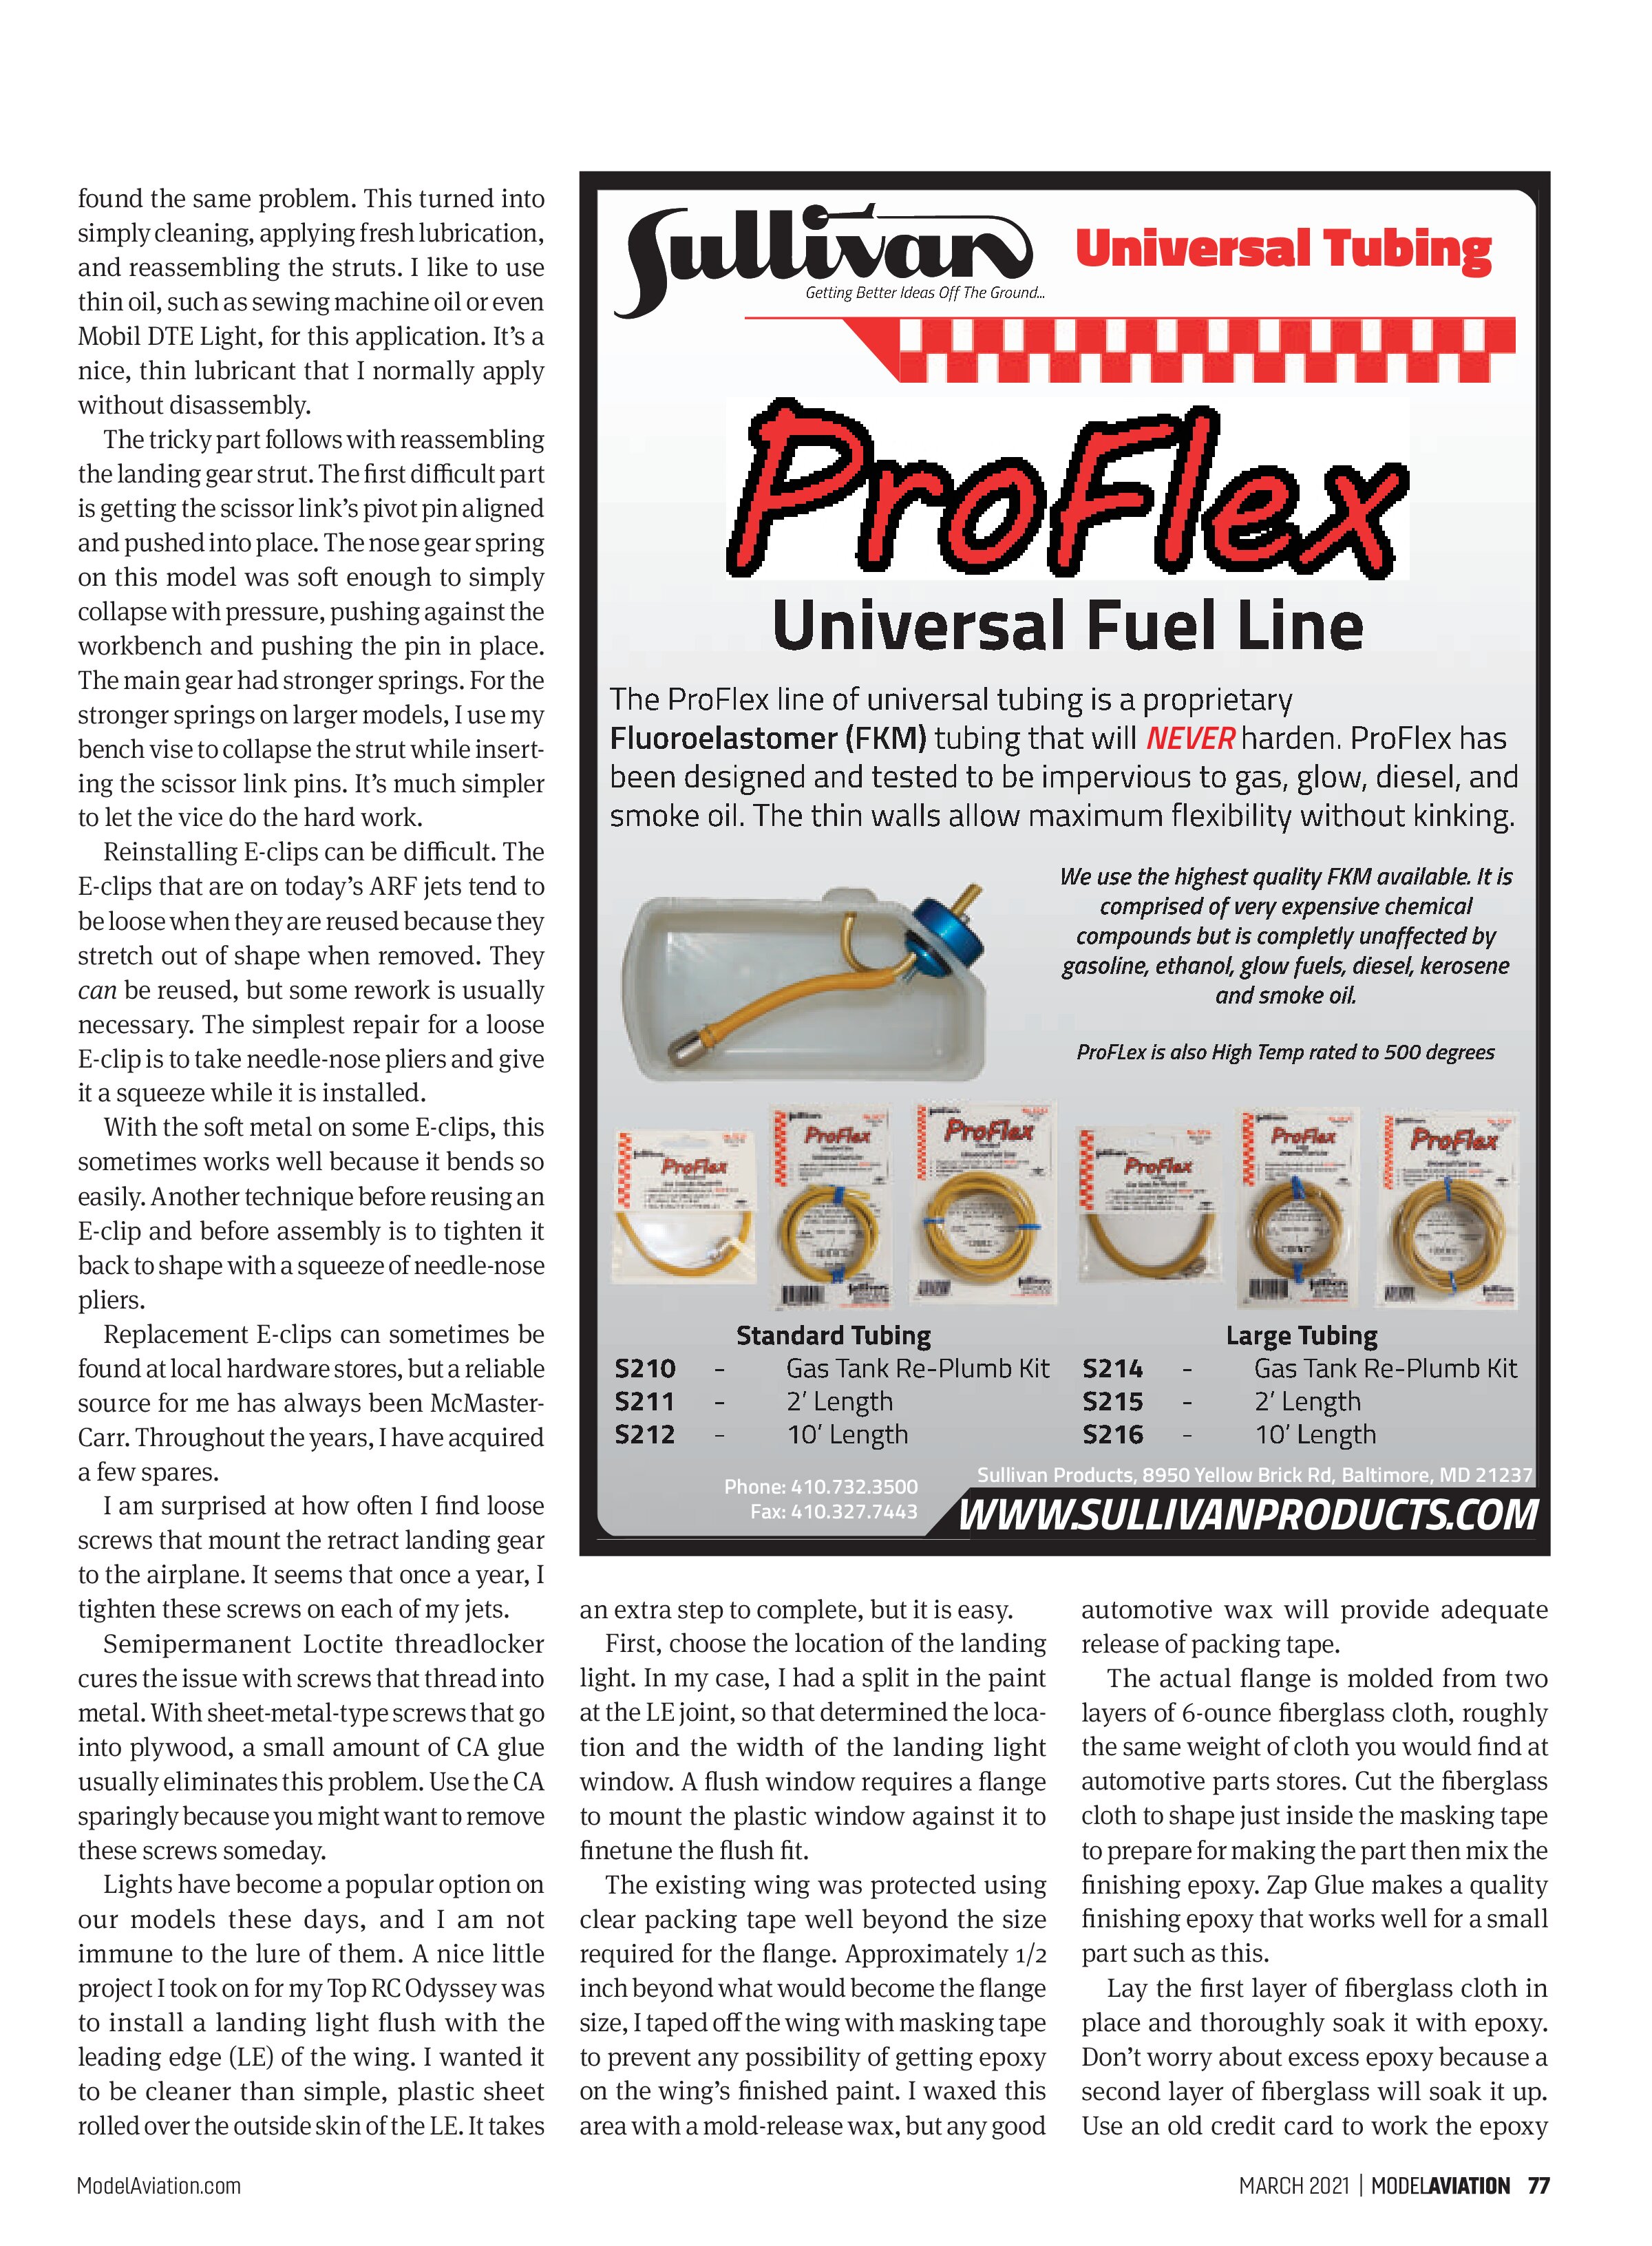
First, choose the location of the landing light. In my case, I had a split in the paint at the LE joint, so that determined the location and the width of the landing light window. A flush window requires a flange to mount the plastic window against it to finetune the flush fit.
The existing wing was protected using clear packing tape well beyond the size required for the flange. Approximately 1/2 inch beyond what would become the flange size, I taped off the wing with masking tape to prevent any possibility of getting epoxy on the wing’s finished paint. I waxed this area with a mold-release wax, but any good automotive wax will provide adequate release of packing tape.
The actual flange is molded from two layers of 6-ounce fiberglass cloth, roughly the same weight of cloth you would find at automotive parts stores. Cut the fiberglass cloth to shape just inside the masking tape to prepare for making the part then mix the finishing epoxy. Zap Glue makes a quality finishing epoxy that works well for a small part such as this.
Lay the first layer of fiberglass cloth in place and thoroughly soak it with epoxy. Don’t worry about excess epoxy because a second layer of fiberglass will soak it up. Use an old credit card to work the epoxy
opening with which to work. Trying to work in such a small opening can be clumsy.
The wires for the light can be run where it is most convenient. I found that the LE ribs of my Odyssey had holes through them, so the light wires run ahead of the spar. A second option for running the wires could be to cut a hole through the center of the spar shear web and run the wires back to the aileron servo bay, routing them along with the aileron servo wires. Both methods work well.
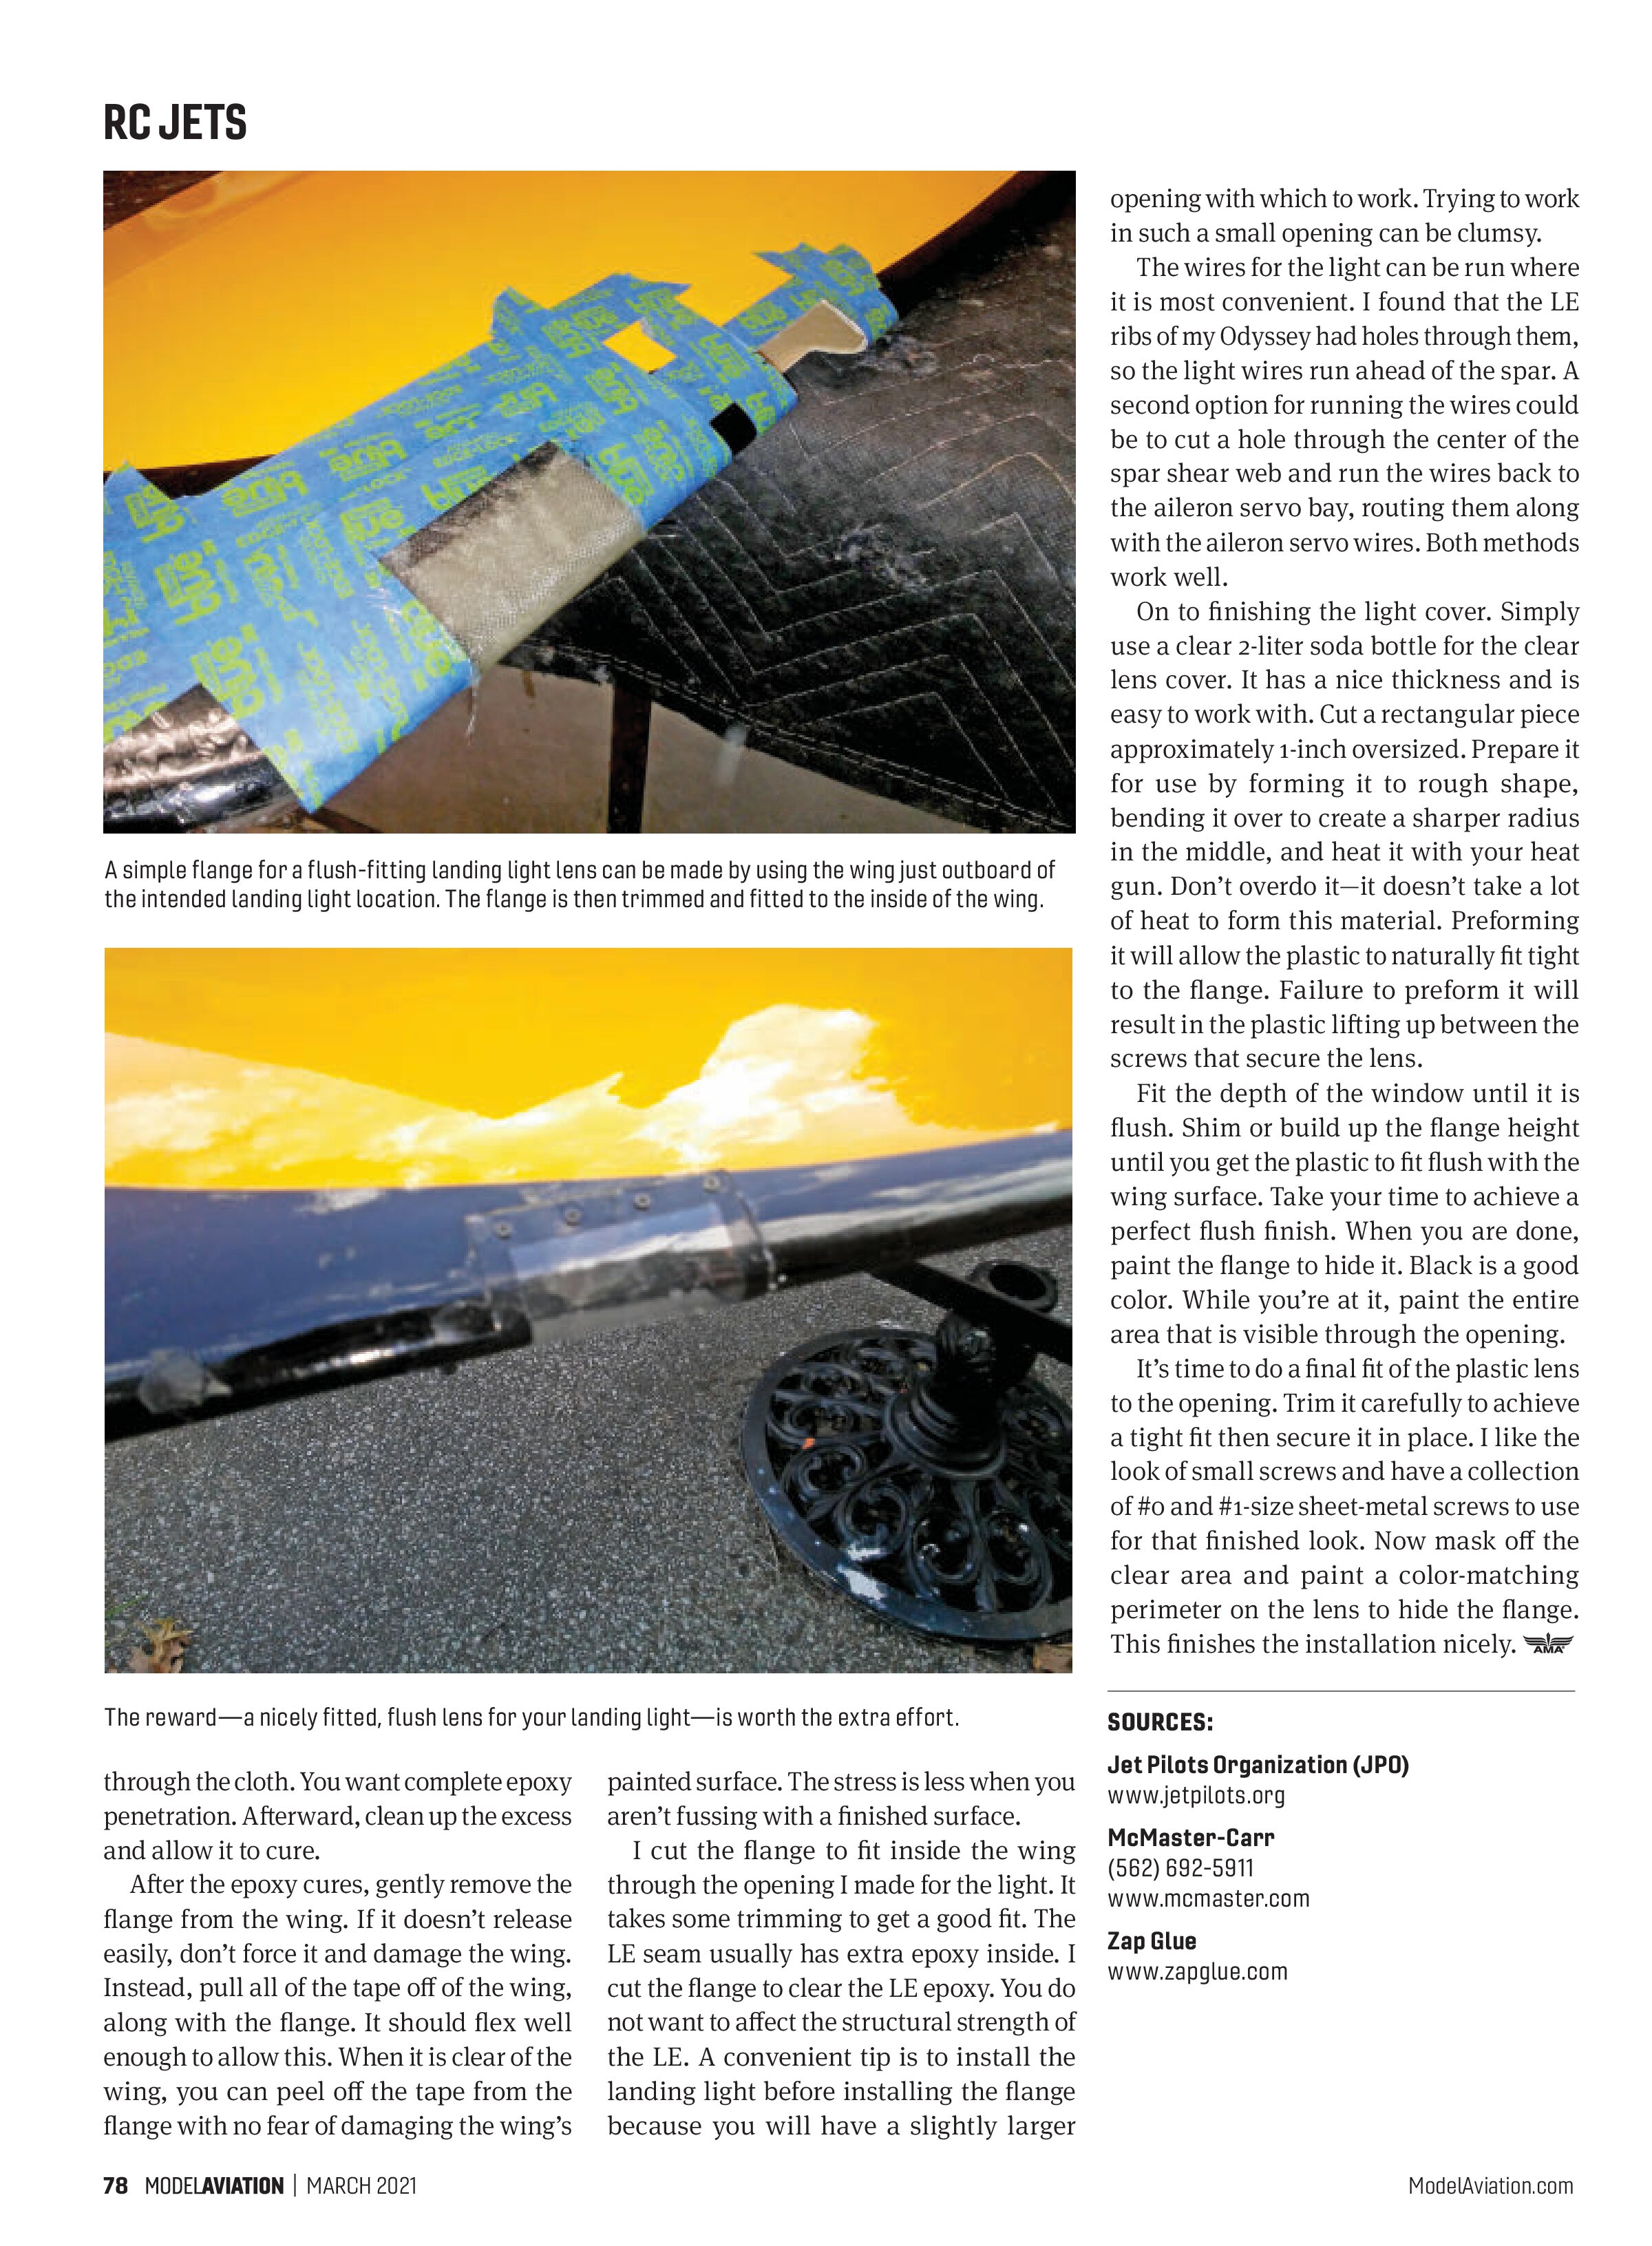
On to finishing the light cover. Simply use a clear 2-liter soda bottle for the clear lens cover. It has a nice thickness and is easy to work with. Cut a rectangular piece approximately 1-inch oversized. Prepare it for use by forming it to rough shape, bending it over to create a sharper radius in the middle, and heat it with your heat gun. Don’t overdo it—it doesn’t take a lot of heat to form this material. Preforming it will allow the plastic to naturally fit tight to the flange. Failure to preform it will result in the plastic lifting up between the screws that secure the lens.
Fit the depth of the window until it is flush. Shim or build up the flange height until you get the plastic to fit flush with the wing surface. Take your time to achieve a perfect flush finish. When you are done, paint the flange to hide it. Black is a good color. While you’re at it, paint the entire area that is visible through the opening.
It’s time to do a final fit of the plastic lens to the opening. Trim it carefully to achieve a tight fit then secure it in place. I like the look of small screws and have a collection of #0 and #1-size sheet-metal screws to use for that finished look. Now mask off the clear area and paint a color-matching perimeter on the lens to hide the flange. This finishes the installation nicely.

through the cloth. You want complete epoxy penetration. Afterward, clean up the excess and allow it to cure.
After the epoxy cures, gently remove the flange from the wing. If it doesn’t release easily, don’t force it and damage the wing. Instead, pull all of the tape off of the wing, along with the flange. It should flex well enough to allow this. When it is clear of the wing, you can peel off the tape from the flange with no fear of damaging the wing’s painted surface. The stress is less when you aren’t fussing with a finished surface.
I cut the flange to fit inside the wing through the opening I made for the light. It takes some trimming to get a good fit. The LE seam usually has extra epoxy inside. I cut the flange to clear the LE epoxy. You do not want to affect the structural strength of the LE. A convenient tip is to install the landing light before installing the flange because you will have a slightly larger opening with which to work.

SOURCES:
Jet Pilots Organization (JPO)
www.jetpilots.org
McMaster-Carr
(562) 692-5911
www.mcmaster.com
Zap Glue
www.zapglue.com