The Sportsman sequence
by Peter Vogel
vogel.peter@gmail.com
In my last column, I covered the final two maneuvers of the second group of five in the Sportsman sequence. Upon completion of the 45° downline on center, a pilot has an opportunity to exit the aerobatic box, briefly relax with an unscored turnaround, and realign the aircraft to a neat parallel line at approximately 150 meters from the flightline.
If you were at a good Z distance and parallel line upon completion of the downline, the ideal turnaround would be a half-reverse Cuban 8 at the completion of the 5/8 loop after the 45° upline, providing you with a nice, long horizontal line to maintain the parallel line and become comfortable before calling your reentry to the aerobatic box.
This month, I’ll cover the first two maneuvers of the final group of five aerobatic maneuvers: the 45° upline on center into the Split S turnaround.
45° Upline
Keep in mind that you need to draw a good, clean, straight-and-level line for at least 15 meters after calling “in the box” and before initiating the first aerobatic maneuver in the box. In this case, the first maneuver is a 45° upline.
The biggest mistake that I see Sportsman pilots make on this maneuver is getting the timing of the maneuver wrong—usually by initiating the pull for the radius to 45° at or near center—so that the entire upline is drawn past the centerline. Less common is the error of pulling too early and pushing back to level on center so that the entire upline is drawn before center. There seems to be a sense that you must do something on the sticks at center, and that’s simply not the case!
For this maneuver, if you get the entry right, you should be able to fly

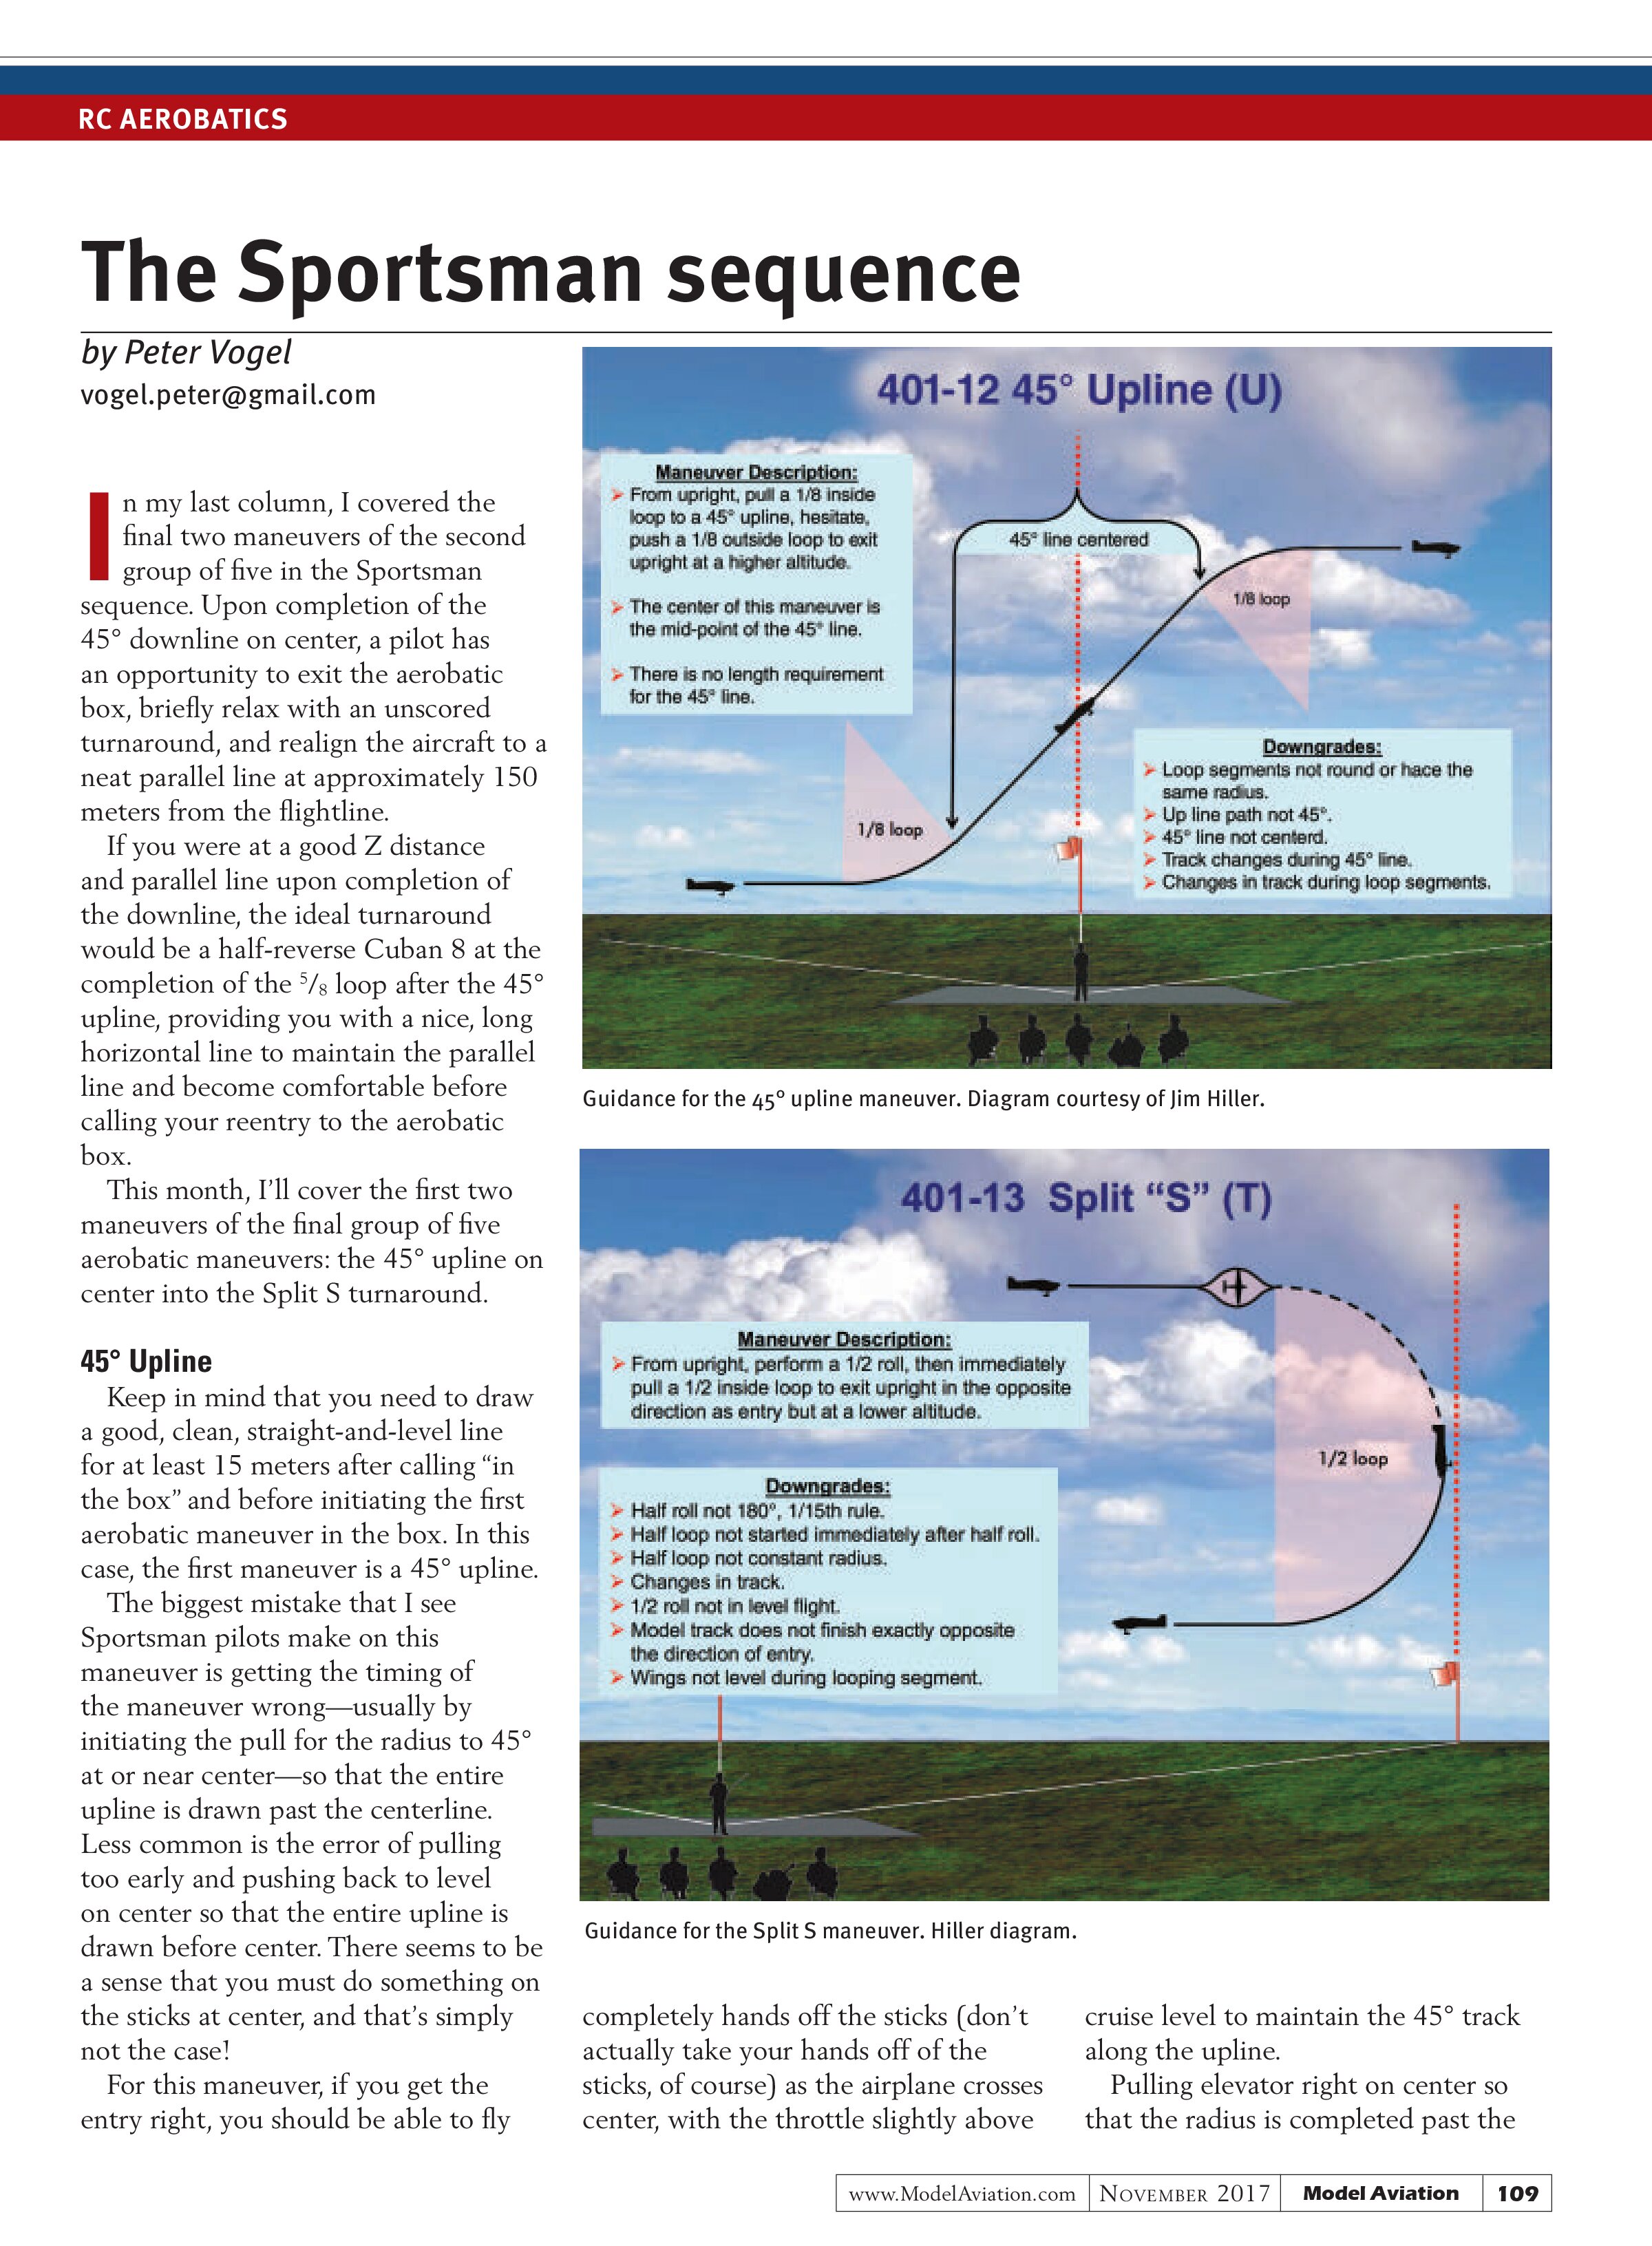
Guidance for the 45° upline maneuver. Diagram courtesy of Jim Hiller.

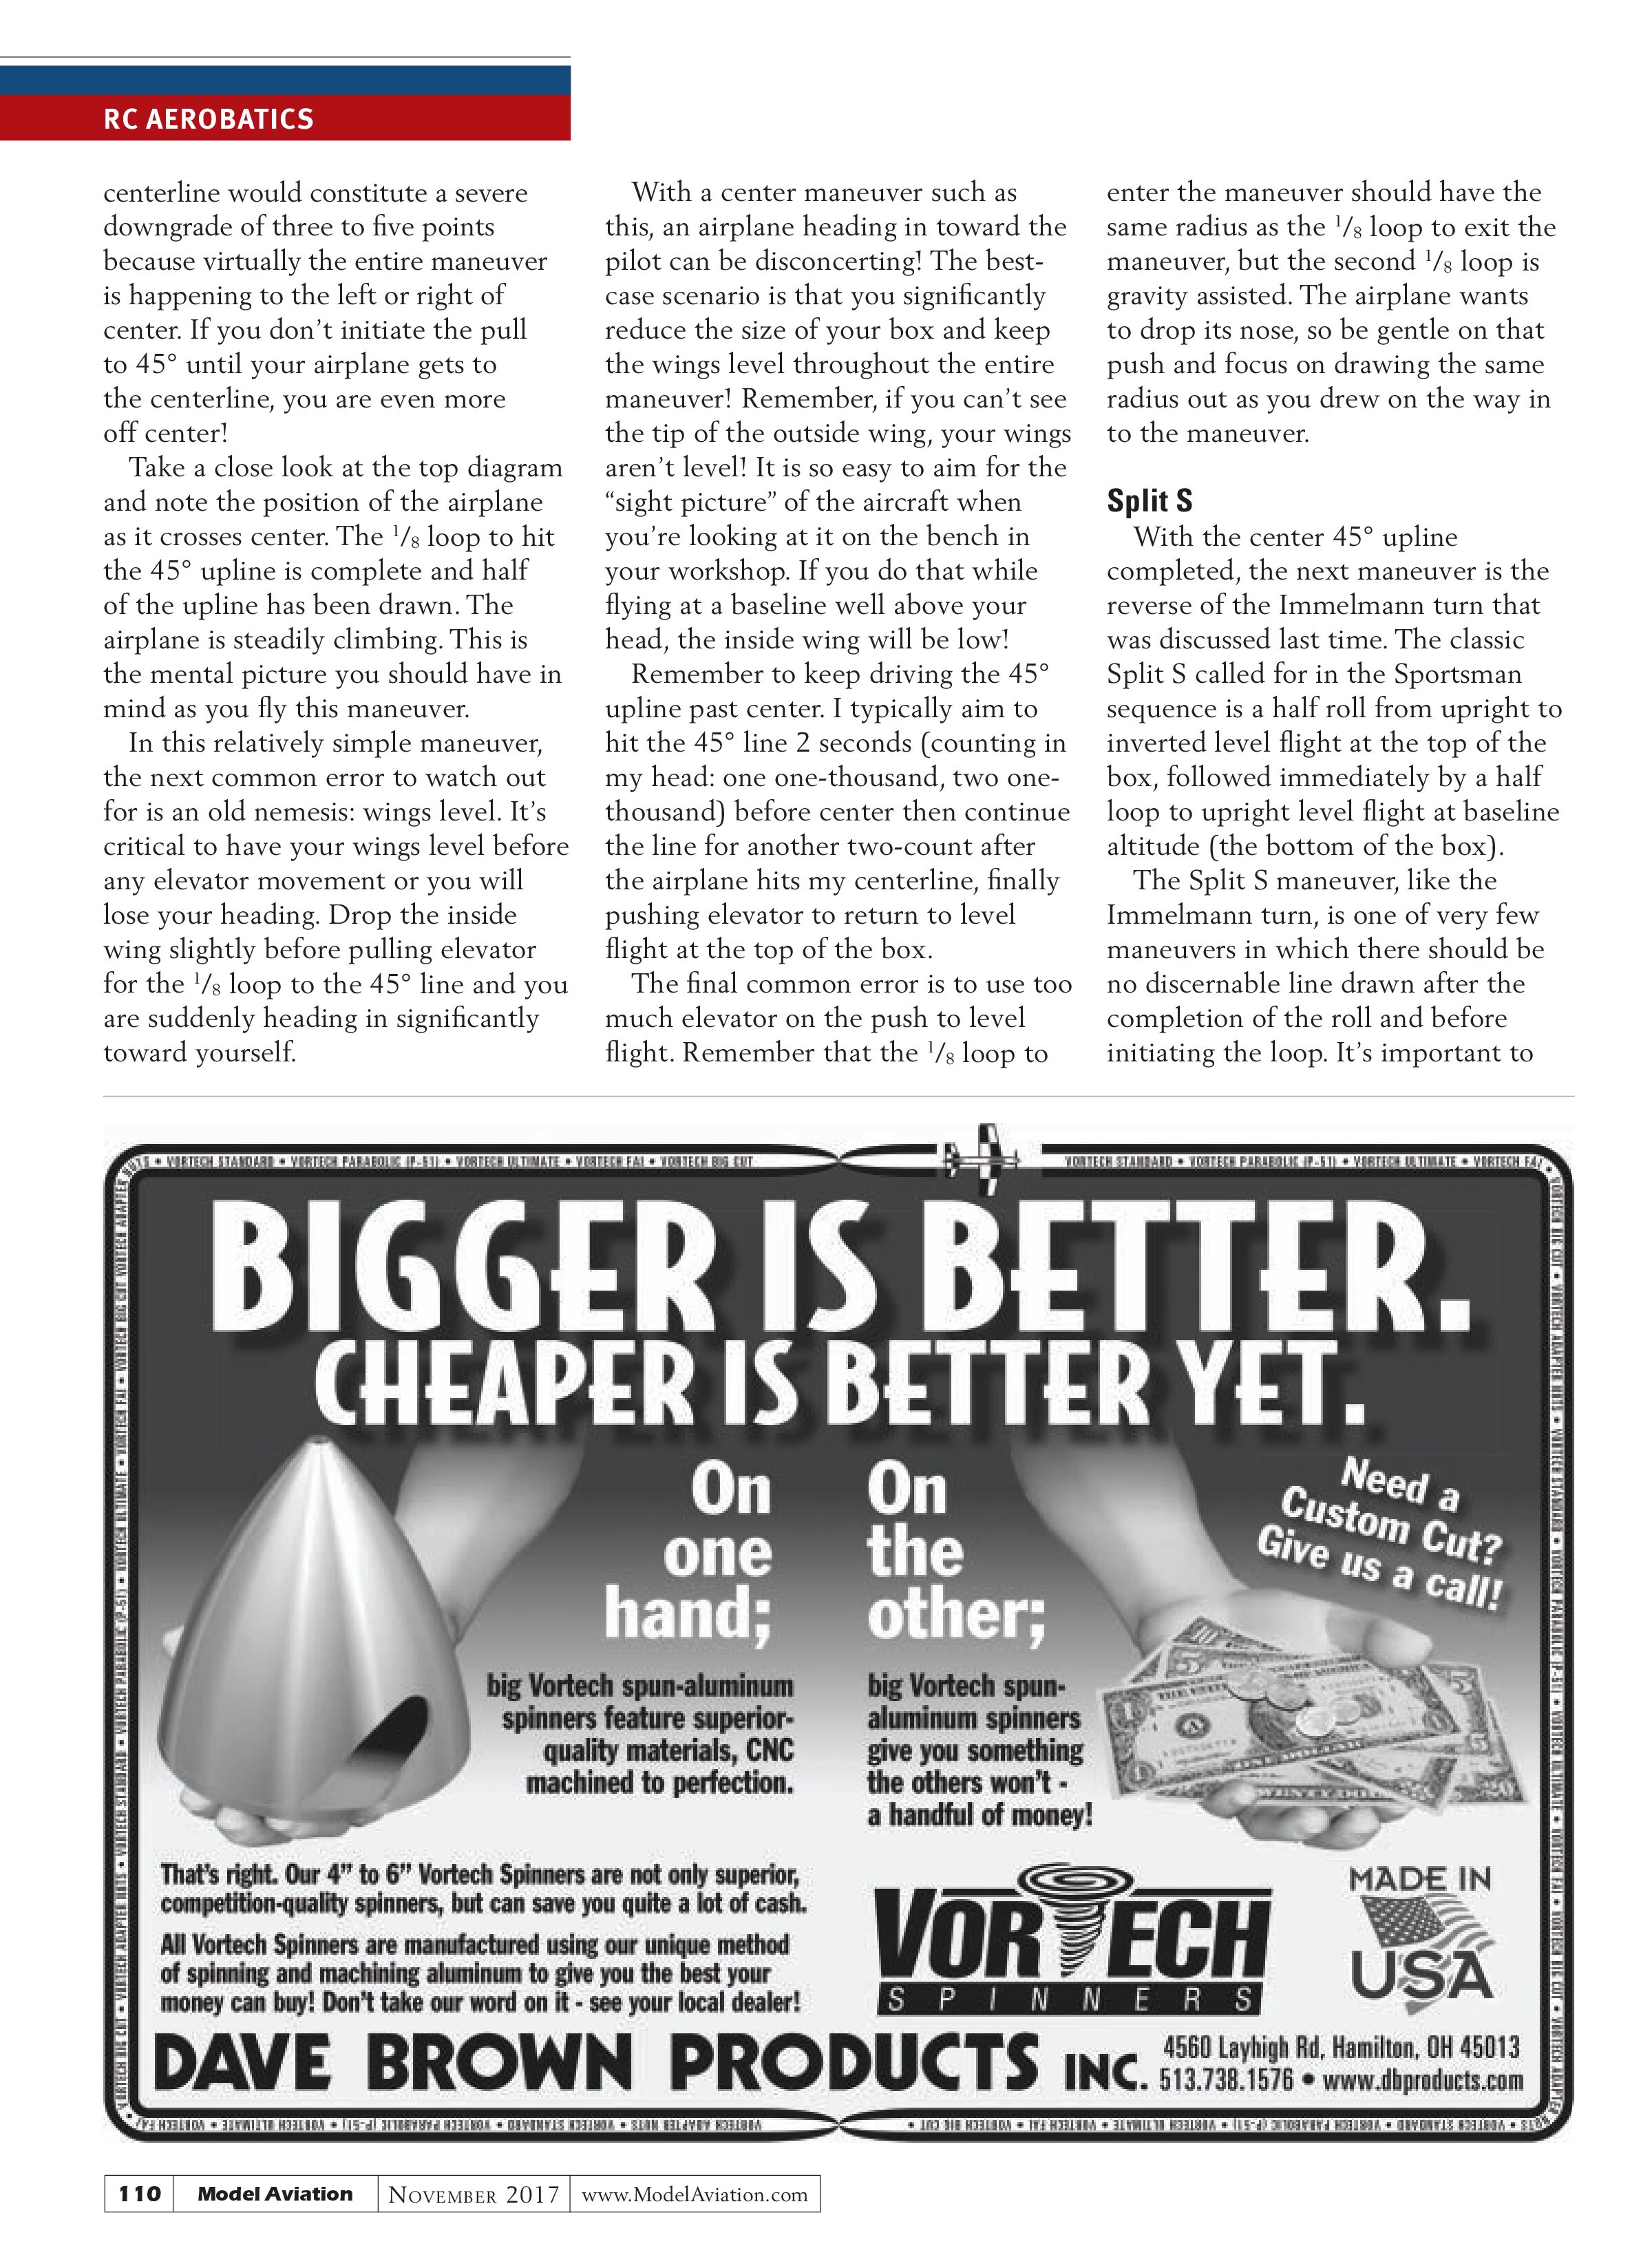
Guidance for the Split S maneuver.
completely hands off the sticks (don’t actually take your hands off of the sticks, of course) as the airplane crosses center, with the throttle slightly above cruise level to maintain the 45° track along the upline.
Pulling elevator right on center so that the radius is completed past the
centerline would constitute a severe downgrade of three to five points because virtually the entire maneuver is happening to the left or right of center. If you don’t initiate the pull to 45° until your airplane gets to the centerline, you are even more off center!
Take a close look at the top diagram and note the position of the airplane as it crosses center. The ⅛ loop to hit the 45° upline is complete and half of the upline has been drawn. The airplane is steadily climbing. This is the mental picture you should have in mind as you fly this maneuver.
In this relatively simple maneuver, the next common error to watch out for is an old nemesis: wings level. It’s critical to have your wings level before any elevator movement or you will lose your heading. Drop the inside wing slightly before pulling elevator for the ⅛ loop to the 45° line and you are suddenly heading in significantly toward yourself.
With a center maneuver such as this, an airplane heading in toward the pilot can be disconcerting! The best-case scenario is that you significantly reduce the size of your box and keep the wings level throughout the entire maneuver! Remember, if you can’t see the tip of the outside wing, your wings aren’t level! It is so easy to aim for the “sight picture” of the aircraft when you’re looking at it on the bench in your workshop. If you do that while flying at a baseline well above your head, the inside wing will be low!
Remember to keep driving the 45° upline past center. I typically aim to hit the 45° line 2 seconds (counting in my head: one one-thousand, two one-thousand) before center then continue the line for another two-count after the airplane hits my centerline, finally pushing elevator to return to level flight at the top of the box.
The final common error is to use too much elevator on the push to level flight. Remember that the ⅛ loop to enter the maneuver should have the same radius as the ⅛ loop to exit the maneuver, but the second ⅛ loop is gravity assisted. The airplane wants to drop its nose, so be gentle on that push and focus on drawing the same radius out as you drew on the way in to the maneuver.
Split S
With the center 45° upline completed, the next maneuver is the reverse of the Immelmann turn that was discussed last time. The classic Split S called for in the Sportsman sequence is a half roll from upright to inverted level flight at the top of the box, followed immediately by a half loop to upright level flight at baseline altitude (the bottom of the box).
The Split S maneuver, like the Immelmann turn, is one of very few maneuvers in which there should be no discernable line drawn after the completion of the roll and before initiating the loop. It’s important to complete the roll in level flight! This maneuver is easy to fly, but it requires considerable skill to fly it well.
Consider what happens when you initiate a half roll directly in front of yourself. If you fail to add a touch of rudder to hold the nose up as the airplane completes the first ¼ roll and it rolls through the knife-edge position, the nose will drop and you’ll lose your level flight. If you are early or late with the rudder, the nose will move left or right and you’ll lose heading through the roll.
The airplane’s behavior near the top corner of the box as you initiate this turnaround is no different! It might be harder for us to see as pilots, but it’s still happening, and, trust me—the judges sitting 22 feet behind you can see it even better! Allow the nose to drop as you roll and you will have initiated the half loop early and with an unintentional radius. This will also make it hard to maintain a consistent radius through the half loop, resulting in a further downgrade.
Fly this half roll at the top of the box no differently than you fly a half roll directly in front of yourself. Bump a little top rudder to keep the nose up as the airplane crosses through knife-edge, and be sure to stop the roll as you hit the inverted position with wings level.
Now, unlike the roll in front of yourself, where a slight push of down-elevator is needed to keep the nose level for your two-point roll, you are to immediately initiate the half loop, so pull elevator gently to achieve your desired radius. Keep in mind that gravity is assisting the first ¼ loop and will be resisting the return to level on the second ¼ loop.
As the airplane crosses through the vertical nose-down attitude, you will need to begin tightening up on the elevator to maintain a consistent radius through the entire half loop.
Aircraft setup plays a big part here as well. Most Sportsman pilots have their roll rate set much too high. This puts the rudder timing on a roll directly in front of the pilot, when it’s easy to see the airplane clearly. When the airplane is much farther away in the upper corner of the aerobatic box, it becomes nearly impossible to get the timing right.
I fly Intermediate and I’m still working on slowing my rolls so that the timing is consistent. It might feel uncomfortable at first as you reduce your roll rate, but stick with it. Through practice, it will pay dividends!
Finally, keep the wind in mind as you pull through the half loop. In a strong wind, you’ll need to pull tighter at first and maintain power longer to penetrate the wind and draw the first ¼ loop. Reduce power and loosen the pull as the airplane transitions from upwind to downwind flight and its ground speed is enhanced by the wind.
SOURCES:
National Society of Radio Controlled Aerobatics (NSRCA)
www.nsrca.us