Molded balsa components
by Bob Hunt
robinhunt@rcn.com
The 2017 Control Line (CL) Stunt portion of the Nats is now history. Congratulations to the winners, and to all who participated. For the record, David Fitzgerald won his 10th Nats title in the Open division. Derek Barry placed second; and the current F2B world champion, Orestes Hernandez, placed third. Rounding out the top five were 12-time Open champion Paul Walker, and first-time top-five competitor Chris Rud. The Junior class winner was Steven Daly and the Senior class winner was Samantha “Sammi” Hines. The Advanced division winner was Rick Huff, followed by Michael Schmitt in second place, and James Mills placed third.
A complete story about the 2017 Nats CL Aerobatics program will be featured in the 2017-5 edition of Stunt News, the official publication of the Precision Aerobatics Model Pilots Association (PAMPA), which is the AMA recognized Special Interest Group for CL Aerobatics. See the “Sources” listing for more information about PAMPA.

Looking a Bit Moldy …
Many modelers have discovered molded parts as a way to decrease both weight and cost in Stunt model construction. Molding balsa components is not a new idea. The Free Flight (FF) community has used molded or “rolled” balsa fuselages for decades.
The first use of molded parts in CL Stunt that I’m aware of was in the many amazing semiscale models produced by Al Rabe. Al molded the entire fuselage shape in two halves and fitted the molded “shells” onto a structure of formers.
The result was a fully sculpted look that was more realistic than most of the models of the era, which had carved and hollowed balsa top and bottom blocks fitted onto slab-sided fuselage crutch structures. Suddenly, almost any shape one could think of was within grasp.
Molded structures are much stronger than hollow-block construction. Whenever you bend or mold a straight sheet of balsa and then attach it to a substructure, you are increasing the component’s torsional rigidity.
Molded components are stronger and weigh less than hollow-block construction. Where it is difficult at best to get a thin and consistent wall thickness when hollowing a balsa block (not to mention the danger of gouging through the surface), a balsa sheet has a fixed wall thickness. Of course, weight is dependent on balsa density.
The wood chosen to be “moldable” is typically of medium density (nominally 6 to 8 pounds per cubic foot). Wood for molding must also have the proper grain structure.
The easiest wood to mold is A grain. The long, straight wood fibers are conducive to bending without breaking. The least moldable wood is C grain. This is the wood that has grain that looks like fish scales. It cracks easily if you try to bend it.
Balsa molding has to be done wet. Most builders simply soak the sheets for a while in water before attempting to bend them over a form or a “buck.” That works well, especially if the smallest radius to be bent is not too small.
I spoke with Kirk Mullinix about balsa molding a few years ago. He told

me that the noted FF guru, Sal Taibi, told him to soak the wood in apple cider vinegar! The vinegar apparently relaxes the fibers of the wood even more than water does, and results in the ability to make even smaller radii bend without fear of the balsa cracking at the bend point.
I tried it and it worked. The only problem is that your airplane will smell like a salad! (Only kidding, of course! The vinegar odor dissipates quickly.)
Both straight-form and compound curves can be achieved using this molding technique. Straight-form molded parts, such as leading edge (LE) shells for a wing, are simple to make. Compound curve parts require more technique.
Enough sales pitch—let’s mold a set of straight-form LEs.
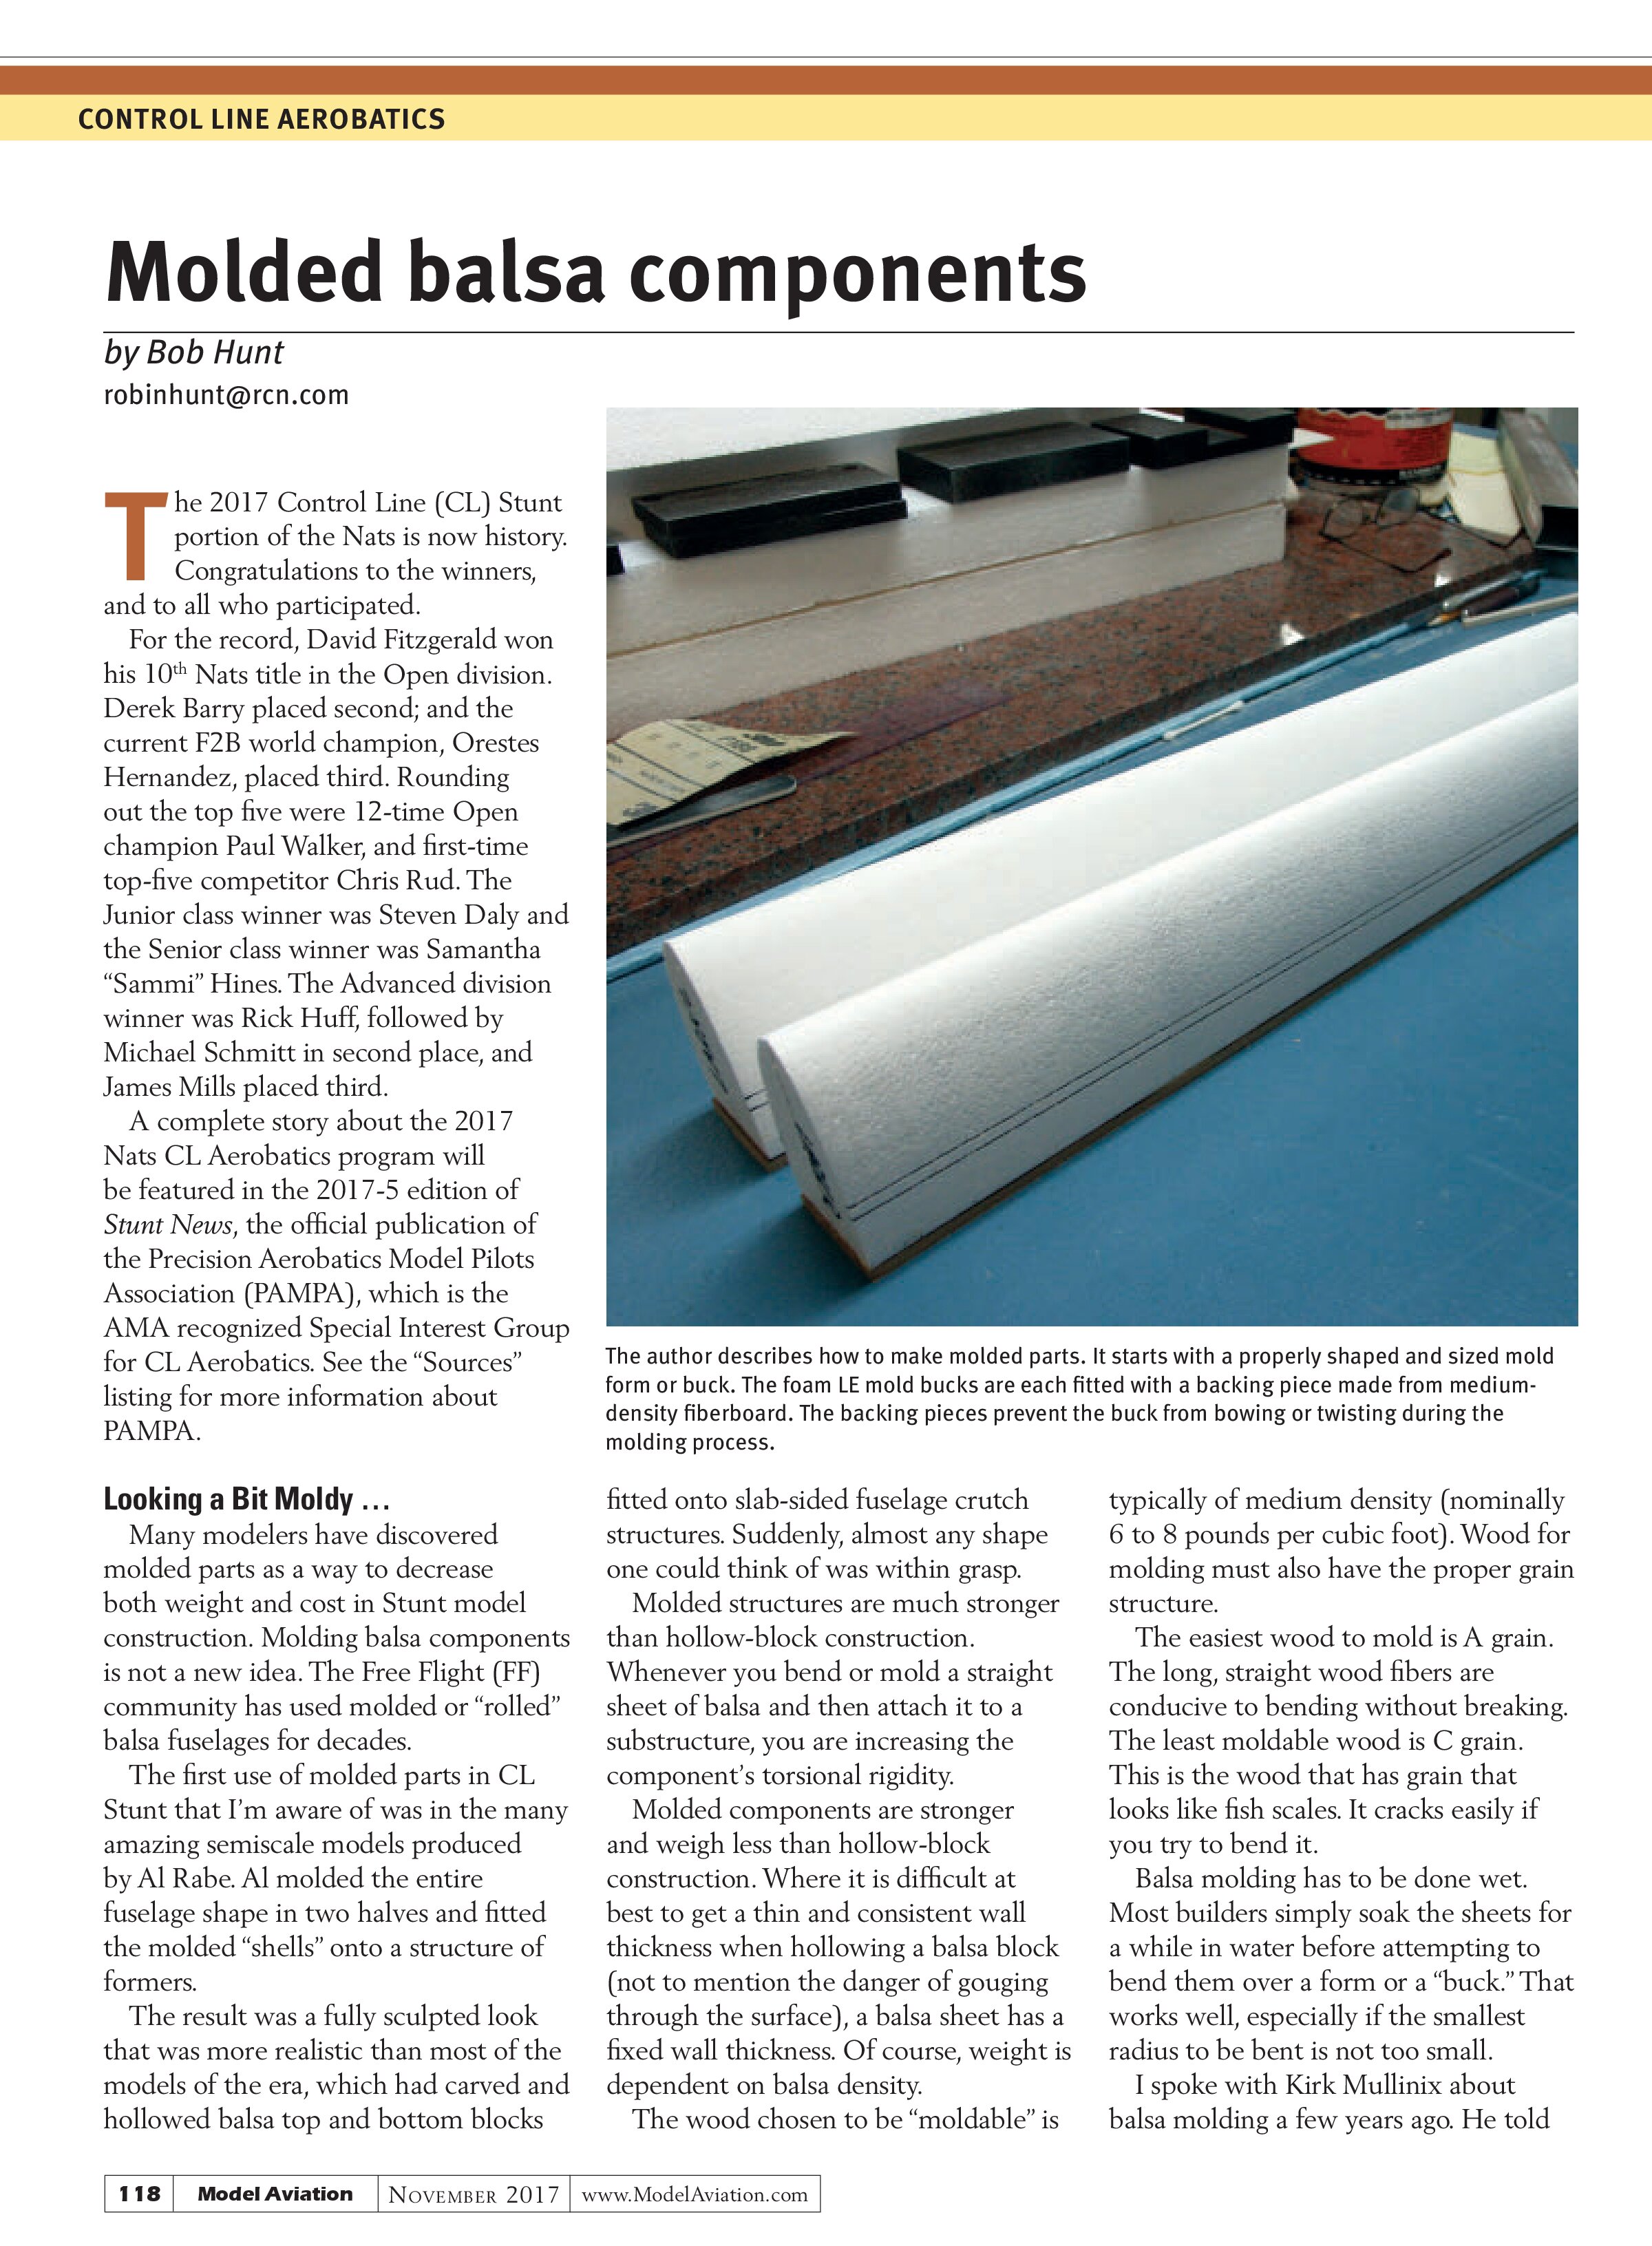
The first thing you will need is a set of accurate mold bucks on which to wrap the wet balsa. I make my straight-form mold bucks from 2-pound density EPS foam. The 2-pound foam will stand up better to repeated use than would the 1-pound variety that is normally used in actual foam wing-core construction.
Cut the mold bucks to have the exact airfoil shape and have the same span as the panels of the wing onto which the molded parts will eventually be glued. To prevent the bucks from twisting or bowing during the wrapping procedure, make a backing piece for each one from ¼-inch, medium-density fiberboard.
Glue the backing pieces onto the rear faces of the foam mold bucks and then carefully sight down them to ensure that a bow is not being induced. Carefully weigh these assemblies down and let them completely dry.
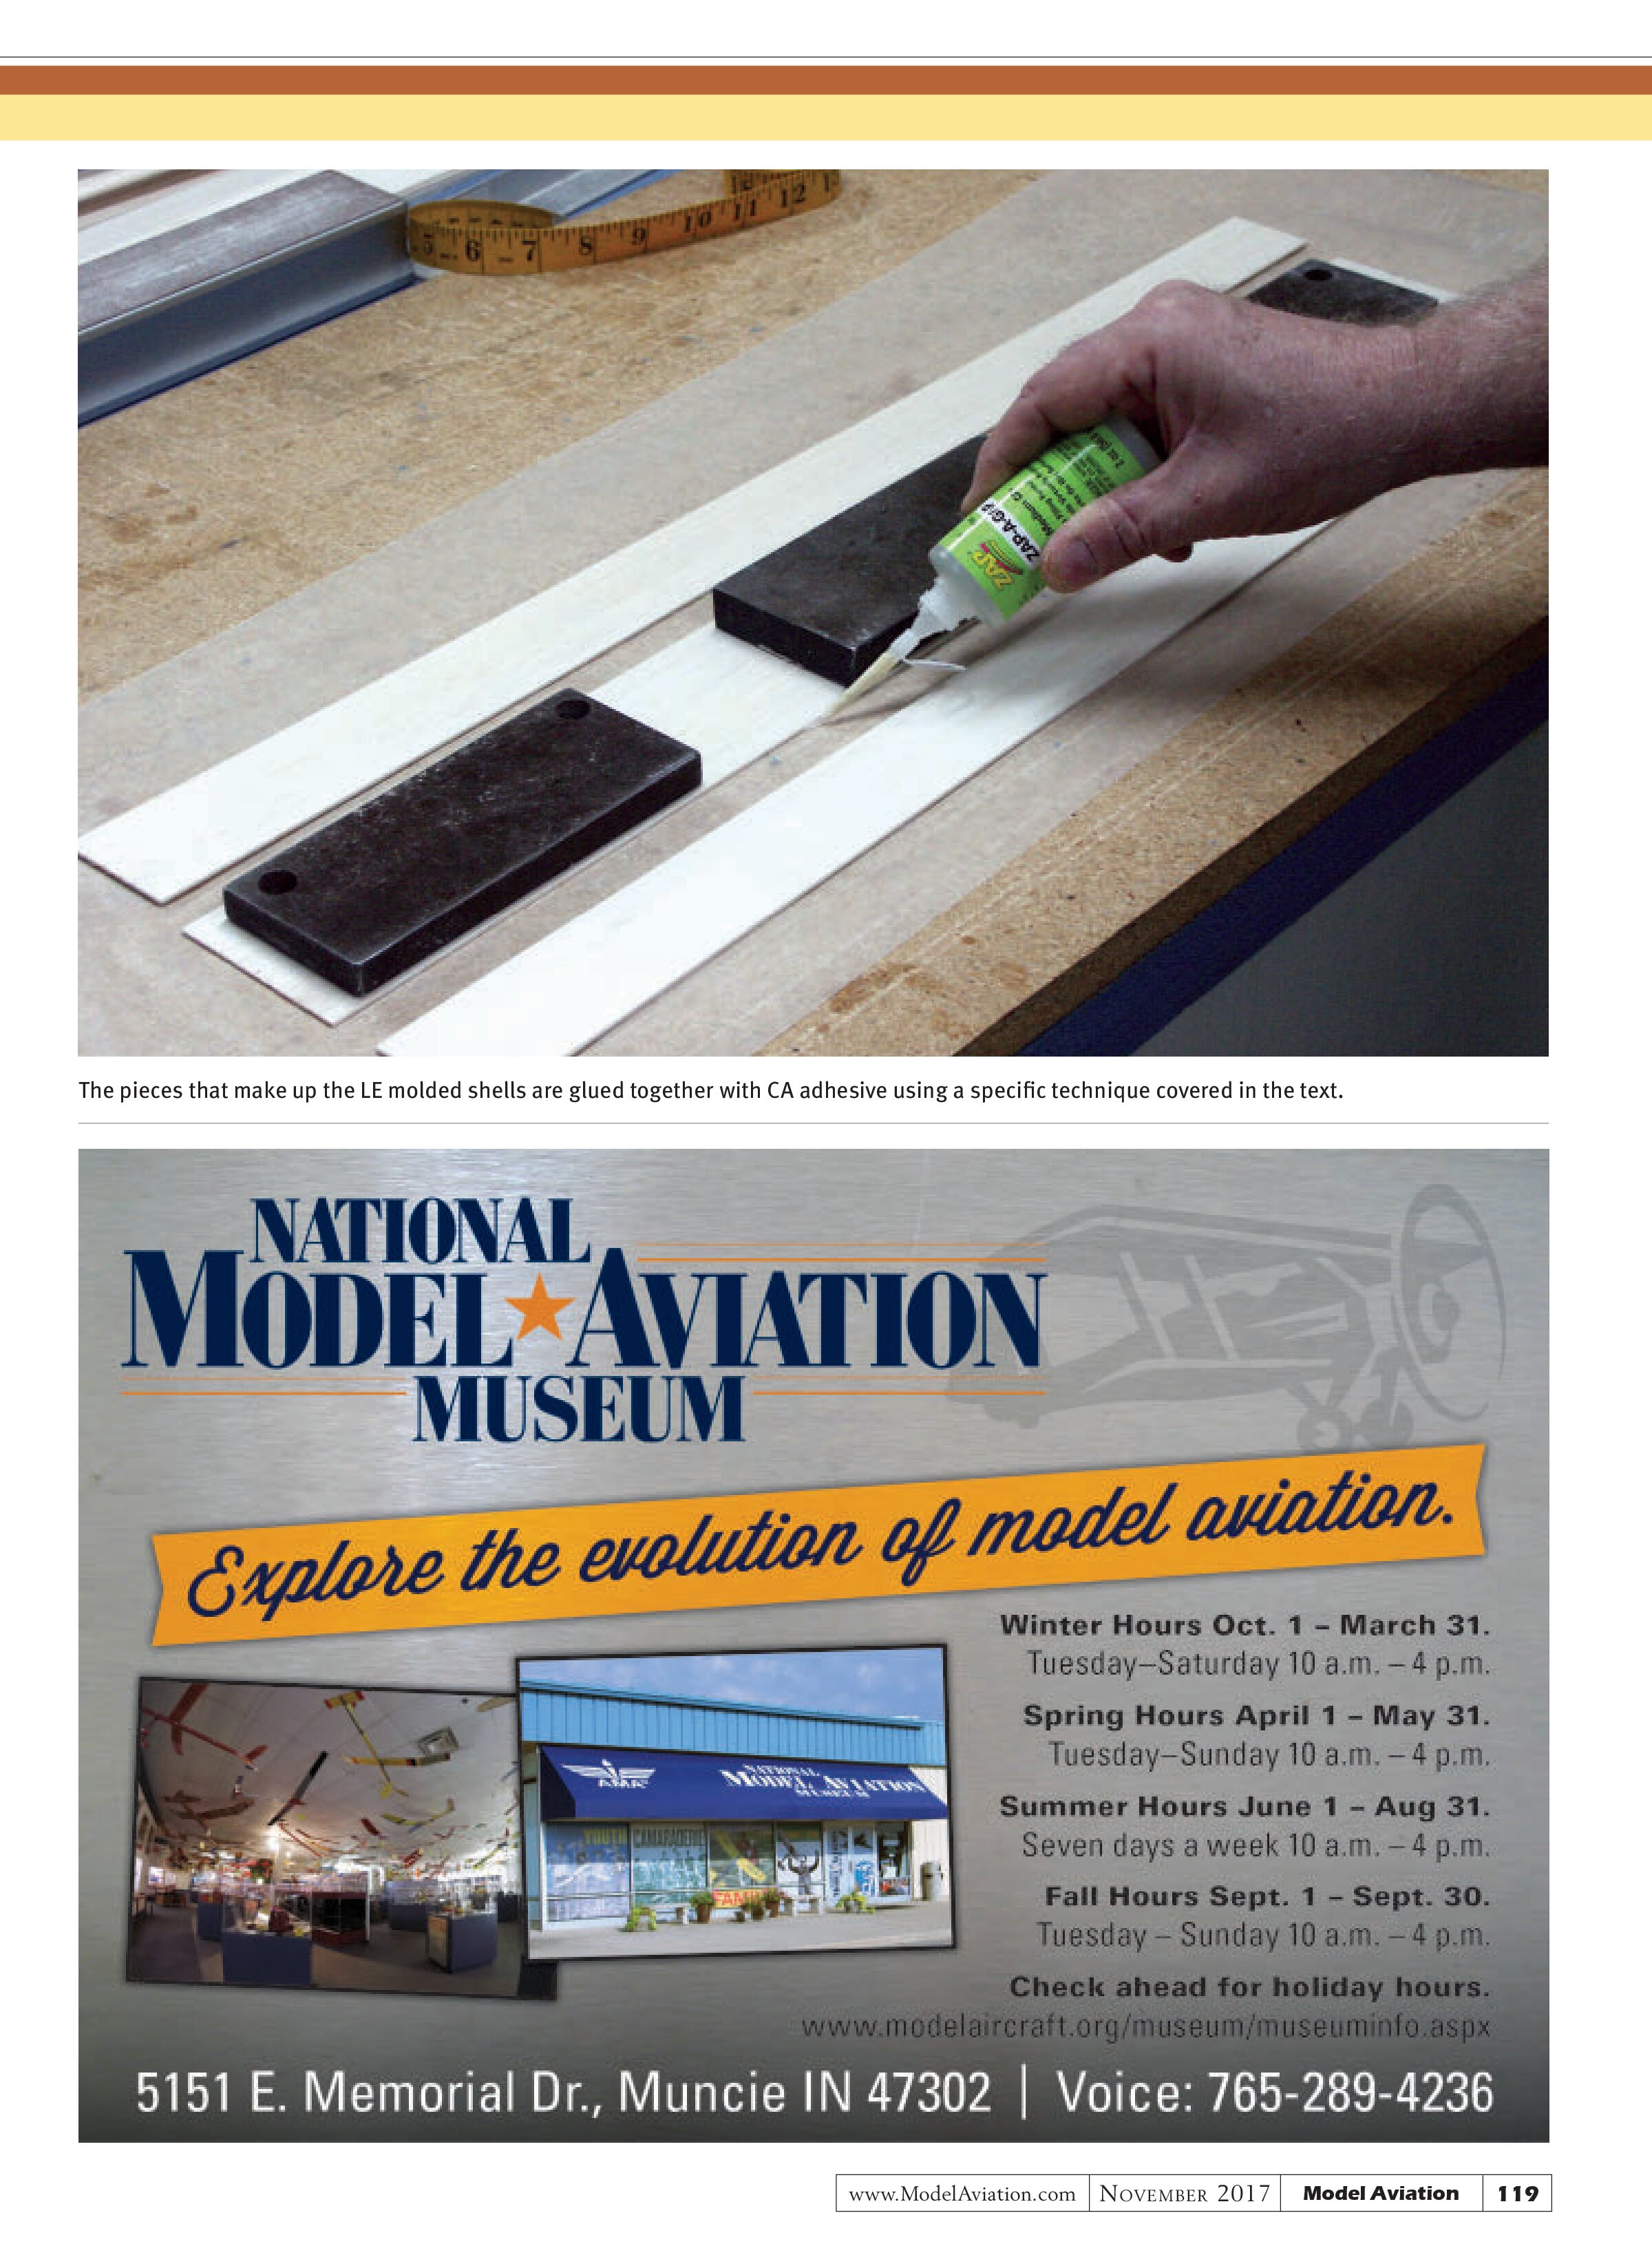
While the bucks are drying, lay out and join the sheets of balsa that will make up the “shells.” The most important thing when making the blank is to ensure that there is no seam at or near the LE radius. Make the center piece of the shell blank from a constant-chord piece of A-grain balsa.
Use a dressmaker’s rule to measure around the LE mold buck at both the root and the tip and record those dimensions. You will need to make tapered balsa pieces that fit up against the constant-chord center piece to yield a blank that is wide enough to fit completely over the mold buck when the molding is done.
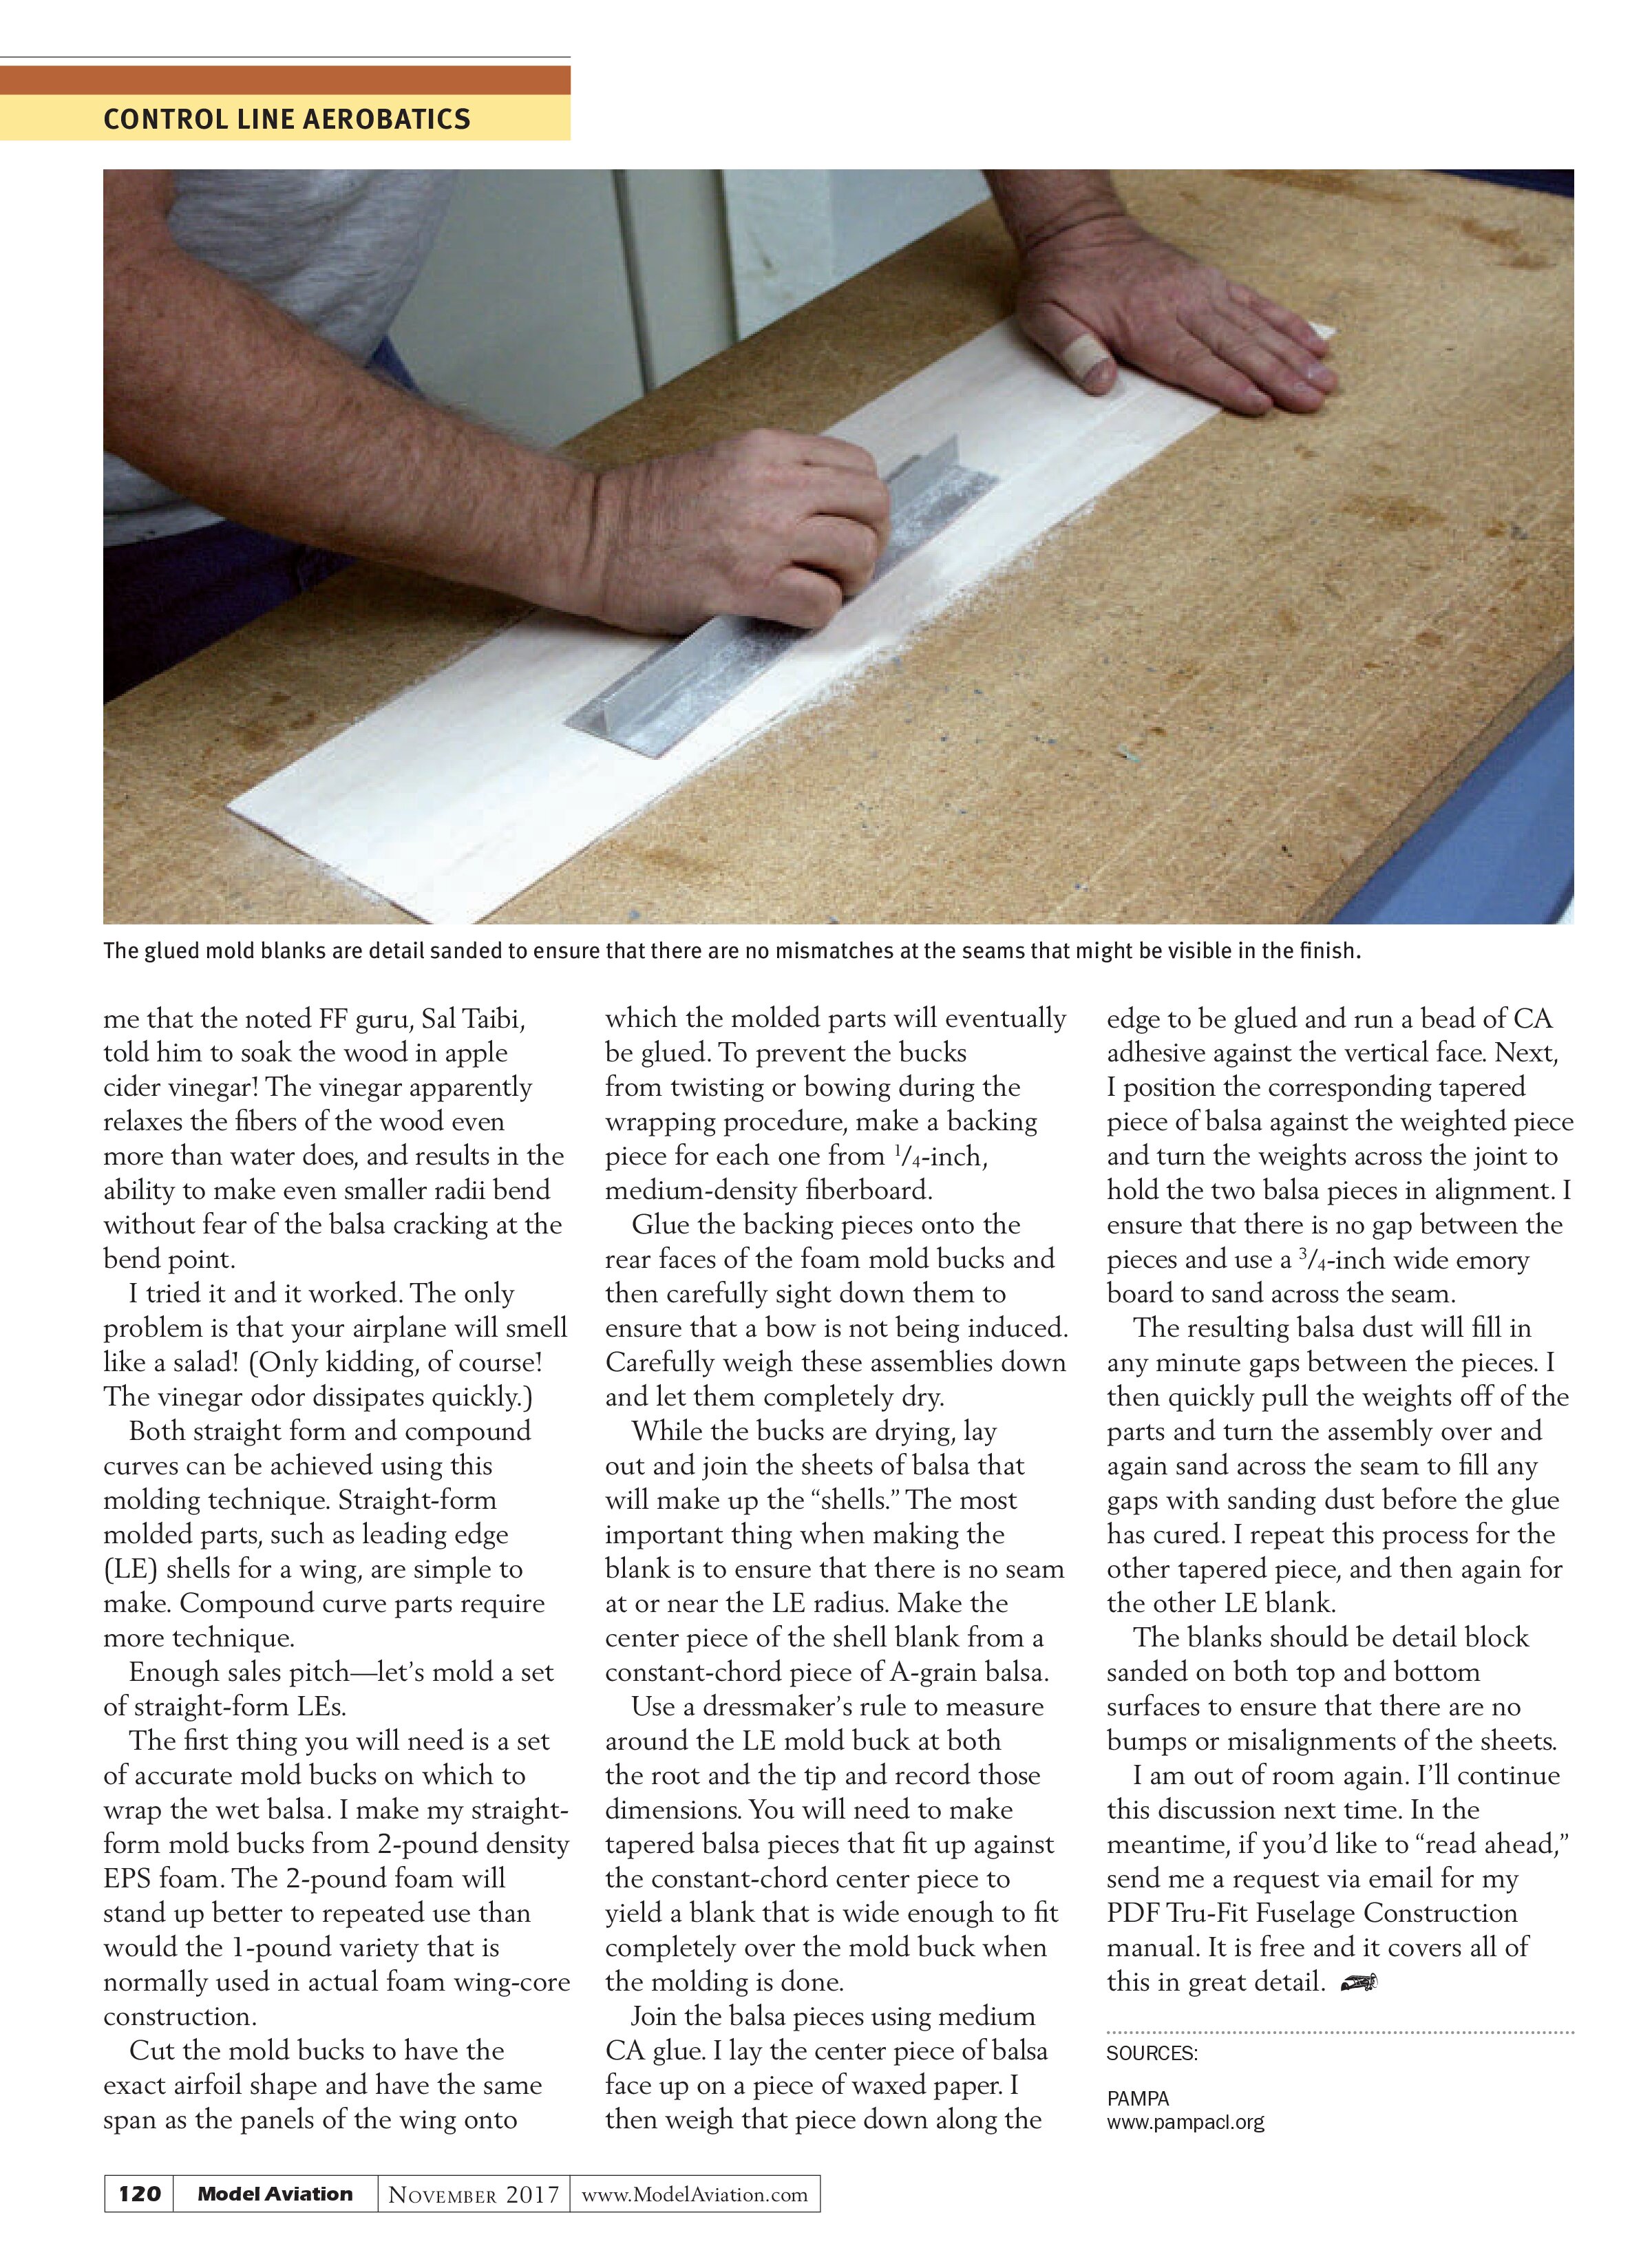
Join the balsa pieces using medium CA glue. I lay the center piece of balsa face up on a piece of waxed paper. I then weigh that piece down along the edge to be glued and run a bead of CA adhesive against the vertical face. Next, I position the corresponding tapered piece of balsa against the weighted piece and turn the weights across the joint to hold the two balsa pieces in alignment. I ensure that there is no gap between the pieces and use a ¾-inch wide emory board to sand across the seam.
The resulting balsa dust will fill in any minute gaps between the pieces. I then quickly pull the weights off of the parts and turn the assembly over and again sand across the seam to fill any gaps with sanding dust before the glue has cured. I repeat this process for the other tapered piece, and then again for the other LE blank.
The blanks should be detail block sanded on both top and bottom surfaces to ensure that there are no bumps or misalignments of the sheets.
I am out of room again. I’ll continue this discussion next time. In the meantime, if you’d like to “read ahead,” send me a request via email for my PDF Tru-Fit Fuselage Construction manual. It is free and it covers all of this in great detail.

SOURCES:
PAMPA
www.pampacl.org