The Sportsman sequence: Immelmann turn and a 45° downline
by Peter Vogel
vogel.peter@gmail.com

For most of this series, I’ve covered only one maneuver at a time. I’m going to try to tackle two because the first significantly impacts your ability to be set up to execute the second well.
In the last installment, I covered maneuver nine, the Cobra without Rolls. This month, I’ll finish the second segment of the Sportsman sequence with maneuver 10, the Immelmann turn, and maneuver 11, the 45° downline, after which you exit the aerobatic box, execute an unscored turnaround, and position the aircraft for the final five aerobatic maneuvers.
The Immelmann Turn
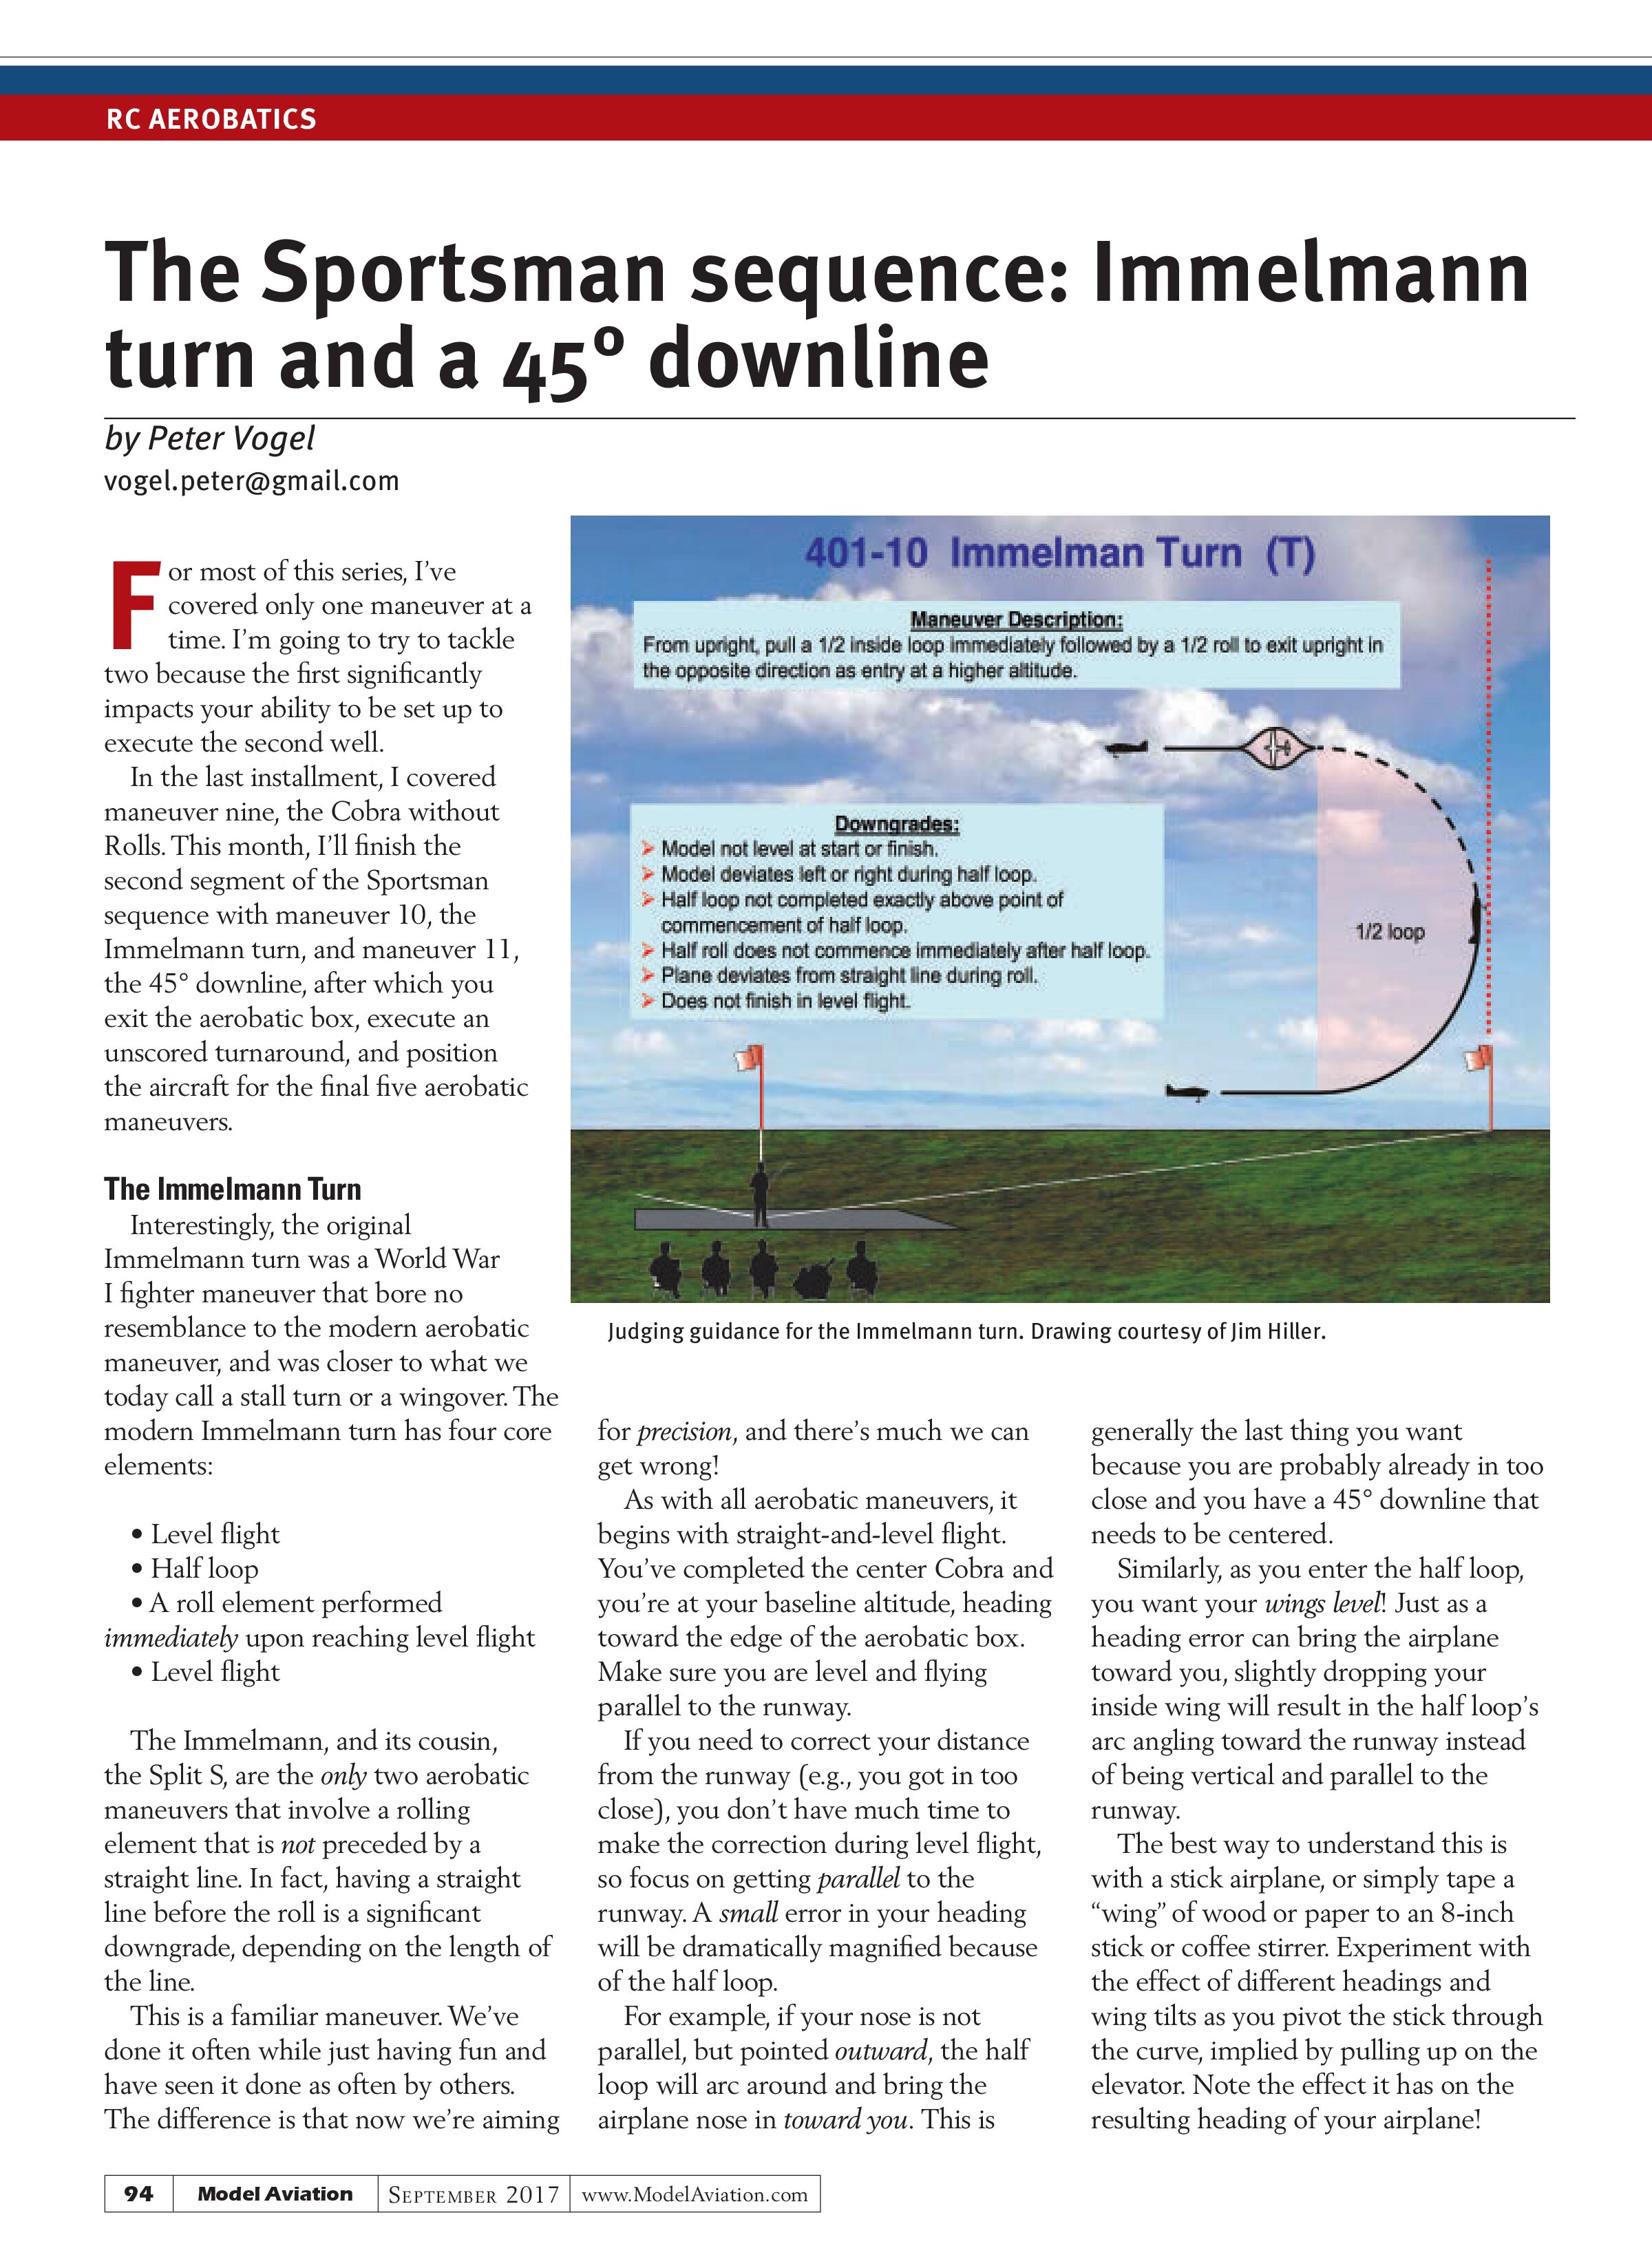
Interestingly, the original Immelmann turn was a World War I fighter maneuver that bore no resemblance to the modern aerobatic maneuver, and was closer to what we today call a stall turn or a wingover. The modern Immelmann turn has four core elements:
- Level flight
- Half loop
- A roll element performed immediately upon reaching level flight
- Level flight
The Immelmann, and its cousin, the Split S, are the only two aerobatic maneuvers that involve a rolling element that is not preceded by a straight line. In fact, having a straight line before the roll is a significant downgrade, depending on the length of the line.
This is a familiar maneuver. We’ve done it often while just having fun and have seen it done as often by others. The difference is that now we’re aiming for precision, and there’s much we can get wrong!
As with all aerobatic maneuvers, it begins with straight-and-level flight. You’ve completed the center Cobra and you’re at your baseline altitude, heading toward the edge of the aerobatic box. Make sure you are level and flying parallel to the runway.
If you need to correct your distance from the runway (e.g., you got in too close), you don’t have much time to make the correction during level flight, so focus on getting parallel to the runway. A small error in your heading will be dramatically magnified because of the half loop.
For example, if your nose is not parallel, but pointed outward, the half loop will arc around and bring the airplane nose in toward you. This is generally the last thing you want because you are probably already in too close and you have a 45° downline that needs to be centered.
Similarly, as you enter the half loop, you want your wings level! Just as a heading error can bring the airplane toward you, slightly dropping your inside wing will result in the half loop’s arc angling toward the runway instead of being vertical and parallel to the runway.
The best way to understand this is with a stick airplane, or simply tape a “wing” of wood or paper to an 8-inch stick or coffee stirrer. Experiment with the effect of different headings and wing tilts as you pivot the stick through the curve, implied by pulling up on the elevator. Note the effect it has on the resulting heading of your airplane!
You can use this to your advantage. If you get in too close and want to push the airplane out, you can enter with level wings and slightly roll your outside wing low on the pull to curve the airplane out. Bend in a little rudder opposite the roll (if you roll right, then rudder left) as the aircraft nears the top of the half loop to return the heading to parallel.
In calm wind, you want a parallel heading and level wings as you pull back on the elevator to execute a clean half loop. Remember to slightly relax the elevator to keep the radius constant as you curve past the vertical because gravity is now pulling the nose in the same direction as the elevator is pushing it.
In stronger wind, you’ll initially want a little less pull to help the airplane penetrate the air through the first quarter loop then manage the elevator to maintain that radius in the second quarter loop as it transitions to flying downwind. If you fly a constant radius, your airplane will return to level flight directly above the point at which you pulled elevator to begin the half loop.
Many judges will simply hold a finger or their pencil at the point where you begin the pull at the bottom and then check whether you hit level flight just above that point. When practicing, you

can have your caller do the same for you to tell you if you got your radius right.
The most common mistake I see is not immediately applying down-elevator to hold the nose level in the inverted position, thereby allowing the airplane’s nose to drop below level flight. The second most frequent mistake is to stop pulling too soon so the half loop becomes a 7/16 loop or 3/8 loop and the nose is still pointing up. These errors become very noticeable as you execute the roll.
With the airplane having just hit level and after bumping down-elevator to establish level flight, immediately apply aileron in your preferred direction (most prefer to roll right when flying in Mode 2, or left if flying in Mode 1), come off the elevator entirely as you begin the roll, and bump a bit of the same rudder as the airplane transitions through knife-edge on the way back to upright level flight. For example, if you choose to roll right, you start inverted so that as you transition through knife-edge, you pop a touch of right rudder then complete the roll to return to upright level flight.
If you executed this correctly, you started the half loop in the far quarter (or better yet, in a sixth) of the aerobatic box. Your first quarter loop was completed with your airplane just kissing the edge of the box and you completed the roll right at the beginning of the inner left or right quarter, or just past the edge sixth of the aerobatic box. Note that the size of your radius impacts how early you need to start your pull and how deep into the box the half loop penetrates. We like big loops, but don’t get too big or you won’t have time to set up for the 45° downline.
The 45° Downline
This begins with setting yourself up with the Immelmann turn. Just as one pool shot needs to end with the cue ball in position for the next shot, aerobatic maneuvers must end with the airplane positioned to begin the next maneuver.
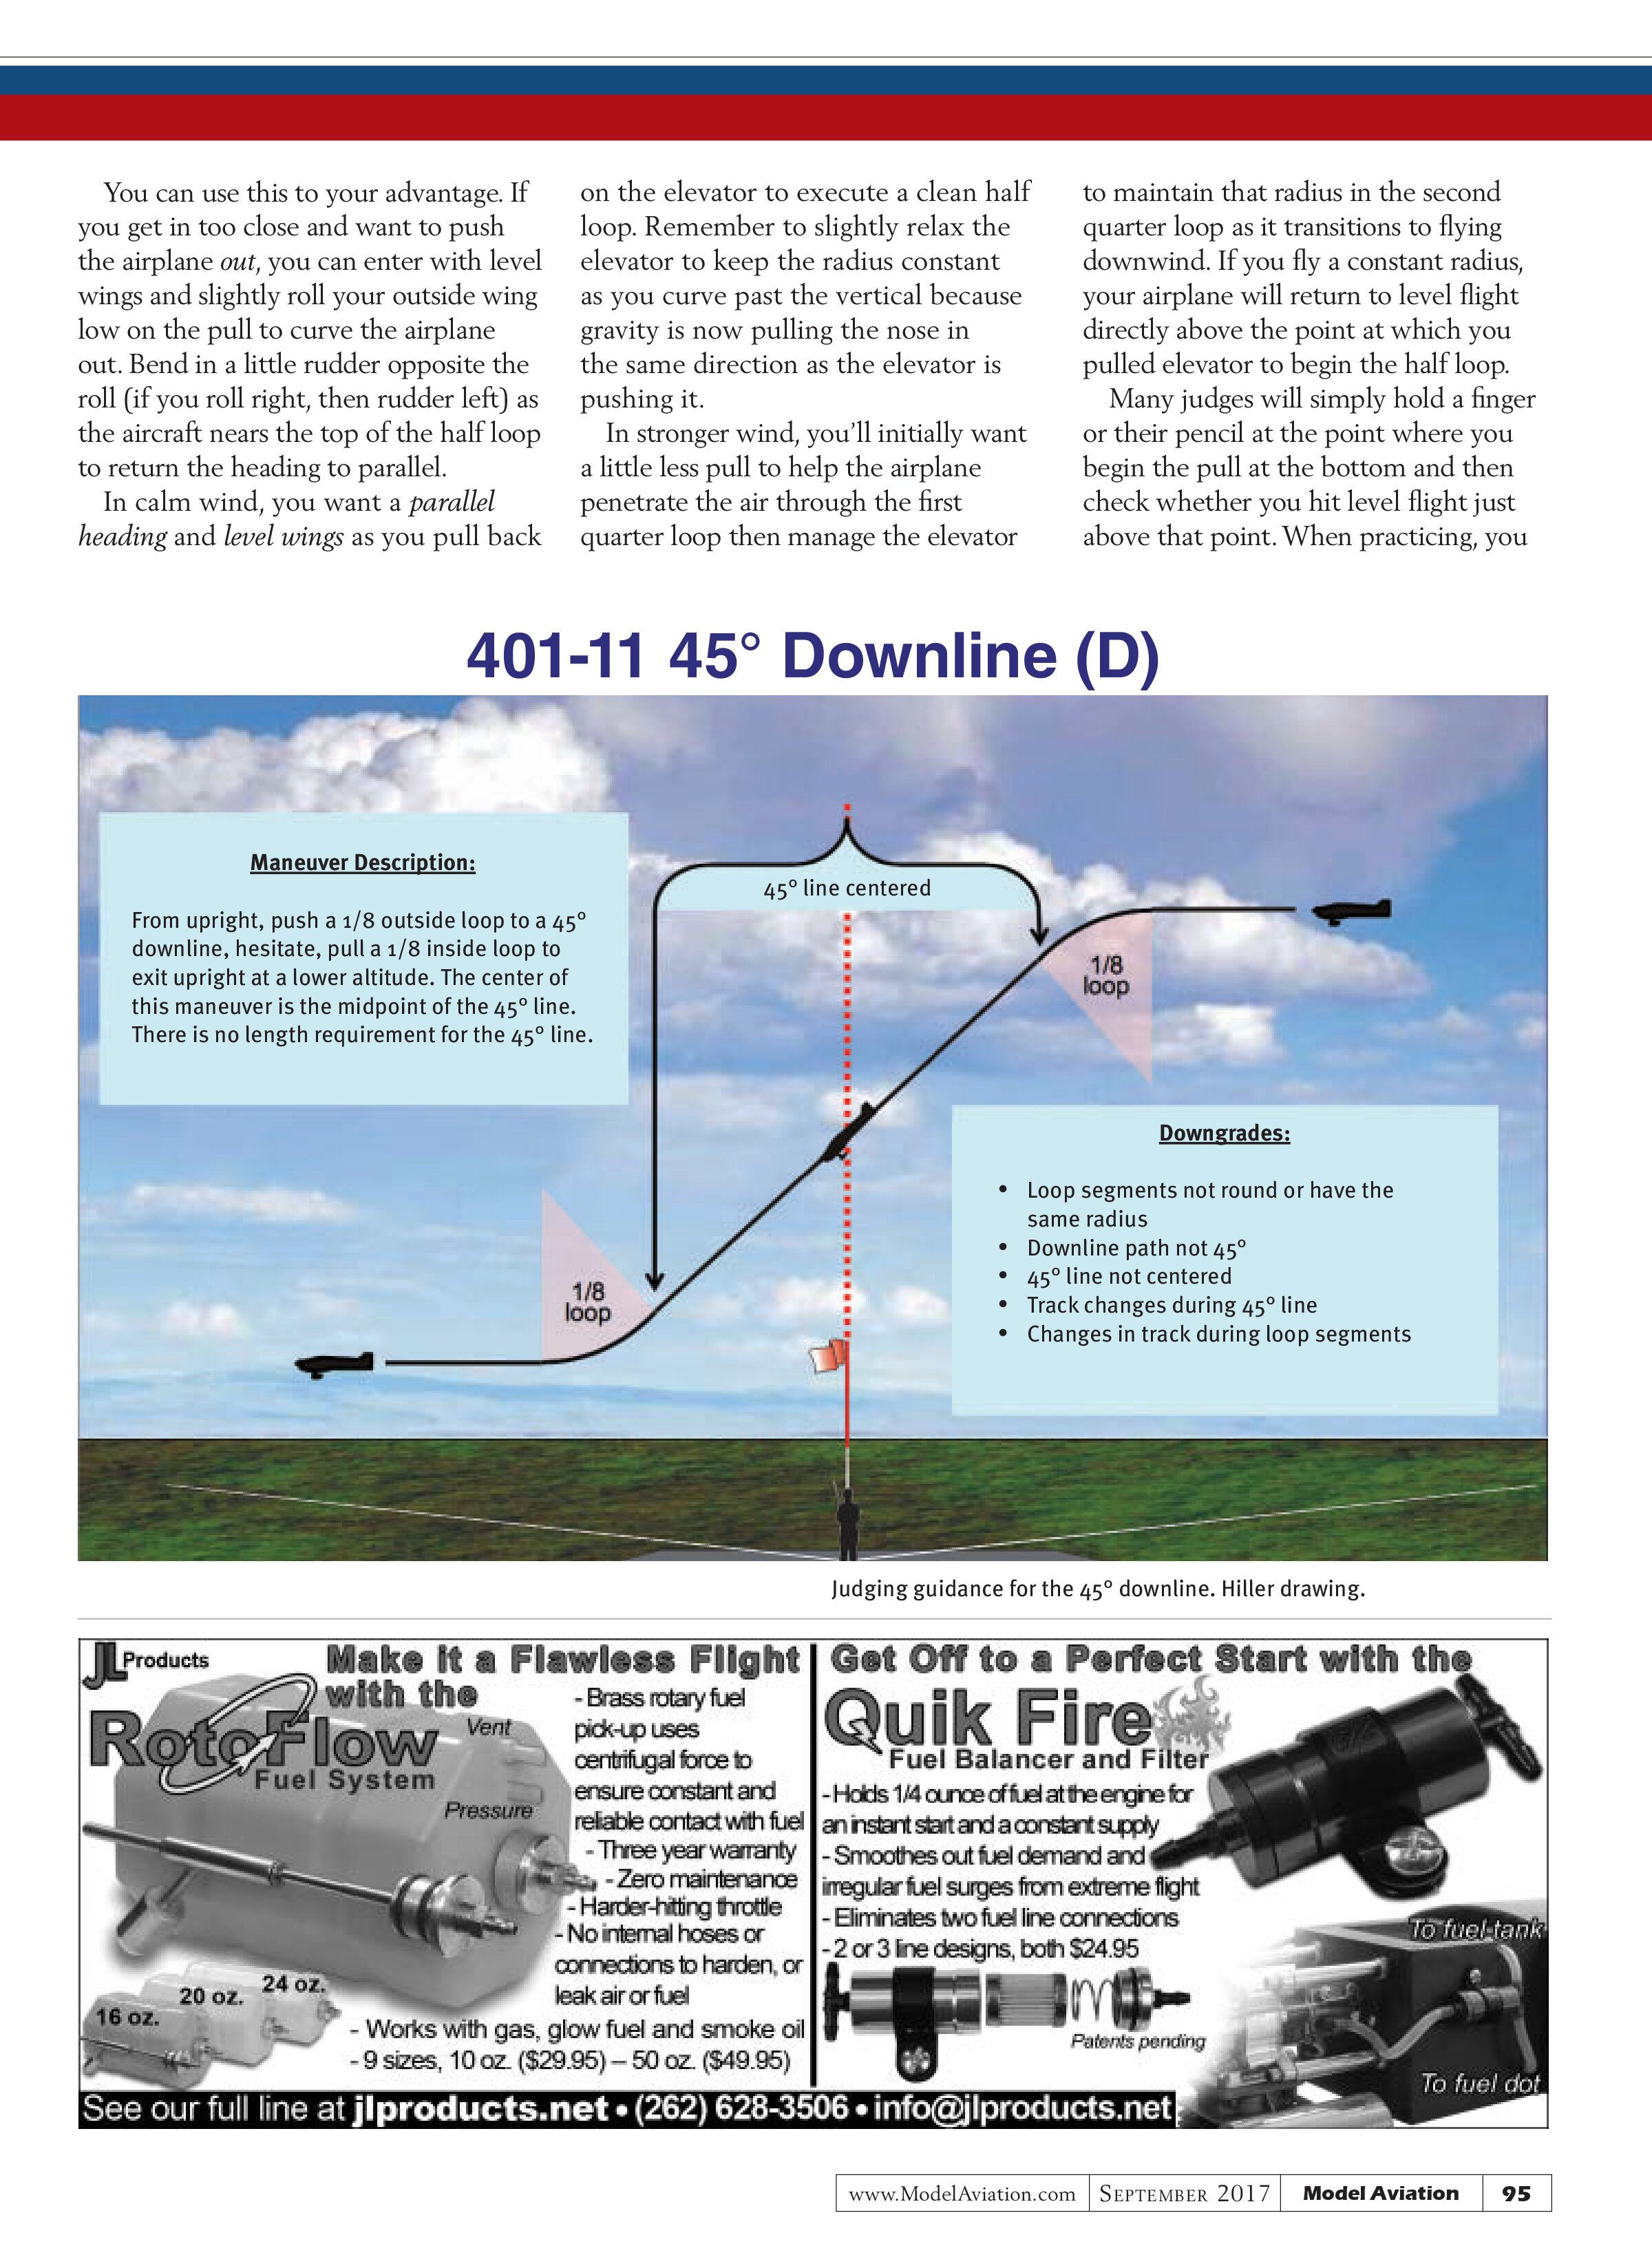
Note that the downline is a centered maneuver, which means that the center of the maneuver itself (the center of the 45° line your airplane draws) should be directly in front of the pilot. The most common error I see in this maneuver is that the push to establish the downline happens late—directly in front of the pilot.
Scored strictly according to the rules (assuming you did everything else in the maneuver perfectly), you would end with a score of five points because of being 50% off center (push later and you lose even more points!). This is why the preceding maneuver is so critical. You need to finish it in time to establish straight-and-level flight to end the Immelmann and begin the 45° downline.
Mentally dividing your picture of the box into quarters or sixths, you’ve completed the Immelmann before penetrating much, if at all, into the inner quarter of the box. If you divide that inner quarter mentally in half, you want to push into the 45° downline slightly before reaching the inside eighth. Keeping the wings level, push gently enough to carve a clear radius into the 45°; otherwise, matching the radius on the exit will be too hard to stop on the straight-and-level line.
After the centering error, the next most common mistake is making the downline too steep or too shallow. Get a friend to hold a transparent 45°/45°/90° drafting triangle during your practice until you get a good mental vision of 45°. Maintain the 45° line as the airplane passes center. I like to count how long it takes for the airplane to get from the push to center, then count the same amount after crossing center, before beginning the pull back to level flight.
Remember that your push was assisted by gravity in bringing the nose down to 45°. To match the radius, you’ll need to pull slightly more than you pushed. Bring the nose to level and draw a short line. End the maneuver by calling, “Exiting the box.” You don’t have to wait until your airplane physically exits the box to tell the judges to stop scoring.
Take a breath and get ready for the last five maneuvers!
SOURCES:
National Society of Radio Controlled Aerobatics (NSRCA)
www.nsrca.us