Reviving Essential Control Setup Fundamentals in an Era of Elaborate Programming
By Dave Scott | Illustrations by the author
Although modern technology has expanded the capabilities of airplanes, the emphasis today on elaborate programming has made the process of setting up an airplane more complicated and, therefore, more subject to error. More importantly, the emphasis on complex programming often overshadows the fundamental control setup principles that remain essential to achieving a great-flying airplane.
Every year, perfectly good airplanes are faulted or wrecked simply because of too much control surface travel and/or excessive use of exponential; yet, people fail to make that simple (obvious) diagnosis because they presume that the solution must always lie in more sophisticated programming.
The aim of this two-part article is to revive the essential control setup fundamentals that will enable you to achieve the best-possible handling airplane that also matches your skill level.
The first step in this process is understanding that how a model handles (and thus the skills required to fly it) is primarily determined by how fast and how far the control surfaces deflect, regardless of whether the airplane is small or large, or high or low performance. That means that it is possible to make a small, high-performance aerobatic airplane relatively docile by reducing control surface travels, or make a primary trainer reasonably

responsive by increasing travels.
Most of the advanced programming features that draw so much attention today fit into the category of helping to fine-tune an otherwise good-flying airplane. Meaning, if you’re unable to quickly achieve a high level of handling comfort, you need to focus on the basic setup, such as increasing or decreasing control surface travels before you dive into adding more exponential or mixes or adding modes and flipping switches.
On the other hand, if the general handling is good, but you want to make it better, the answer probably lies in utilizing some of your radio’s more sophisticated capabilities.
A common mistake is making changes in the setup to try to improve an isolated condition or maneuver, but at the cost of overall handling comfort. Logic dictates the “best” airplane setup is the one that best complements the type of flying a person does most often. For most pilots, that means setting up their airplanes for better takeoffs and landings, precise patterns, and smooth sport flying.
Therefore, the following setup rules of thumb are aimed at maximizing “precision” control and handling, as opposed to the entirely different setup required to perform extreme 3-D maneuvers.

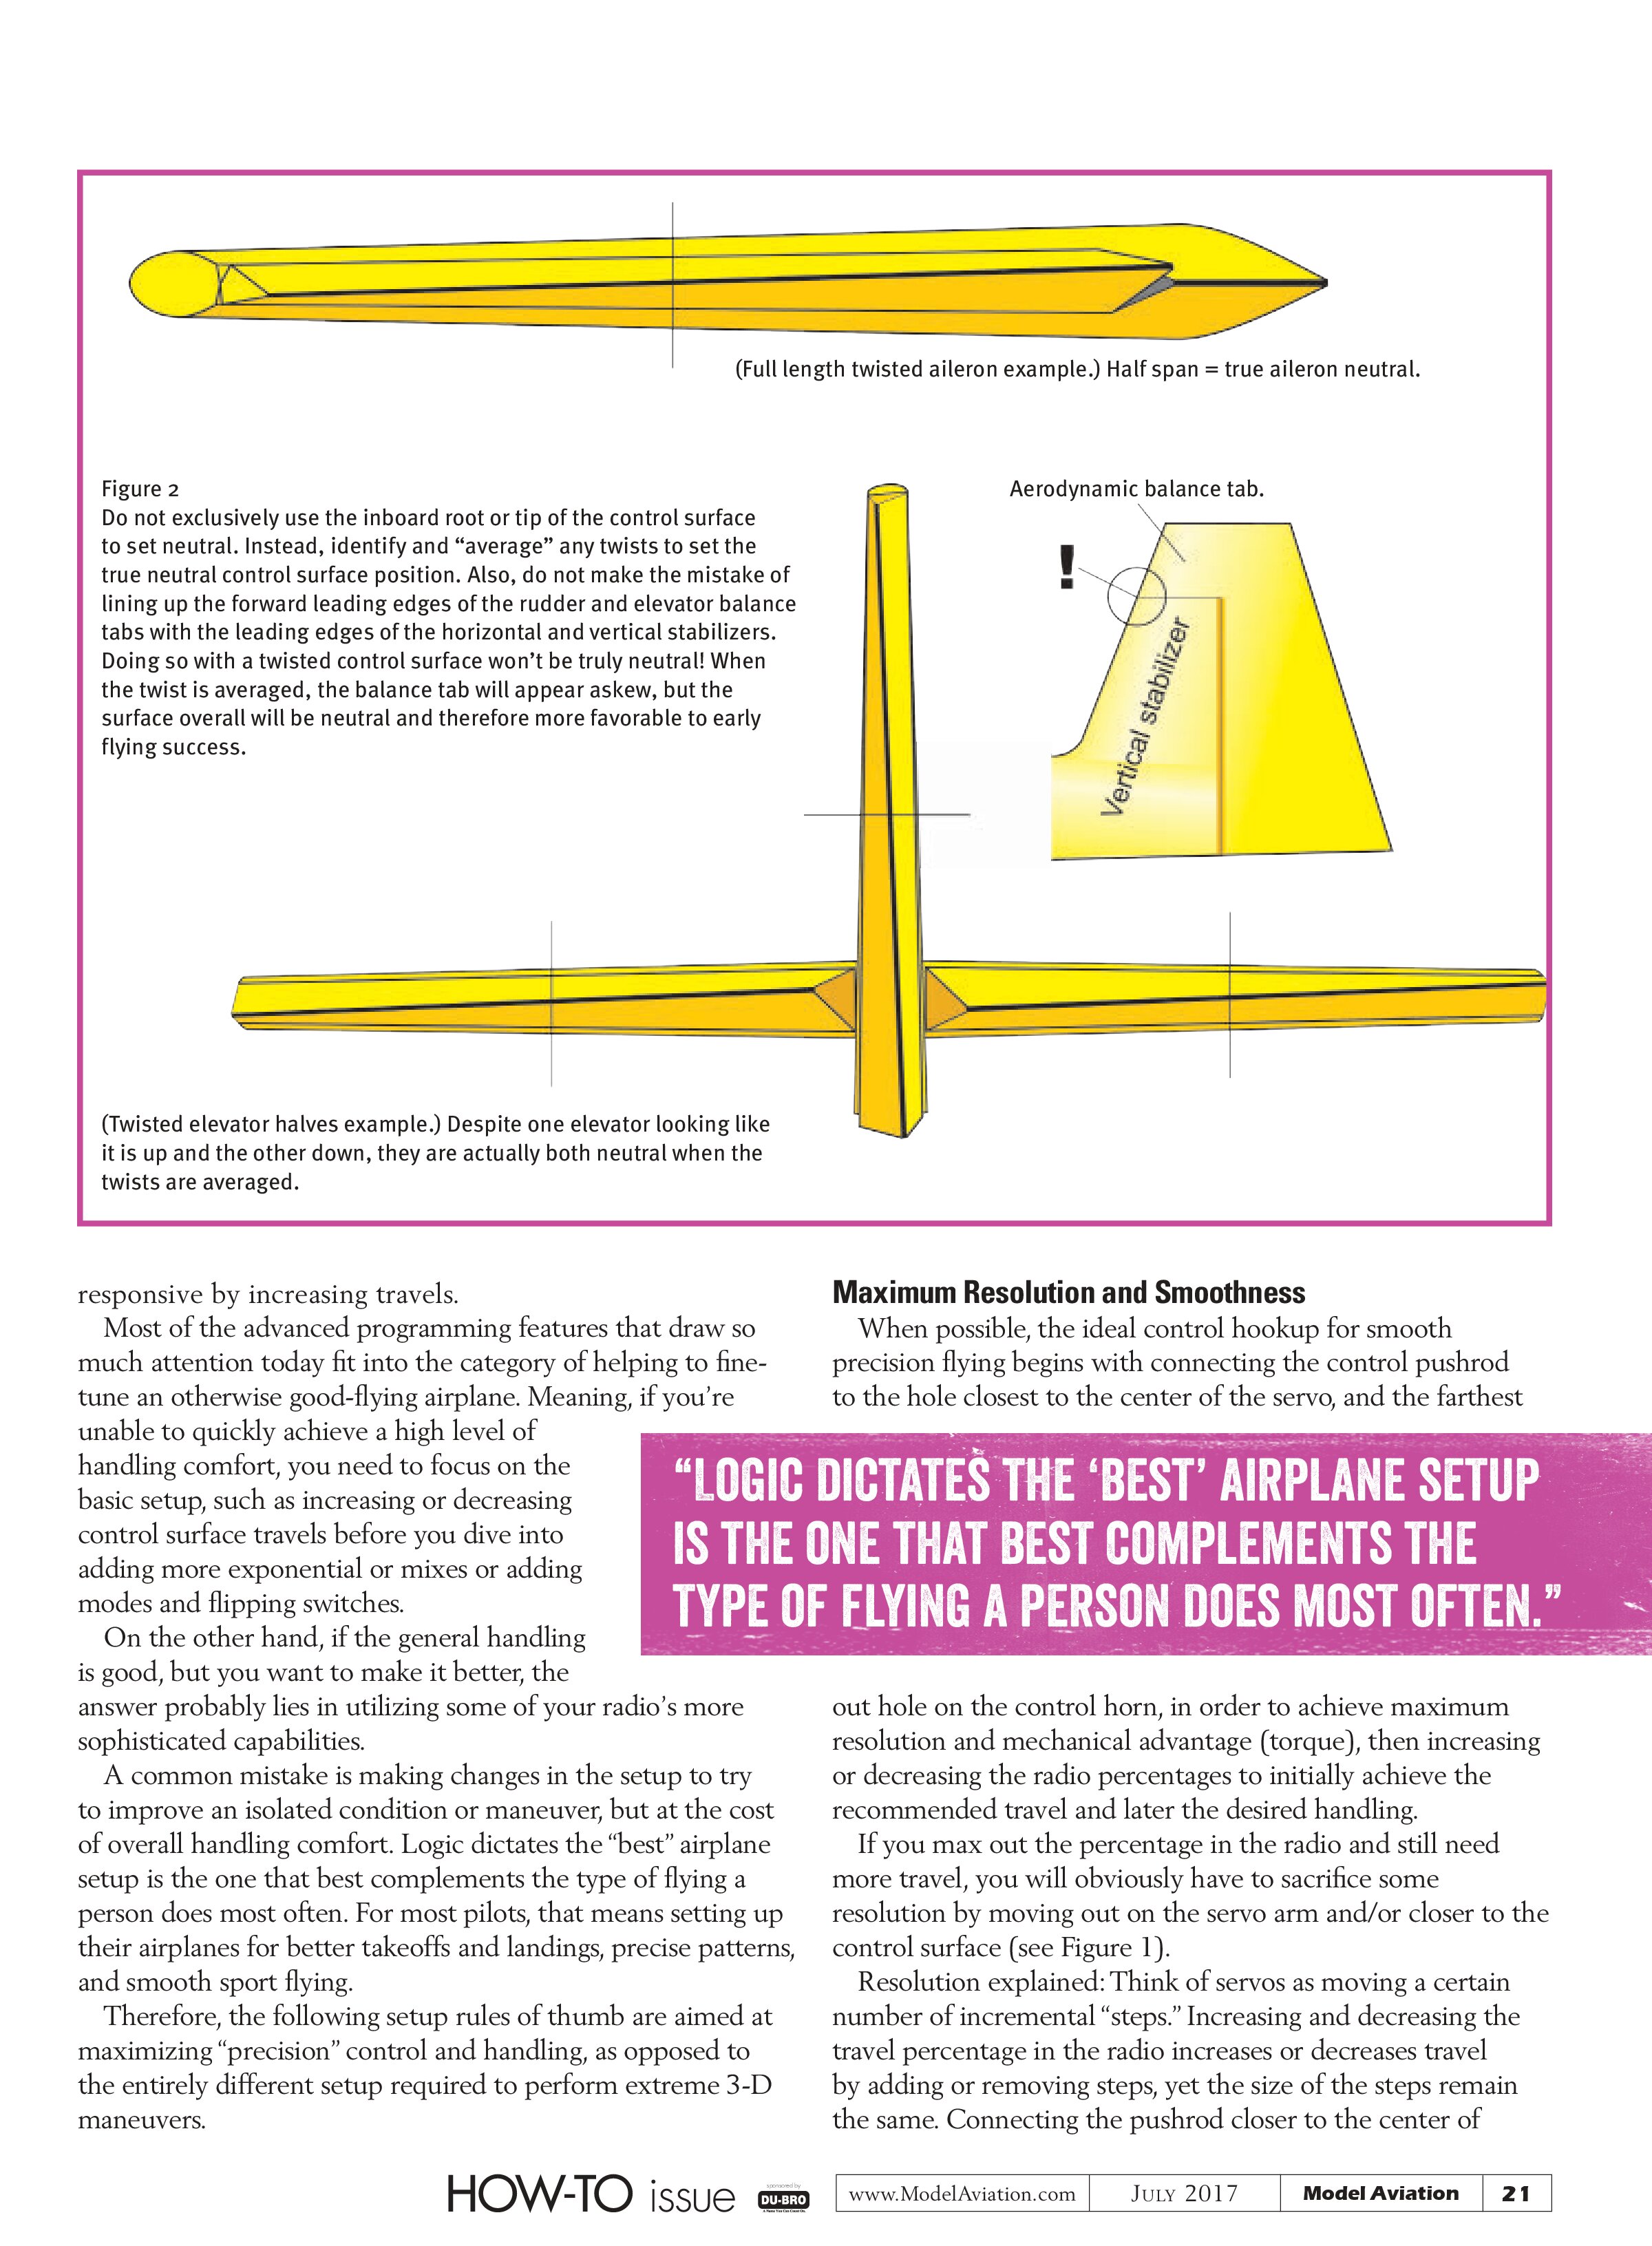
(Full length twisted aileron example.) Half span = true aileron neutral.
Figure 2. Do not exclusively use the inboard root or tip of the control surface to set neutral. Instead, identify and “average” any twists to set the true neutral control surface position. Also, do not make the mistake of lining up the forward leading edges of the rudder and elevator balance tabs with the leading edges of the horizontal and vertical stabilizers. Doing so with a twisted control surface won’t be truly neutral! When the twist is averaged, the balance tab will appear askew, but the surface overall will be neutral and therefore more favorable to early flying success.
(Twisted elevator halves example.) Despite one elevator looking like it is up and the other down, they are actually both neutral when the twists are averaged.
Maximum Resolution and Smoothness
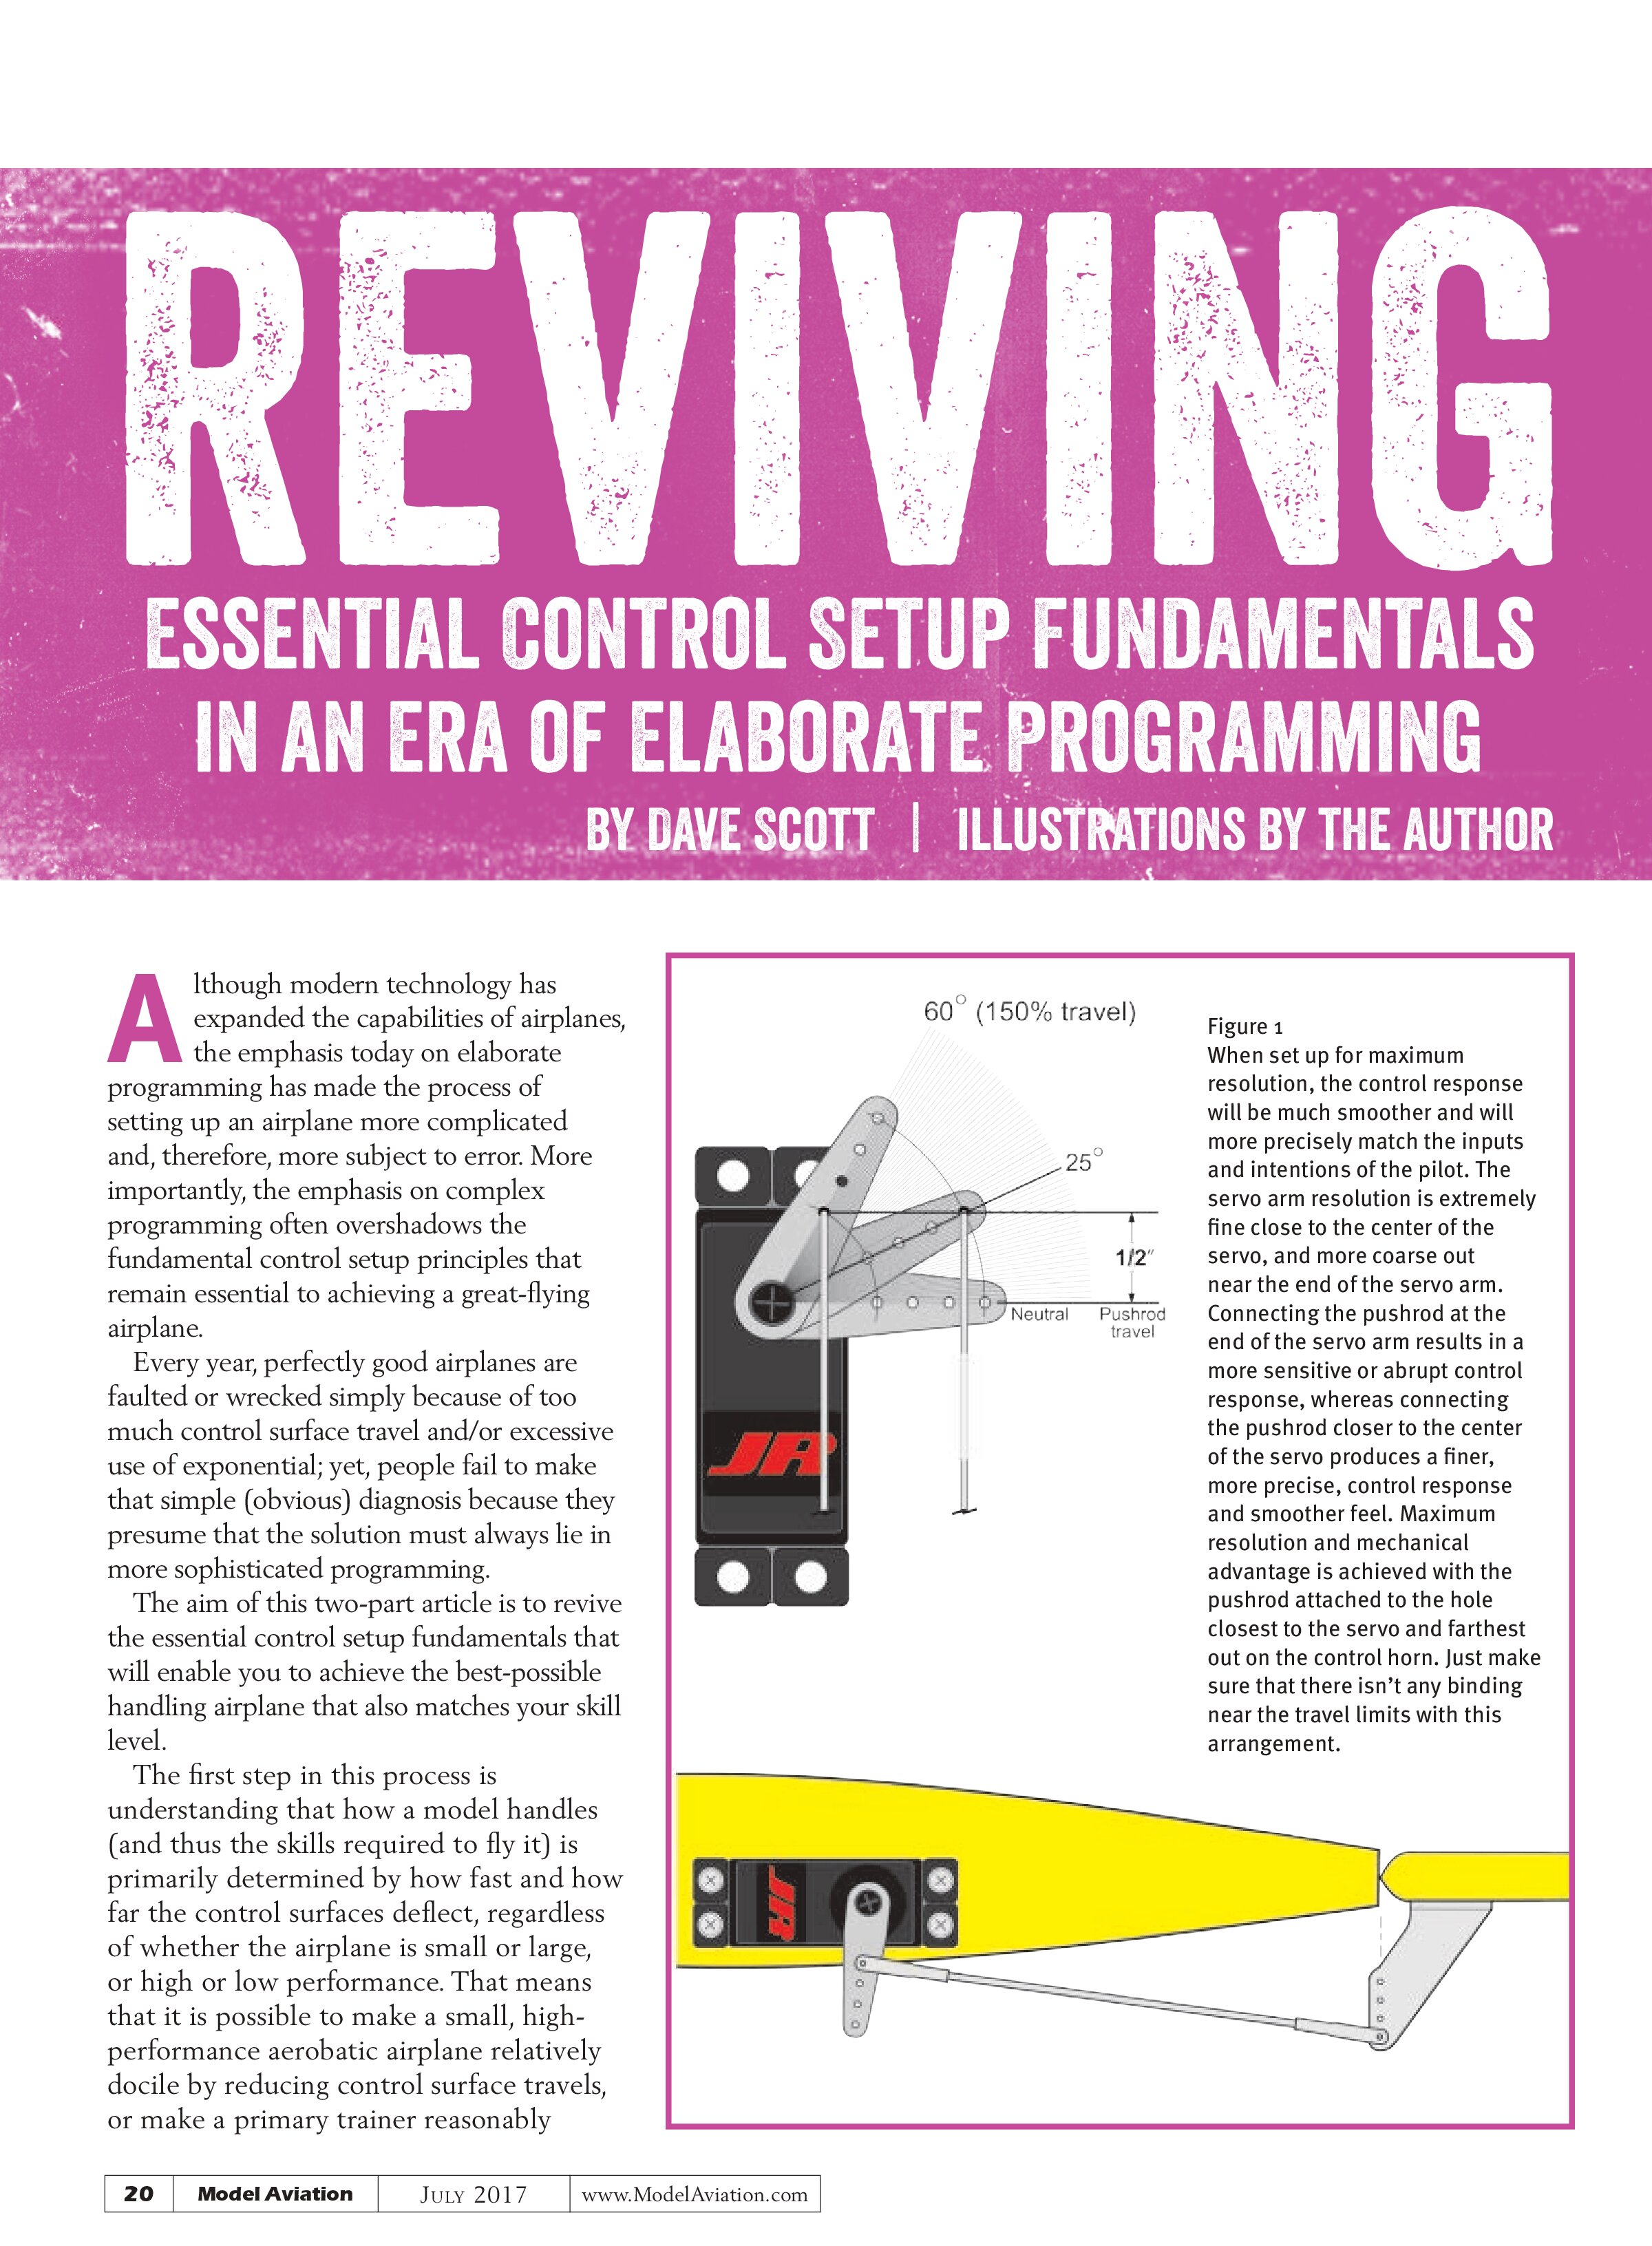
When possible, the ideal control hookup for smooth precision flying begins with connecting the control pushrod to the hole closest to the center of the servo, and the farthest out hole on the control horn, in order to achieve maximum resolution and mechanical advantage (torque), then increasing or decreasing the radio percentages to initially achieve the recommended travel and later the desired handling.
If you max out the percentage in the radio and still need more travel, you will obviously have to sacrifice some resolution by moving out on the servo arm and/or closer to the control surface (see Figure 1).
Resolution explained: Think of servos as moving a certain number of incremental “steps.” Increasing and decreasing the travel percentage in the radio increases or decreases travel by adding or removing steps, yet the size of the steps remain the same. Connecting the pushrod closer to the center of

ABOUT THE AUTHOR:
Dave Scott is a champion full-scale aerobatics competitor, air show pilot, aviation author, and he operates 1st U.S. R/C Flight School. His manuals and articles feature the specialized training techniques that he has developed—instructing more than 1,700 RC pilots of all skill levels, and setting up and test-flying more than 1,000 airplanes at his school. More information about Dave’s books and school can be found at www.rcflightschool.com.

the servo means that a higher travel percentage will have to be programmed into the radio because of the small (fine) amount that each step is actually moving the pushrod, thereby increasing the “resolution” of a given control surface movement, leading to smoother (finer) control.
Conversely, connecting the pushrod near the end of the servo arm sacrifices resolution and results in a coarser (abrupt) control surface movement for each incremental step that the servo arm moves. Of course, 3-D pilots must sacrifice resolution in order to achieve the large travels necessary to perform extreme 3-D stunts. Airplanes set up for 3-D are consequently harder to fly precisely and feel less “connected” because of the large amounts of exponential they require.
Before attaching the pushrods, you’ll need to decide whether the airplane will be used primarily for 3-D or precision flying and, if you’re smart, determine the optimized setup for what you do most often.
True Control Surface Neutral
One setup mistake that almost everybody makes is lining up the inboard root or tip of a control surface at neutral while failing to step back and look at the position of the entire control surface. Most lightweight wood ailerons, rudders, and elevators are inherently twisted for part or all of their length, so you should never set neutral using only the end of the control surface.
You must look at the entire length of the control surface and identify any twists or bows, and then “average” the twist to set the true neutral position (see Figure 2). To reduce the potential for programming errors and to simplify things at the flying field, as a rule, always try to mechanically set the control surface neutrals, and then use the radio to fine-tune things when the limits of the mechanical adjustments have been reached during setup.
Dual Rates/Flight Modes
Although not mandatory for sport flying or precision aerobatics, it’s nice to have the options afforded by dual rates/flight modes. “High rates” are typically set up to achieve maximum travels for extreme 3-D flying or when taxiing in strong winds, whereas “low (normal) rates” are set up to provide optimum travels for takeoff and landing, precision patterns, and aerobatics.
It is wise to put all of the dual rates/flight modes on one switch to make it simpler to switch back and forth. It might sound ideal to use dual rates to set up different control responses for different maneuvers, but those who attempt to do so often end up taking longer to achieve proficiency. That is because instead of mastering one airplane, these pilots are learning to fly multiple airplanes depending on the position of the dual rates switch!
It’s no different from driving; it proves much easier to master one consistent setup and learn to change the size of your control inputs depending on the situation than it is to try to juggle different rates or deal with control that is not consistent. In short, those who most quickly identify appropriate setup changes and early comfort use dual rates principally to switch between precision flying and 3-D or taxi mode, and seldom between or during maneuvers.
Tip: Page through any RC magazine today and it’s clear that the sport is heavily oriented toward 3-D flying. Consequently, the emphasis on 3-D tends to bias manufacturers to recommend low rates that are less than high rates, but are still far too much for most pilots! Pilots aiming for precision handling will therefore almost always find it immediately necessary to reduce the manufacturer’s low-rate percentages to be able to takeoff, maneuver, and land comfortably.
Confirming Equal Throws!
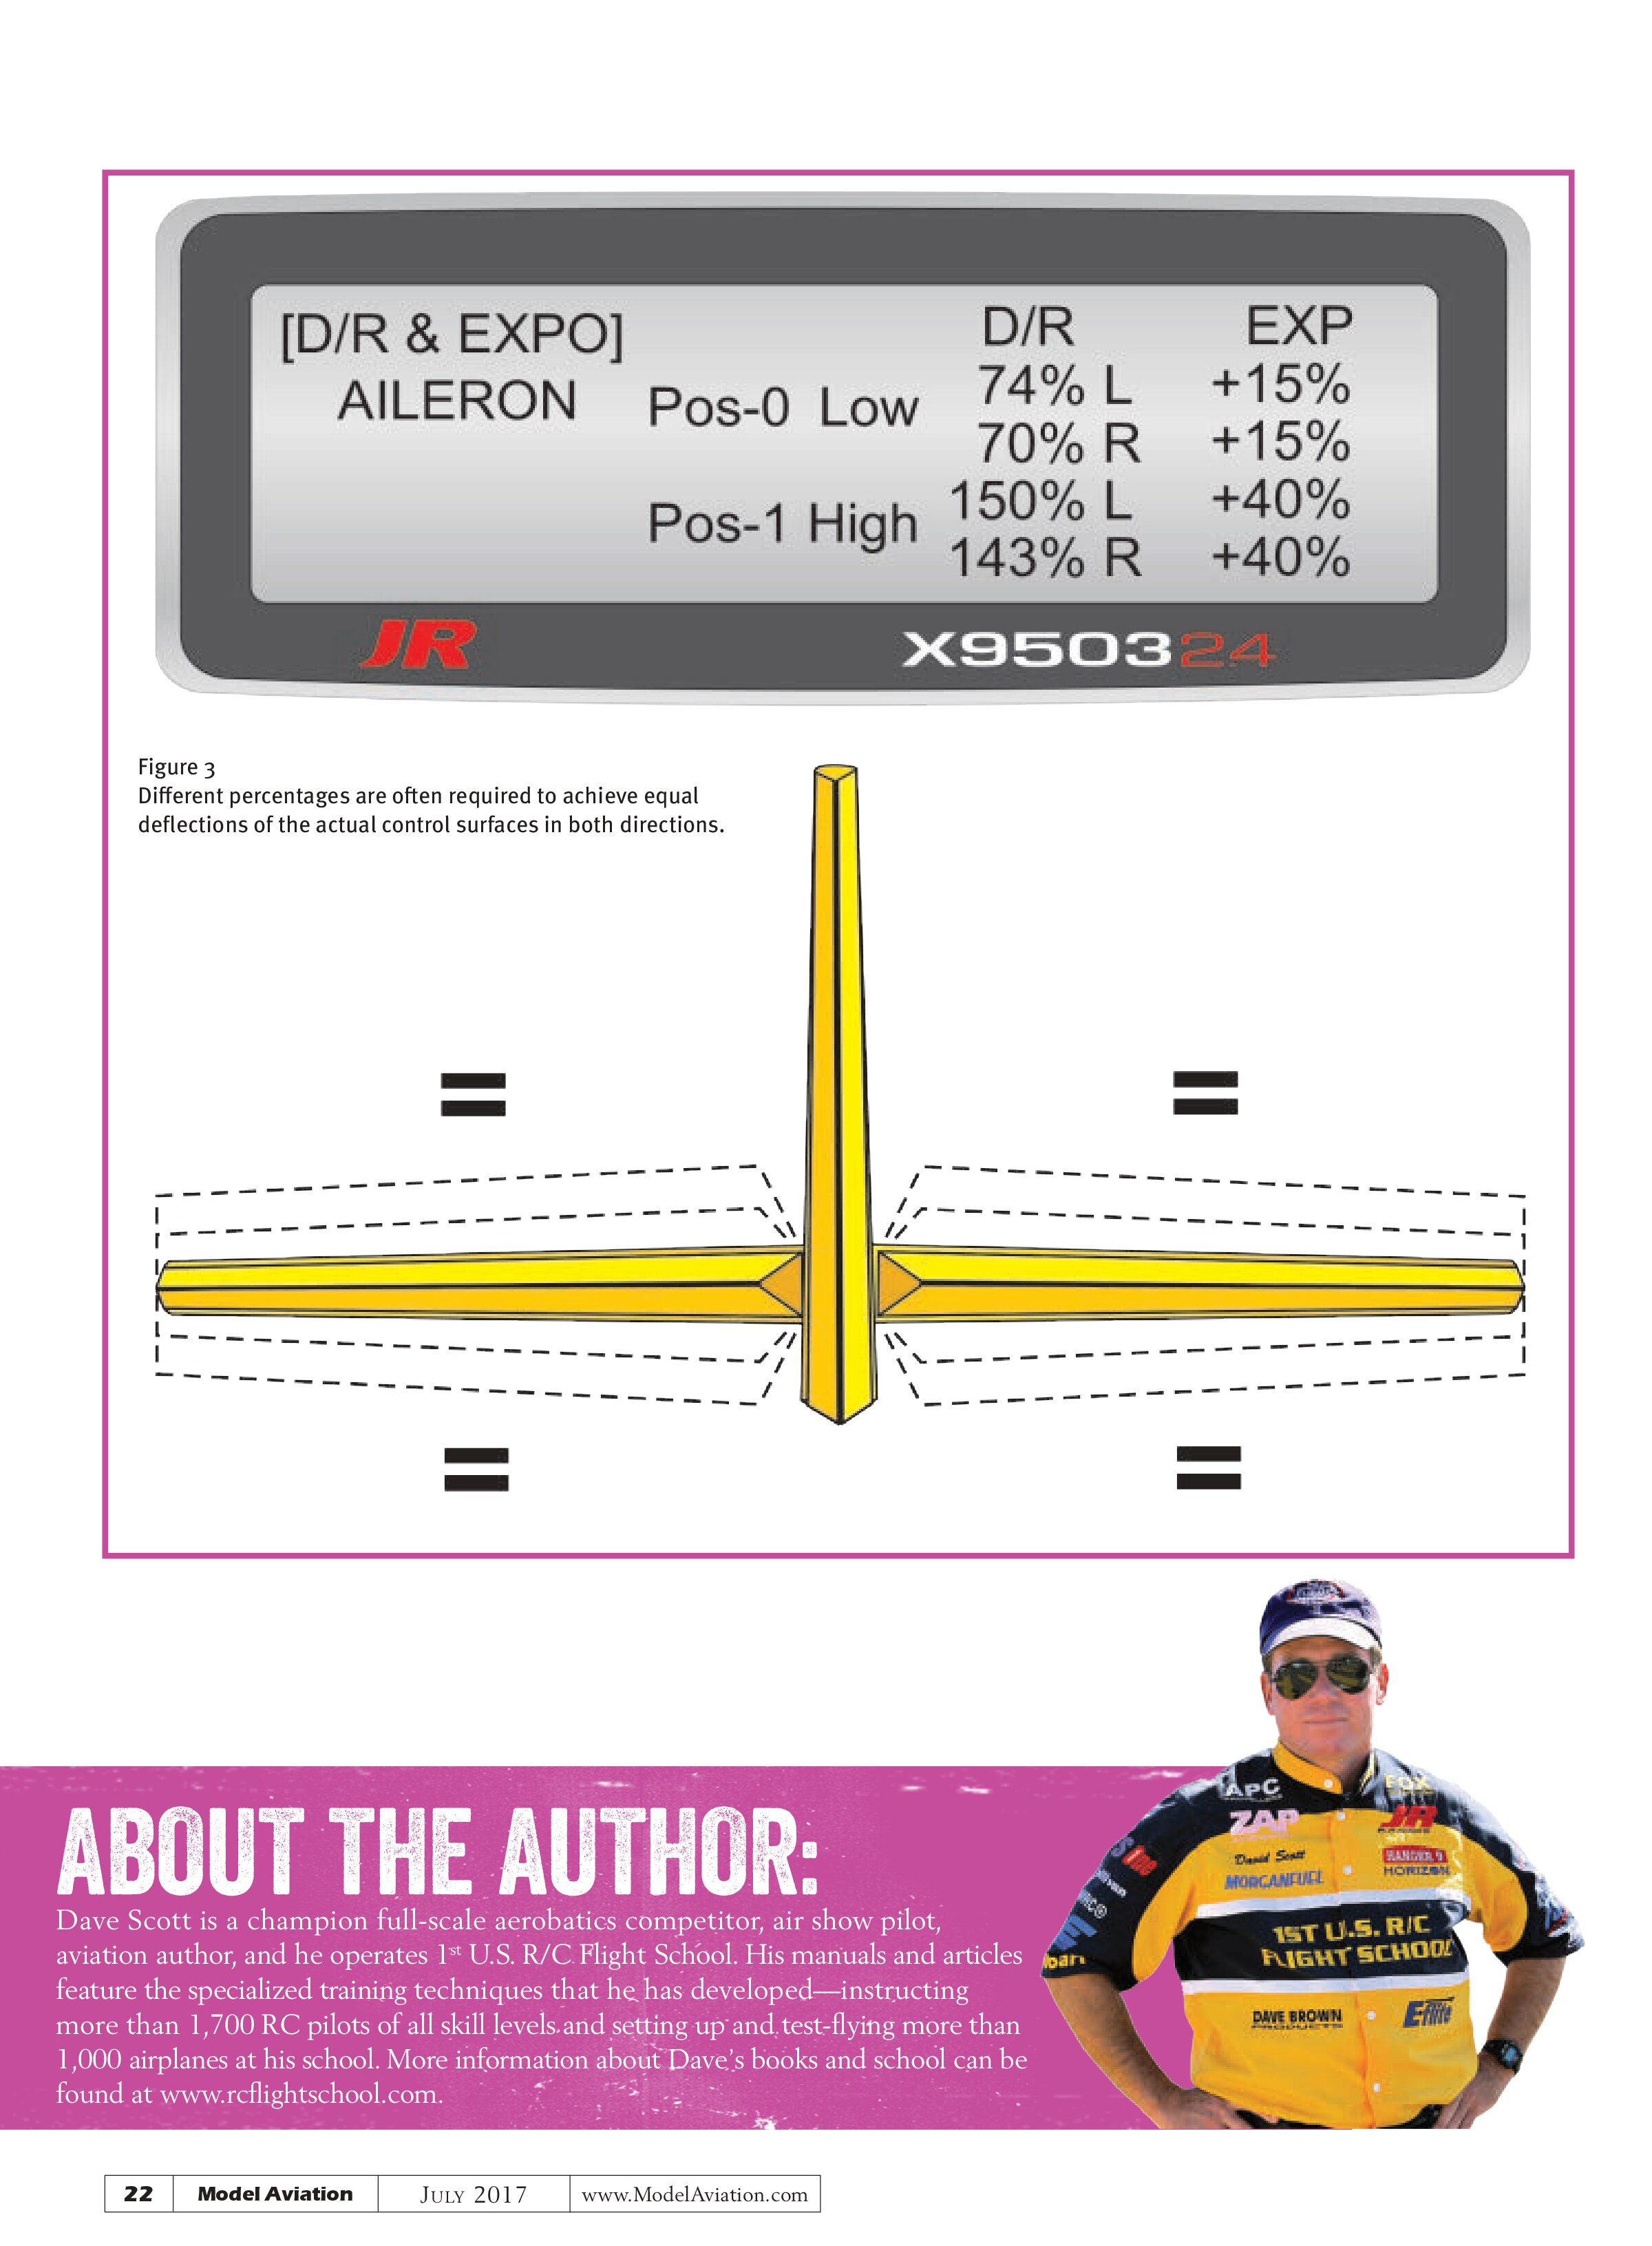
When setting up the control surface travels or after making adjustments, it is critically important that you physically measure the control surface deflections in all directions (see Figure 3). For a variety of reasons, it is likely that you will have to program different percentages to achieve the same control surface travel in both directions. Pilots often neglect to physically measure all of the control surface deflections in both directions because they assume that things are equal based on the “numbers” read off of the transmitter.
Many pilots end up unhappy with the way their airplanes handle, or assume that having to make numerous and/or large adjustments at the flying field is an indication of a faulty design. The problem is often no more complicated than one aileron deflecting more than the other, or one elevator half deflecting more than the other, and except for that, the airplanes are fine.
Conclusion
The sport is full of people whose bad habits and lack of appreciation for the fundamentals prevent them from becoming better fliers, and therefore have little choice but to look to elaborate programming to try to improve their flying, albeit unsuccessfully. It is my hope that you understand that no amount of elaborate programming can fix a fundamentally flawed setup. Only after addressing the control setup fundamentals that are essential to achieving a good-flying airplane can you begin to effectively take advantage of the more advanced programming capabilities to achieve a great-flying airplane!
On that note, next month we’ll look at how to take advantage of exponential and mixing controls. Good luck!
—Dave Scott
1usrcfs@gmail.com
SOURCES:
1st U.S. R/C Flight School
www.rcflightschool.com