Learning the Sportsman sequence—the Double Immelmann
by Peter Vogel
vogel.peter@gmail.com
This month I’m continuing with my series of articles designed to help you understand the finer points of the Sportsman sequence—the difference between participating and competing to win. Last time, I covered the stall turn, which is the second-to-last maneuver in the first set of maneuvers.
After the Double Immelmann is completed, you get to every Sportsman pilot’s favorite part of the sequence: an unscored “break” where you get to leave the aerobatic box, turn back around any way you like, relax, and return to the box.

The Double Immelmann
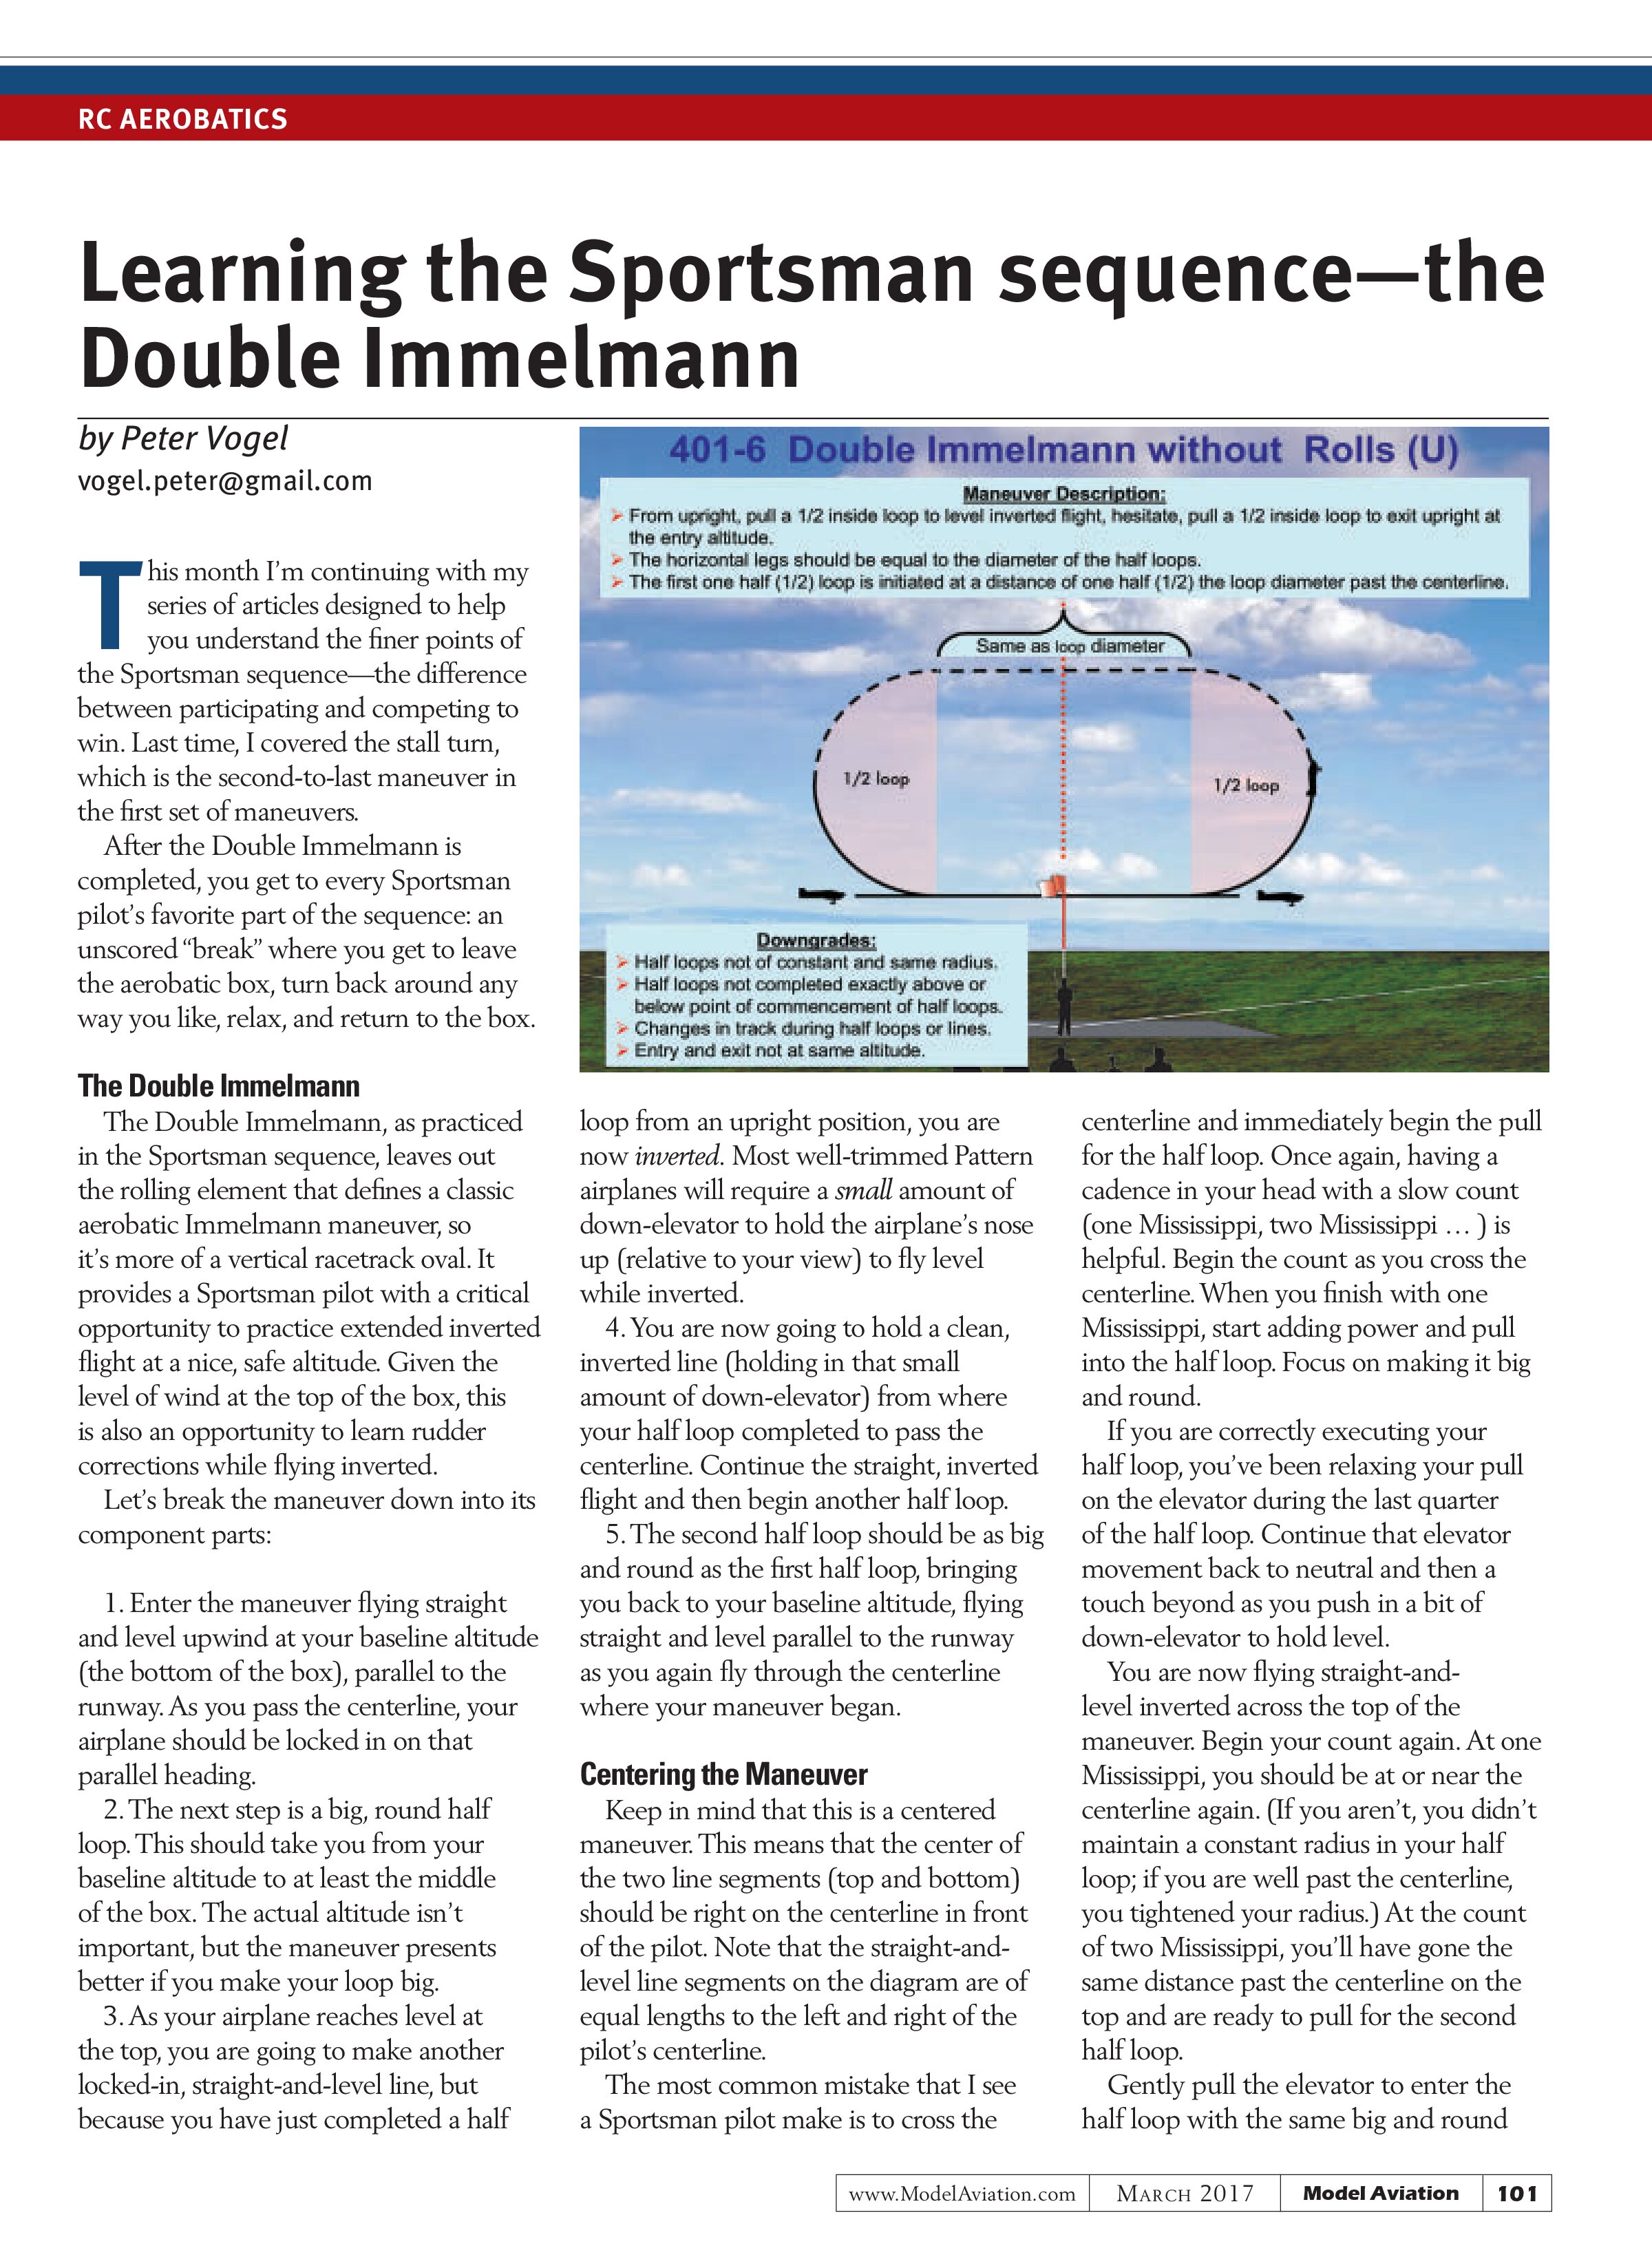
The Double Immelmann, as practiced in the Sportsman sequence, leaves out the rolling element that defines a classic aerobatic Immelmann maneuver, so it’s more of a vertical racetrack oval. It provides a Sportsman pilot with a critical opportunity to practice extended inverted flight at a nice, safe altitude. Given the level of wind at the top of the box, this is also an opportunity to learn rudder corrections while flying inverted.
Let’s break the maneuver down into its component parts:
- Enter the maneuver flying straight and level upwind at your baseline altitude (the bottom of the box), parallel to the runway. As you pass the centerline, your airplane should be locked in on that parallel heading.
- The next step is a big, round half loop. This should take you from your baseline altitude to at least the middle of the box. The actual altitude isn’t important, but the maneuver presents better if you make your loop big.
- As your airplane reaches level at the top, you are going to make another locked-in, straight-and-level line, but because you have just completed a half loop from an upright position, you are now inverted. Most well-trimmed Pattern airplanes will require a small amount of down-elevator to hold the airplane’s nose up (relative to your view) to fly level while inverted.
- You are now going to hold a clean, inverted line (holding in that small amount of down-elevator) from where your half loop completed to pass the centerline. Continue the straight, inverted flight and then begin another half loop.
- The second half loop should be as big and round as the first half loop, bringing you back to your baseline altitude, flying straight and level parallel to the runway as you again fly through the centerline where your maneuver began.
Centering the Maneuver
Keep in mind that this is a centered maneuver. This means that the center of the two line segments (top and bottom) should be right on the centerline in front of the pilot. Note that the straight-and-level line segments on the diagram are of equal lengths to the left and right of the pilot’s centerline.
The most common mistake that I see a Sportsman pilot make is to cross the centerline and immediately begin the pull for the half loop. Once again, having a cadence in your head with a slow count (one Mississippi, two Mississippi . . . ) is helpful. Begin the count as you cross the centerline. When you finish with one Mississippi, start adding power and pull into the half loop. Focus on making it big and round.
If you are correctly executing your half loop, you’ve been relaxing your pull on the elevator during the last quarter of the half loop. Continue that elevator movement back to neutral and then a touch beyond as you push in a bit of down-elevator to hold level.
You are now flying straight-and-level inverted across the top of the maneuver. Begin your count again. At one Mississippi, you should be at or near the centerline again. (If you aren’t, you didn’t maintain a constant radius in your half loop; if you are well past the centerline, you tightened your radius.) At the count of two Mississippi, you’ll have gone the same distance past the centerline on the top and are ready to pull for the second half loop.
Gently pull the elevator to enter the half loop with the same big and round
radius that you used for the first half loop. If you complete the second half loop correctly, you’ll be back to your baseline altitude, again in straight-and-level, upright flight.
At a count of one Mississippi, you should be crossing the centerline again and your maneuver is complete! Remember to maintain that straight-and-level flight slightly longer to show a clean exit from the maneuver, then you can call your first box exit of the sequence!
The Two Half Loops
Many pilots think a loop is easy, and, indeed, it’s one of the fun things I have my training students do to help build confidence. Simply pull back on the elevator, jam the throttle forward, and “zoom, whoop”—you’ve flown a loop! But flying a precise loop requires more finesse and nuance.
In an “ideal” world, with no outside forces such as wind and gravity operating on your airplane, a loop with a constant radius is perfectly executed by pulling back-elevator and holding it until the loop is complete. The size of the loop is controlled by how far back you pull the elevator. The more you pull, the smaller the loop.
But the real world always has gravity, and usually has wind. Both significantly influence a loop. Let’s think first about the effect of gravity on a loop.
As you pull into a loop, gravity is going to try to pull the airplane’s nose back down, so you need to pull more than you might otherwise think. As you complete the first quarter of the loop, your airplane is briefly pointing straight up. Gravity is looking to pull it straight back down, so you need power at this point more than anywhere else in the loop. Push the throttle stick forward through this first quarter loop as well.
As you pull the nose through the vertical plane to start the second quarter of the loop, gravity is acting on the aircraft again, but this time to tighten the radius. Therefore, you need to slowly relax your pull on the elevator through this second quarter of the loop. As you finish the second quarter loop, the elevator should be at or near neutral.
If you were to immediately complete the loop, you would be “floating” across the top at neutral elevator to allow the nose to drop into the third quarter loop. For a Double Immelmann, you’ll “catch” the nose as the airplane floats into the top of the half loop. Push the elevator to hold the model level through the straight line segment.
To enter the second half loop, gravity again operates to pull the nose into the half loop. Pull gently to keep the same radius as the entry into the first half loop. As you complete this quarter-loop segment, the airplane will be pointing vertically down. That means that you need far less power than you did when you pulled into the first half loop, so gently pull the throttle way back to zero, or almost zero, as you complete the third quarter loop.
As you cross through the vertical for the last quarter loop, gravity is going to try to pull the nose back down. As in the first quarter loop, you need to pull more to track through to complete the final quarter loop with a consistent radius. You also need to slowly add power so that you complete the loop straight, level, and at the preferred cruise power—approximately half throttle.
Finally, there is the wind’s effect. You are flying this maneuver in the upwind direction. As you pull into the first quarter loop, the wind is acting to push you back and slow you down. You’ll need to add power to penetrate, and because of the increased airspeed, you’ll need slightly less elevator than when there’s no wind.
As you cross the vertical and start the downwind top half of the first half loop, the wind starts to speed you up. You’ll need slightly less power, but the wind is also still trying to tighten your radius, so you will relax your elevator a little more quickly.
Entering the second half loop, the wind is now acting to loosen the radius by blowing the aircraft downwind. You need slightly less power and more elevator as you enter the third quarter loop.
Coming into the final quarter loop, add more power to start to penetrate upwind. The wind is still acting to open up your radius; therefore, you need slightly more elevator than when there is no wind.
SOURCES:
National Society of Radio Controlled Aerobatics (NSRCA)
www.nsrca.us